Monitoring your CPU temperature is crucial to ensure the longevity and optimal performance of your Ubuntu system. As the central processing unit (CPU) handles intensive computational tasks, it generates heat, which can potentially lead to overheating and hardware damage if left unchecked. While modern systems are equipped with efficient cooling mechanisms, older hardware or systems running resource-intensive applications may still require temperature monitoring.
In this comprehensive guide, we’ll explore two main methods to check CPU temperature on Ubuntu: the command-line utility lm-sensors and various graphical tools. By the end, you’ll have a thorough understanding of how to install, configure, and utilize these tools to keep a watchful eye on your CPU’s temperature, ensuring a stable and reliable computing experience.
Prerequisites
- A server running one of the following operating systems: Ubuntu, and any other Debian-based distribution like Linux Mint.
- It’s recommended that you use a fresh OS install to prevent any potential issues.
- SSH access to the server (or just open Terminal if you’re on a desktop).
- An active internet connection.
- A
non-root sudo useror access to theroot user. We recommend acting as anon-root sudo user, however, as you can harm your system if you’re not careful when acting as the root.
Check CPU Temperature on Ubuntu
Step 1. First, make sure that all your system packages are up-to-date by running the following apt commands in the terminal.
sudo apt update
sudo apt upgrade
Step 2. Check CPU temperature on Ubuntu.
There are three ways that you can use to check your CPU temperature:
- Install lm_sensor.
lm-sensors is a powerful command-line utility that allows you to monitor various system temperatures, including the CPU, hard drives, and other hardware components. It provides accurate temperature readings by interfacing with the sensors built into your motherboard and other components.
Lm_sensors comes pre-installed with most modern Linux operating systems. If it is not installed already, you can install it as shown below:
sudo apt install lm-sensors hddtemp
Once installed, run the following command to configure lm_sensors:
sudo sensors-detect
When the configuration is done, check the CPU temperature by invoking the sensors command. This will display the temperature of your CPU cores as shown below:
sensors
coretemp-isa-0000
Adapter: ISA adapter
Package id 0:  +54.0°C  (high = +79.0°C, crit = +83.0°C)
Core 0:        +54.0°C  (high = +79.0°C, crit = +83.0°C)
Core 1:        +52.0°C  (high = +79.0°C, crit = +83.0°C)

BAT0-acpi-0
Adapter: ACPI interface
in0:          12.43 V
curr1:       1000.00 uA

dell_smm-virtual-0
Adapter: Virtual device
Processor Fan: 3449 RPM
CPU:            +59.0°C
Other:          +52.0°C
Other:          +51.0°C
GPU:            +14.0°C
Other:          +51.0°C

acpitz-acpi-0
Adapter: ACPI interface
temp1:        +57.5°C  (crit = +84.0°C)
- Using the sensors Command to Check CPU Temp
Now that you have lm-sensors installed, you can easily check your CPU temperature using the sensors command in the terminal. Here’s how to interpret the output and understand the temperature readings:
When you run the sensors command, you’ll see output similar to the following:
coretemp-isa-0000
Adapter: ISA adapter
Package id 0: +45.0°C (high = +80.0°C, crit = +100.0°C)
Core 0: +43.0°C (high = +80.0°C, crit = +100.0°C)
Core 1: +45.0°C (high = +80.0°C, crit = +100.0°C)
In this example, the output shows the temperature readings for the CPU package and individual cores. The “Package id 0” line represents the overall CPU temperature, while the “Core 0” and “Core 1” lines show the temperatures for each individual CPU core.
The temperature values are displayed in degrees Celsius (°C). The “high” value indicates the maximum temperature threshold before the CPU starts throttling to prevent overheating. The “crit” value represents the critical temperature limit, beyond which the CPU may suffer permanent damage.
To monitor your CPU temperature continuously, you can use the watch command in combination with sensors:
watch -n 1 sensors
This command will update the sensor output every second, allowing you to keep an eye on your CPU temperature in real-time.
While the sensors command provides a quick and easy way to check your CPU temperature, it may not be the most user-friendly or visually appealing method for everyone. In the next section, we’ll explore a graphical alternative called Psensor.
- Install Psensors tool.
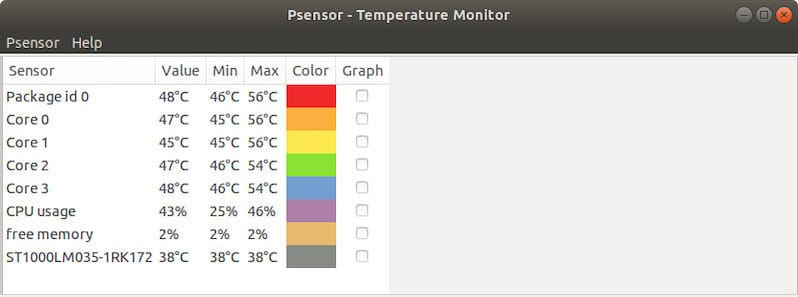
Psensor is a highly popular graphical temperature monitoring tool for Linux systems, including Ubuntu. It offers a user-friendly interface that displays temperature readings for various components, including the CPU, hard drives, and graphics cards. Run the following command to install it:
sudo apt install psensor
Once the installation is complete, you can use the application to search for the Psensor application and launch it. Therefore, the window below will be displayed:

Step 3. Best Practices for Monitoring CPU Temperature.
Now that you know how to check your CPU temperature, here are some best practices to ensure your system’s optimal performance:
- Importance of Regular Monitoring
Frequent monitoring is crucial to identify abnormal temperature fluctuations early. Overheating can lead to system instability and hardware damage, so checking your CPU temperature regularly is essential for system health.
- Optimal Temperature Range for CPUs
Most CPUs operate best within a specific temperature range, typically between 50°C and 80°C. Staying within this range helps maintain performance and prolong the life of your CPU.
- Cooling Solutions and Maintenance Tips
To keep your CPU temperature in check, consider the following cooling and maintenance tips:
- Ensure your computer’s cooling system, including fans and heat sinks, is clean and functioning correctly.
- Proper cable management can improve airflow and prevent heat buildup.
- In extreme cases, you may want to invest in additional cooling solutions, such as better fans or liquid cooling systems.
By following these steps and maintaining a watchful eye on your CPU temperature, you can ensure your Ubuntu system remains in excellent health, running smoothly and efficiently.