How To Disable Automatic Updates on Ubuntu 24.04 LTS

Ubuntu 24.04 LTS, codenamed “Noble Numbat”, is the latest long-term support release of the popular Linux distribution. It comes packed with new features, enhanced security, and improved performance. However, one aspect that may not suit every user’s needs is the automatic update feature. In this comprehensive guide, we’ll walk you through various methods to disable automatic updates on Ubuntu 24.04 LTS, giving you full control over when and how updates are installed on your system.
Understanding Automatic Updates in Ubuntu
What are Automatic Updates?
Automatic updates in Ubuntu are handled by the unattended-upgrades service. This service regularly checks for available updates and installs them without requiring user intervention. While this feature helps maintain system security and ensures you have the latest bug fixes and improvements, it may not be ideal for everyone.
Benefits and Drawbacks
Automatic updates offer several benefits, such as keeping your system secure with the latest patches and providing access to new features. However, they can also lead to potential instability, unexpected changes, and increased bandwidth usage. Some users prefer to have full control over when updates are applied to avoid disruptions and ensure compatibility with their specific setup.
Methods to Disable Automatic Updates
Method 1: Using the Graphical Interface
Accessing Software & Updates
To disable automatic updates using the graphical interface, follow these steps:
- Open the “Software & Updates” application from the system menu or by running the command
software-properties-gtkin the terminal. - Enter your password if prompted to authenticate.
Disabling Automatic Checks
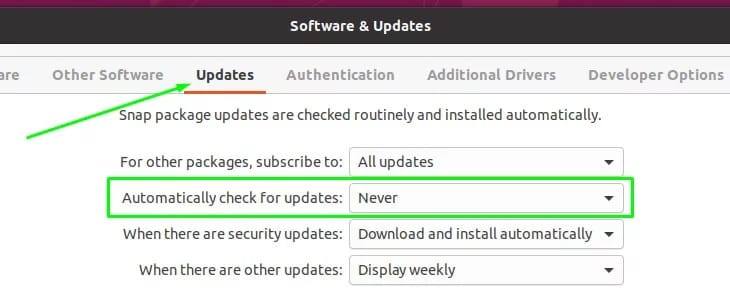
- In the “Software & Updates” window, navigate to the “Updates” tab.
- Locate the “Automatically check for updates” option and set it to “Never”.
Adjusting Security Update Settings
- Under the “When there are security updates” section, change the option from “Download and install automatically” to “Display immediately”.
- Close the “Software & Updates” window to apply the changes.

Method 2: Disabling the Unattended-Upgrades Service
Using Systemctl Command
To disable the unattended-upgrades service responsible for automatic updates, run the following command in the terminal:
sudo systemctl disable --now unattended-upgradesThis command will stop the service if it’s currently running and prevent it from starting during system boot.
Verifying Service Status
To check the status of the unattended-upgrades service, use the command:
systemctl status unattended-upgradesThe output should indicate that the service is disabled and not running.
Method 3: Editing Configuration Files
Editing the 20auto-upgrades File
To modify the automatic update behavior through configuration files, follow these steps:
- Open the
/etc/apt/apt.conf.d/20auto-upgradesfile with a text editor, such as Nano:
sudo nano /etc/apt/apt.conf.d/20auto-upgrades- Locate the following lines and change their values from “1” to “0”:
APT::Periodic::Update-Package-Lists "0";
APT::Periodic::Unattended-Upgrade "0";- Save the changes and exit the text editor.
Optional: Adjusting the 50unattended-upgrades File
For more granular control over which types of updates are applied automatically, you can modify the /etc/apt/apt.conf.d/50unattended-upgrades file. This file allows you to specify security updates or updates from specific repositories to be included or excluded from automatic upgrades.
To make changes, open the file with a text editor:
sudo nano /etc/apt/apt.conf.d/50unattended-upgradesComment out or uncomment the relevant lines to include or exclude specific update types. For example, to disable automatic updates for the main Ubuntu repository, comment out the following line:
// "${distro_id}:${distro_codename}";Method 4: Uninstalling Unattended-Upgrades Package
Removing the Package
If you prefer to completely remove the unattended-upgrades package from your system, you can do so by running the following command:
sudo apt remove unattended-upgrades -yConsequences and Reinstallation
Keep in mind that removing the unattended-upgrades package means you will no longer receive any automatic updates, including security updates. It is crucial to manually check for and install updates regularly to maintain system security.
If you decide to re-enable automatic updates in the future, you can reinstall the package using the command:
sudo apt install unattended-upgradesConsiderations and Best Practices
Security Implications
Disabling automatic updates can expose your system to potential security risks. It is essential to understand the implications and take necessary precautions. Regularly monitoring for security advisories and manually applying critical updates is crucial to maintain a secure system.
Manual Update Management
When automatic updates are disabled, the responsibility of keeping the system up to date falls on the user. Establish a routine to periodically check for available updates using the following commands:
sudo apt update
sudo apt upgrade
Review the list of updates carefully and install them as needed. Pay special attention to security updates and critical bug fixes.
Congratulations! You have successfully disabled automatic updates. Thanks for using this tutorial to disable automatic updates on your Ubuntu system. For additional help or useful information, we recommend you check the official Ubuntu website.