How To Enable/Disable Wayland on Ubuntu 22.04 LTS

In this tutorial, we will show you how to enable/disable Wayland on Ubuntu 22.04 LTS. Wayland, the default display server in Ubuntu 22.04, is a modern, streamlined protocol that reduces the complexity of the display server and improves performance and security. However, its compatibility with applications is not universal. Some users may experience certain applications performing poorly or not working at all under Wayland. In such cases, switching back to the more established Xorg/X11 can resolve these issues.
This article assumes you have at least basic knowledge of Linux, know how to use the shell, and most importantly, you host your site on your own VPS. The installation is quite simple and assumes you are running in the root account, if not you may need to add ‘sudo‘ to the commands to get root privileges. I will show you the step-by-step enable or disable Wayland on Ubuntu 22.04 (Jammy Jellyfish). You can follow the same instructions for Ubuntu 22.04 and any other Debian-based distribution like Linux Mint, Elementary OS, Pop!_OS, and more as well.
Prerequisites
- A server running one of the following operating systems: Ubuntu 22.04, 20.04, and any other Debian-based distribution like Linux Mint.
- SSH access to the server (or just open Terminal if you’re on a desktop).
- Basic knowledge of the Linux command-line interface (CLI). This guide assumes you’re comfortable with executing commands in a terminal.
- An active internet connection.
- A
non-root sudo useror access to theroot user. We recommend acting as anon-root sudo user, however, as you can harm your system if you’re not careful when acting as the root.
Enable/Disable Wayland on Ubuntu 22.04 LTS Jammy Jellyfish
Step 1. Update Your Ubuntu system.
The first step in the installation process is to update your system packages. This ensures that your system is up-to-date, providing a stable base for the installation. Open the terminal and enter the following command:
sudo apt update
sudo apt upgrade
Step 2. Enable Wayland on Ubuntu 22.04
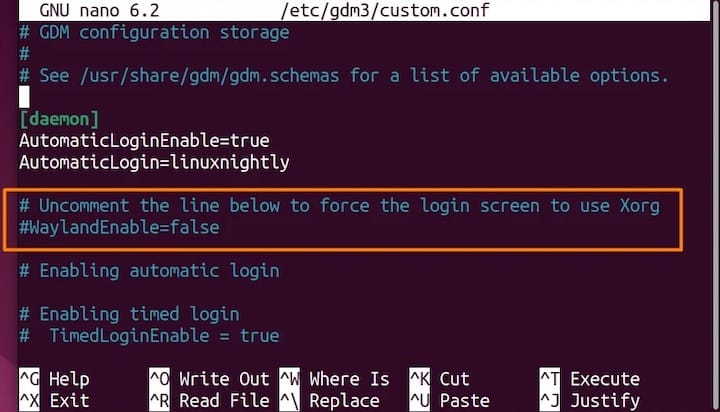
Enabling Wayland on Ubuntu 22.04 involves editing a system file. Now enter the following command to open the /etc/gdm3/custom.conf file with root privileges:
sudo nano /etc/gdm3/custom.conf
In this file, look for the line that says #WaylandEnable=false. Uncomment this line by removing the # at the beginning and set it to true:
WaylandEnable=true

Press Ctrl + X to exit, then press Y to confirm that you want to save the changes, and finally press Enter to confirm the file name.
For the changes to take effect, you need to restart GDM3 (GNOME Display Manager) or reboot your Ubuntu 22.04 desktop. To restart GDM3, use the following command:
sudo systemctl restart gdm3
Alternatively, you can reboot your system using the reboot command:
reboot
Step 3. Disable Wayland on Ubuntu 22.04.
Disabling Wayland follows a similar process. Here are the steps:
sudo nano /etc/gdm3/custom.conf
In the file, find the line that says WaylandEnable=true and change it to false:
WaylandEnable=false
Press Ctrl + X, then Y, and finally Enter to save the changes and exit.
For the changes to take effect, you need to restart GDM3 (GNOME Display Manager) or reboot your Ubuntu 22.04 desktop. To restart GDM3, use the following command:
sudo systemctl restart gdm3
Alternatively, you can reboot your system using the reboot command:
reboot
Congratulations! You have successfully set up Wayland. Thanks for using this tutorial to enable or disable Wayland on the Ubuntu 22.04 LTS Jammy Jellyfish system. For additional help or useful information, we recommend you check the official Ubuntu website.