In this tutorial, we will show you how to install Apache on CentOS 6. For those of you who didn’t know, Apache Web Server is an open-source Web server creation, deployment, and management software. Initially developed by a group of software programmers, it is now maintained by the Apache Software Foundation. Apache HTTP Server is the most popular web server in the world and has been so since April 1996. It played a key role in the growth of the World Wide Web. It is estimated that Apache Server is serving 54.2% of all active websites and 53.3% of the top servers across all domains
This article assumes you have at least basic knowledge of Linux, know how to use the shell, and most importantly, you host your site on your own VPS. The installation is quite simple. I will show you the step-by-step installation of apache on CentOS 6.
Prerequisites
- A server running one of the following operating systems: CentOS 6.
- It’s recommended that you use a fresh OS install to prevent any potential issues.
- SSH access to the server (or just open Terminal if you’re on a desktop).
- A
non-root sudo useror access to theroot user. We recommend acting as anon-root sudo user, however, as you can harm your system if you’re not careful when acting as the root.
Install Apache on CentOS 6
Step 1. Set the Hostname.
Before you begin installing and configuring the components described in this guide, please make sure you’ve followed our instructions for setting your hostname.
hostname
hostname -f
Step 2. Install Apache Server and dependencies.
yum install httpd -y
Step 3. Apache Configuration.
All configurations for Apache is contained in the httpd.conf file, which is located at: /etc/httpd/conf/httpd.conf.
# nano /etc/httpd/conf/httpd.conf

KeepAlive Off

...

<IfModule prefork.c>
StartServers 2
MinSpareServers 6
MaxSpareServers 12
MaxClients 80
MaxRequestsPerChild 5000
</IfModule>
Adding Virtual Hosts:
You use Virtual Host configurations when running more than one website on a single machine. You create a new .conf file with the desired name (for example: vhost.conf) in this folder with the configuration specific for this website. Basic configuration settings are:
<VirtualHost *:80>
     ServerAdmin webmaster@idroot.us
     DocumentRoot /var/www/idroot.us/public_html
     ServerName www.idroot.us
     ServerAlias idroot.us
     ErrorLog /etc/var/www/idroot.us/error.log
     CustomLog /var/www/idroot.us/requests.log
</VirtualHost>

<VirtualHost *:80>
     ServerAdmin webmaster@example.org
     DocumentRoot /var/www/example.org/public_html
     ServerName www.example.org
     ServerAlias example.org
     ErrorLog /var/www/example.org/error.log
     CustomLog /var/www/example.orgrequests.log
</VirtualHost>
Step 3. Start the Apache server and start on boot.
service httpd start
chkconfig httpd on
Step 4. Test Apache Server.
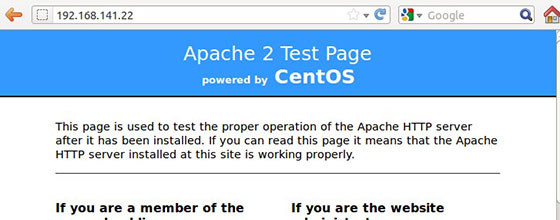
Once the installation is complete the next step is to verify the webserver is up and running. At this stage, you can point your web browser to your server’s IP address such as http://192.168.77.22). The following page should display on the screen:

Congratulations! You have successfully installed apache. Thanks for using this tutorial for installing an Apache web server on CentOS 6. systems.