In this tutorial, we will show you how to install Jenkins on your Debian 9 Stretch. For those of you who didn’t know, Jenkins is a powerful open-source automation server that simplifies the process of building, testing, and deploying software. It is an essential tool for implementing Continuous Integration and Continuous Delivery (CI/CD) pipelines, which help developers deliver high-quality software more efficiently.
This article assumes you have at least basic knowledge of Linux, know how to use the shell, and most importantly, you host your site on your own VPS. The installation is quite simple and assumes you are running in the root account, if not you may need to add ‘sudo‘ to the commands to get root privileges. I will show you the step-by-step installation of Jenkins on a Debian 9 (Stretch) server.
Prerequisites
- A server running one of the following operating systems: Debian 9 (Stretch).
- It’s recommended that you use a fresh OS install to prevent any potential issues.
- SSH access to the server (or just open Terminal if you’re on a desktop).
- A
non-root sudo useror access to theroot user. We recommend acting as anon-root sudo user, however, as you can harm your system if you’re not careful when acting as the root.
Install Jenkins on Debian 9 Stretch
Step 1. To ensure that your Debian 9 system is up to date, run the following commands in the terminal:
apt-get update
apt-get upgrade
These commands will refresh the package list and upgrade any outdated packages to their latest versions. This step is crucial to maintain the security and stability of your system.
Step 2. Installing Java.
Jenkins requires a minimum of Java 7, but you can also install Java 8 which is recommended by Jenkins:
apt-get install openjdk-8-jdk apt-transport-https
Verify Java installation by typing the command below:
java -version
You should see an output similar to this:
openjdk version "1.8.0_212"
OpenJDK Runtime Environment (build 1.8.0_212-8u212-b01-1~deb9u1-b01)
OpenJDK 64-Bit Server VM (build 25.212-b01, mixed mode)
If you have multiple versions of Java installed on your system, you can set Java 8 as the default version using the update-alternatives command:
sudo update-alternatives --config java
Step 3. Installing Jenkins.
Add the key and source list to apt:
wget -q -O - http://pkg.jenkins-ci.org/debian-stable/jenkins-ci.org.key | sudo apt-key add -
Create a sources list for Jenkins:
sudo sh -c 'echo deb http://pkg.jenkins-ci.org/debian-stable binary/ > /etc/apt/sources.list.d/jenkins.list'
After the cache has been updated, start to proceed with installation Jenkins:
sudo apt-get update
sudo apt-get install jenkins
After the installation is complete, Jenkins will automatically start running on your system. You can verify the status of the Jenkins service using the systemctl command:
sudo systemctl enable jenkins
sudo systemctl start jenkins
Jenkins will write log files to /var/log/jenkins/jenkins.log. You can also fine-tune the configuration.
Step 4. Configure Firewall for Jenkins.
By default, Jenkins runs on port 8080. To access the Jenkins web interface from a remote machine, you need to configure your firewall to allow traffic on this port.
If you are using the default UFW (Uncomplicated Firewall) on Debian 9, you can open port 8080 by running the following command:
firewall-cmd --permanent --add-port=8080/tcp
firewall-cmd --reload
Step 5. Accessing Jenkins.
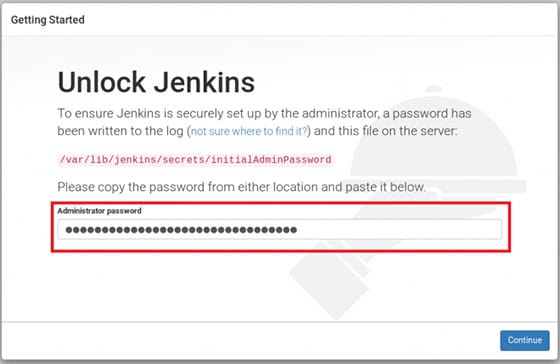
Jenkins will be available on HTTP port 8080 by default. Open your favorite browser and navigate to http://your-domain.com:8080 or http://server-ip:8080 and complete the required steps to finish the installation. If you are using a firewall, please open port 8080 to enable access to the control panel. The default installation password can be found at /var/lib/jenkins/secrets/initialAdminPassword as shown in the below image.

Congratulations! You have successfully installed Jenkins. Thanks for using this tutorial for installing Jenkins on Debian 9 (Stretch) server. For additional help or useful information, we recommend you to check the official Jenkins website.