
In this tutorial, we will show you how to install and configure Vesta Control Panel on CentOS 7. For those of you who didn’t know, VestaCP is an open-source hosting control panel that currently supports both RHEL flavored Linux releases (Red Hat, CentOS) and Ubuntu. It packs a bunch of features by default to allow you to host and manage your websites with ease on your Virtual Private Server.
This article assumes you have at least basic knowledge of Linux, know how to use the shell, and most importantly, you host your site on your own VPS. The installation is quite simple and assumes you are running in the root account, if not you may need to add ‘sudo‘ to the commands to get root privileges. I will show you the step-by-step installation Vesta Control Panel on a CentOS 7 server.
Prerequisites
- A server running one of the following operating systems: CentOS 7.
- It’s recommended that you use a fresh OS install to prevent any potential issues.
- SSH access to the server (or just open Terminal if you’re on a desktop).
- A
non-root sudo useror access to theroot user. We recommend acting as anon-root sudo user, however, as you can harm your system if you’re not careful when acting as the root.
Install Vesta Control Panel on CentOS 7
Step 1. First, let’s start by ensuring your system is up-to-date.
yum -y update
yum -y install curl
Step 2. Installing Vesta Control Panel.
Download the Vesta Control panel install script with the following command:
curl -O http://vestacp.com/pub/vst-install.sh
After the download is completed, make the script execute and execute it:
chmod +x vst-install.sh
bash vst-install.sh
Step 3. If everything is fine then you will get the below screen. Type “y” where it asks if you want to proceed. The system will ask you for an email address, it’s ok to provide a real one, they won’t SPAM you and it’ll advise you when it’s complete and will issue your login credentials to that address.

Step 4. Access Vesta Control Panel.
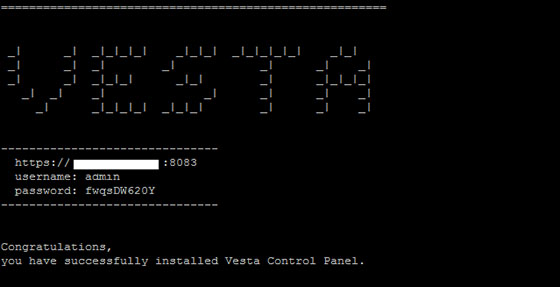
Once the installer finishes installing, it will show you the URL, Username, and Password. Just open that URL in a web browser and log in using the username and password.
https://your-ip-address:8083/
Congratulations! You have successfully installed VestaCP. Thanks for using this tutorial for installing the vesta control panel in CentOS 7 system. For additional help or useful information, we recommend you check the official Vesta Control Panel website.
[su_box title=”VPS Manage Service Offer” style=”bubbles” box_color=”#000000″ radius=”10″]If you don’t have time to do all of this stuff, or if this is not your area of expertise, we offer a service to do “VPS Manage Service Offer”, starting from $10 (Paypal payment). Please contact us to get the best deal![/su_box]