In this tutorial, we will show you how to install WSL (Windows Subsystem for Linux) on Windows 11. For those of you who didn’t know, Windows Subsystem for Linux (WSL) has revolutionized the way developers and system administrators work on Windows machines. With WSL, you can run a full-fledged Linux environment directly on your Windows 11 computer without the need for a virtual machine or dual-boot setup. This seamless integration allows you to leverage the power of Linux tools and utilities while still enjoying the familiarity and convenience of the Windows operating system.
This article assumes you have at least basic knowledge of Linux, know how to use the shell, and most importantly, you host your site on your own VPS. The installation is quite simple and assumes you are running in the root account, if not you may need to add ‘sudo‘ to the commands to get root privileges. I will show you the step-by-step installation of WSL 2 on Windows 11. You can follow the same instructions for Ubuntu 18.04, 16.04, and any other Debian-based distribution like Linux Mint.
Install WSL 2 on Windows 11
Step 1. Install and Enable the Windows Subsystem for Linux.
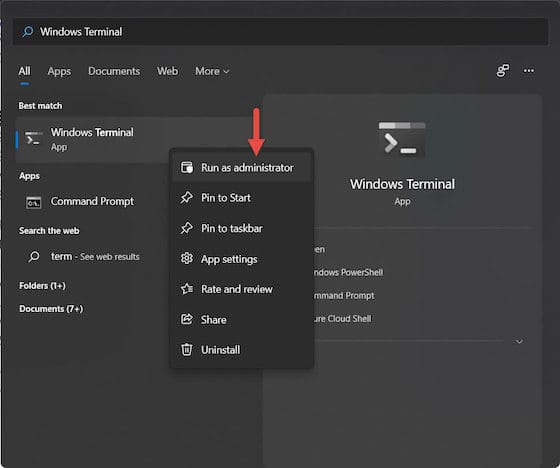
First, open the Start Menu and type “Terminal“. Right-click the Windows Terminal result, then click Run as Administrator.

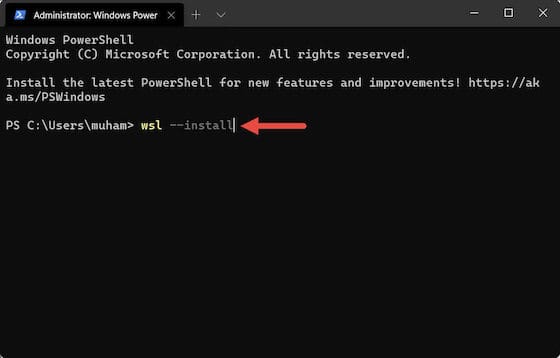
Next, run the command below in the Windows console to install WSL:
wsl --install

Wait for Windows 11 to install WSL 2.0 and once done restart your computer. After restart, WSL is ready to use. When you want to update WSL, run the commands below:
wsl --update
Step 2. Installing Your Linux Distribution.
Now you can install the Linux distro of your choice. To list the available distributions to install, simply run the commands below:
wsl --list --online
Output:
NAME            FRIENDLY NAME
Ubuntu          Ubuntu
Debian          Debian GNU/Linux
kali-linux      Kali Linux Rolling
openSUSE-42     openSUSE Leap 42
SLES-12         SUSE Linux Enterprise Server v12
Ubuntu-16.04    Ubuntu 16.04 LTS
Ubuntu-18.04    Ubuntu 18.04 LTS
Ubuntu-20.04    Ubuntu 20.04 LTS
For example, to install Ubuntu on Windows 11 run the commands below:
wsl --install -d ubuntu-24.04
Once installed, it will launch automatically and you will get a command console to create and set up a default user account:
Installing, this may take a few minutes... Please create a default UNIX user account. The username does not need to match your Windows username. For more information visit: https://aka.ms/wslusers Enter new UNIX username: idroot New password: Retype new password: passwd: password updated successfully Installation successful! To run a command as administrator (user "root"), use "sudo". See "man sudo_root" for details. Welcome to Ubuntu 24.04 LTS (GNU/Linux 4.4.0-20002-Microsoft x86_64)
Use some troubleshooting commands when you get the issues above. Run the below troubleshooting commands and launch Ubuntu again:
wsl --set-default-version 1
bcdedit /set hypervisorlaunchtype auto start
Step 3. Accessing Windows Subsystem for Linux 2.
Once successfully installed, Open the Start Menu and type “Ubuntu”. You’ll see your Ubuntu instance on your Windows 11. Start by clicking on it.
Step 4. Running Linux Commands and Applications.
With WSL installed, you can now run Linux commands and applications seamlessly within the Windows environment. To access the Linux shell, open the Windows Terminal application. You can launch it from the Start menu or by searching for it in the search bar. In the Windows Terminal, you will see a dropdown menu that allows you to select the installed Linux distributions. Choose the distribution you want to use, and a new terminal window will open with the Linux shell prompt.
From here, you can run various Linux commands just as you would on a native Linux system. For example, you can navigate the file system using commands like cd, ls, and pwd. You can also install and use Linux applications and development tools. Let’s take a look at an example of installing and using the popular GNU Compiler Collection (gcc), g++, and make for C and C++ development.
To install gcc, g++, and make, run the following command in the Linux shell:
sudo apt update
sudo apt install build-essential
This command updates the package list and installs the build-essential package, which includes gcc, g++, and make. Once the installation is complete, you can verify the versions by running:
gcc --version
g++ --version
make --version
Congratulations! You have successfully installed WSL 2. Thanks for using this tutorial for installing the latest stable version of the Windows Subsystem for Linux 2 (WSL 2). For additional help or useful information, we recommend you check the official Ubuntu website.