How To Install Angular on Rocky Linux 9

Rocky Linux 9 is a robust, enterprise-ready operating system built from Red Hat Enterprise Linux sources, making it stable and well-suited for a wide range of server and development tasks. One of the most popular ways to create highly reactive and dynamic web interfaces on Rocky Linux 9 is by leveraging the Angular framework, a TypeScript-based solution maintained by Google and powered by Node.js. This guide explains how to install Angular on Rocky Linux 9 from start to finish, including installing Node.js, configuring your system, setting up the Angular CLI, creating a test project, troubleshooting errors, and applying best practices. By the end of this tutorial, you will have a clear understanding of Angular’s installation process and be able to start building full-featured web applications on your Rocky Linux server environment.
System Requirements
Before configuring Angular on Rocky Linux 9, ensure your server or development environment meets certain minimum requirements. Proper hardware and software prerequisites not only prevent errors but also ensure a smoother user experience while coding and deploying applications.
Hardware Requirements:
• At least 2 CPU cores for comfortable package installations and serving web projects
• Minimum of 2 GB RAM (recommended 4 GB or more)
• At least 20 GB of free disk space to manage cache, logs, packages, and project files
Software Prerequisites:
• A fresh or updated installation of Rocky Linux 9
• Sudo or root privileges for installing and upgrading system packages
• Basic knowledge of command-line tools such as dnf, curl, and wget
• Terminal or SSH access if working remotely
Choosing a server or virtual machine that meets these requirements typically ensures minimal interruptions. While smaller configurations may still work, especially for smaller Angular projects, higher-end specs help avoid performance bottlenecks in larger builds. A stable internet connection is also important since you will be downloading the Node.js runtime, Angular CLI packages, and other project dependencies.
Preparing the System
In order to install Angular, Node.js, and other core dependencies on Rocky Linux 9, you must ensure that your operating system is up to date. This step reduces the likelihood of incompatible libraries or outdated software causing issues during the Angular installation process.
To update your Rocky Linux 9 system, run:
sudo dnf makecache --refresh
sudo dnf update -y
This command sequence refreshes the local package metadata and updates all packages to their most recent versions. You should reboot afterward if the process updates your kernel or other critical subsystems:
sudo reboot
Once your system is back online, verify that you have essential development tools and network utilities:
sudo dnf install dnf-utils curl wget -y
These tools will help you with fetching repositories, debugging potential network errors, and ensuring the system has the capacity to compile source packages if needed.
Installing Node.js
Angular relies heavily on Node.js and its package manager (npm or sometimes yarn) to install dependencies, create project scaffolds, and serve development builds. It is crucial to install a stable Node.js version compatible with Angular. Versions 16 or later work well, although newer releases also bring improved performance.
Begin by adding the official NodeSource repository to your Rocky Linux 9 system:
curl -sL https://rpm.nodesource.com/setup_20.x | sudo bash -
The script automatically configures your package manager to recognize the NodeSource repository. After that, install Node.js and npm:
sudo dnf install nodejs -y
Check the version numbers for reassurance:
node -v
npm -v
At this point, it is good practice to update npm itself:
sudo npm install -g npm@latest
Having the latest npm helps streamline installation and reduce dependency-related conflicts. If you need a specific Node.js version, you can adjust the command to fetch another Node.js major release (for example, setup_18.x).
Installing the Angular CLI
With Node.js and npm in place, the next step is to install the Angular CLI. The CLI (Command-Line Interface) is a powerful tool for generating Angular components, services, routes, and more without manually configuring complex build files.
Run the following command to install the Angular CLI globally:
sudo npm install -g @angular/cli
Once complete, verify the installation:
ng version
This command outputs detailed version information, including Angular framework versions, Node.js versions, and relevant build tools. Successful output indicates you can now use ng commands anywhere on your system. Many developers prefer global CLI installation as it simplifies project management, though local or per-project installations are also possible in certain advanced setups.
Creating Your First Angular Project
Generating a new project with the Angular CLI is straightforward. This step helps confirm that everything is working correctly and allows you to explore essential Angular concepts while practicing on a real project.
To create a project named my-angular-app:
ng new my-angular-app
During scaffold creation, default settings and prompts appear. Typically, you are asked whether to include Angular routing and a stylesheet format preference (such as CSS, SCSS, or Less). Use the arrow keys to select your preferences, or just hit Enter for the defaults.
The CLI organizes your project with an app folder for components, a main index.html file, environment configurations, and configuration files for TypeScript and Angular. This automated structure is essential for maintainability, especially as your application grows over time.
When the creation process finishes, move into the directory:
cd my-angular-app
To serve your new application for development:
ng serve --open
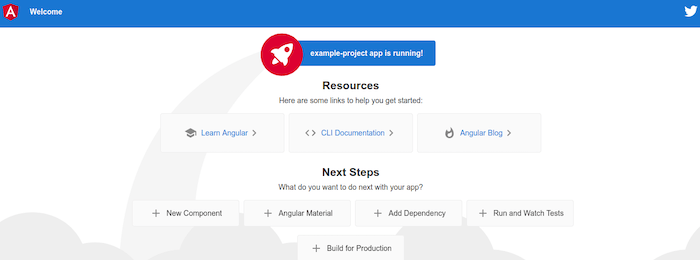
The --open flag automatically launches your default web browser and navigates to http://localhost:4200. You will see a welcome page verifying that your fresh Angular app is up and running. If you are working on a headless server, omit --open and instead access the URL from a local browser or via an SSH tunnel.

Testing and Verification
Testing your newly created project ensures the Angular CLI installation and dependencies are in good condition. The Angular CLI provides several commands to help with automated testing, linting, and building:
ng test– Runs unit tests and displays the results in a console or browser interface.ng e2e– Executes end-to-end tests (often configured with Protractor or a similar tool).ng build– Creates a production-ready build in thedistfolder.
By confirming that your initial Angular project can compile, test, and run, you gain confidence in your Rocky Linux 9 setup. This is an invaluable step in identifying misconfigurations that may surface only after attempting a production-oriented build.
At this stage, verifying that Node.js, npm, and the Angular CLI are all synchronized is crucial. If you run into warnings or version conflicts, try updating or downgrading Node.js to a more stable release. The official Angular documentation also highlights Node.js versions that are officially tested.
Troubleshooting Guide
Even though Angular installation on Rocky Linux 9 is usually smooth, you might encounter occasional errors. Here are some common pitfalls and ways to fix them:
1. EACCES or Permission Issues:
File or folder permission errors often occur when installing Node.js packages globally. These can be resolved by prefixing the installation command with sudo, changing ownership of /usr/local/lib directories, or using Node Version Manager (NVM) to manage multiple Node.js versions with user-level permissions.
2. Command Not Found (ng):
If ng is unrecognized, confirm that the npm global bin directory is in your PATH. Another approach is to uninstall the CLI (sudo npm uninstall -g @angular/cli) and reinstall it.
3. Incompatible Node.js Version:
If you see warnings that your Node.js version is not supported, install the recommended version. Using the NodeSource repository with the correct branch (e.g., setup_16.x or setup_18.x) typically resolves such errors.
4. Port Already in Use:
When you attempt ng serve, you might see an error if port 4200 is unavailable. Attach a different port by appending --port 4300, or free up the conflicting process using kill.
5. Dependencies and Peer Dependency Warnings:
Angular might show warnings about peer dependencies not matching specific versions. Solutions include using npm install with the --legacy-peer-deps flag or upgrading to a Node.js release that the CLI expects.
Staying calm and carefully reading error messages makes a difference in resolving installation headaches quickly.
Best Practices and Security Considerations
When deploying Angular apps in production on Rocky Linux 9 or any server, a set of best practices ensure performance optimization, strong security, and simpler maintainability:
Production Build:
Always create an optimized version of your application using ng build --configuration=production or simply ng build --prod. This command minifies scripts, optimizes assets, and ensures the bundle is as lightweight as possible.
Server-Side Security:
Use HTTPS to encrypt traffic between clients and the server. Also consider employing a reverse proxy like Nginx or Apache configured with SSL certificates to shield your Angular application from direct internet exposure.
Regular Updates:
Keep Node.js, npm, and Angular CLI updated. Frequent updates often patch security vulnerabilities and introduce performance improvements. Use sudo npm install -g @angular/cli@latest to update the CLI, and the NodeSource repository to keep Node.js current.
Environment Management:
Use environment files for secrets and environment-specific variables. For instance, store production settings in environment.prod.ts and avoid placing sensitive keys directly in version control.
Code Splitting and Lazy Loading:
Angular supports lazy loading modules to reduce initial load times for large applications. Lazy loading loads only the modules required for a particular route, enhancing application performance.
By following these guidelines, your Angular applications will function reliably in demanding business scenarios. Security remains paramount, especially when dealing with user data or enterprise-level deployments, so always adopt best operating practices for servers and web frameworks.
Congratulations! You have successfully installed Angular. Thanks for using this tutorial for installing Angular on your Rocky Linux 9 system. For additional or useful information, we recommend you check the official Angular website.