How To Install Apache OpenOffice on Linux Mint 20

In this tutorial, we will show you how to install Apache OpenOffice on Linux Mint 20. For those of you who didn’t know, Apache OpenOffice is a free, open-source, and multi-platform software office suite. It provides a complete bundle of useful office applications like spreadsheets, presentations software, and drawing tools. Although OpenOffice uses a different file format than Microsoft Office, it can still open MS Office files.
This article assumes you have at least basic knowledge of Linux, know how to use the shell, and most importantly, you host your site on your own VPS. The installation is quite simple and assumes you are running in the root account, if not you may need to add ‘sudo‘ to the commands to get root privileges. I will show you the step-by-step installation of Apache OpenOffice on a Linux Mint 20 (Ulyana).
Prerequisites
- A server running one of the following operating systems: Linux Mint 20 (Ulyana).
- It’s recommended that you use a fresh OS install to prevent any potential issues.
- A
non-root sudo useror access to theroot user. We recommend acting as anon-root sudo user, however, as you can harm your system if you’re not careful when acting as the root.
Install Apache OpenOffice on Linux Mint 20 Ulyana
Step 1. Before running the tutorial below, it’s important to make sure your system is up to date by running the following apt commands in the terminal:
sudo apt update
sudo apt install software-properties-common
Step 2. Installing Java.
To install apache OpenOffice, make sure that java must be installed on your system:
sudo apt install openjdk-8-jre
Then, set Java 8 to default by running the below commands:
sudo update-alternatives --config java
Verify the installed Java version:
java -version
Step 3. Installing Apache OpenOffice on Linux Mint 20.
Now we download the latest version of OpenOffice from Apache official page:
wget https://sourceforge.net/projects/openofficeorg.mirror/files/4.1.10/binaries/en-US/Apache_OpenOffice_4.1.10_Linux_x86-64_install-deb_en-US.tar.gz
Once the file is downloaded on your system, extract this file:
tar xvf Apache_OpenOffice_4.1.10_Linux_x86-64_install-deb_en-US.tar.gz
After extraction, the ‘en-US/DEBS’ folder is created. Navigate into the directory using the cd command and start the installation using the following command:
cd en-US/DEBS
sudo dpkg -i *.deb
Let us now install the Desktop integration package:
cd desktop-integration
sudo dpkg -i *.deb
Step 4. Accessing Apache OpenOffice on Linux Mint.
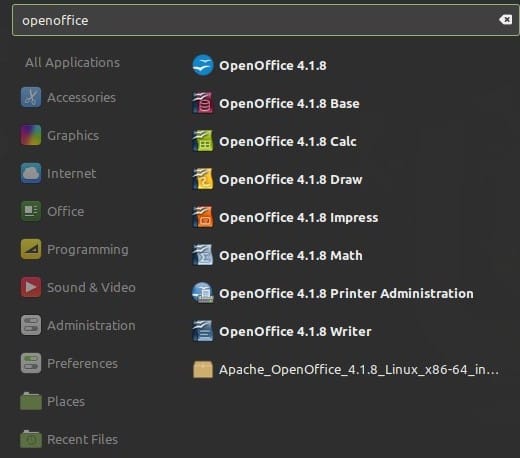
Once successfully installed, open the apache OpenOffice application from the application search bar. Type OpenOffice in the search bar and the following results shows on the desktop:

Congratulations! You have successfully installed OpenOffice. Thanks for using this tutorial for installing the latest version of Apache OpenOffice on the Linux Mint system. For additional help or useful information, we recommend you check the official OpenOffice website.