How To Install Apache Solr on Ubuntu 24.04 LTS

Apache Solr is a powerful, open-source enterprise search platform built on Apache Lucene, a Java-based library. It offers a wide range of features, including full-text search, real-time indexing, faceted search, and geospatial search. Solr is highly scalable, fault-tolerant, and optimized for handling large volumes of data and traffic. Its modular architecture and extensive plugin ecosystem make it adaptable to various search and indexing requirements. Installing Apache Solr on Ubuntu 24.04 LTS enables you to leverage its capabilities for building robust search applications and enhancing the search functionality of your websites or enterprise systems. This comprehensive guide will walk you through the step-by-step process of installing and configuring Apache Solr on Ubuntu 24.04 LTS, providing troubleshooting tips and additional resources to ensure a smooth installation experience.
Prerequisites
Before diving into the installation, ensure your system meets the following requirements:
- Ubuntu 24.04 LTS installed on your server or virtual machine
- A non-root user with sudo privileges
- Minimum 2GB RAM and 2 CPU cores for optimal performance
With these prerequisites in place, let’s proceed to update your system packages to their latest versions:
sudo apt update
sudo apt upgrade
Step 1: Install Java JDK
Apache Solr requires Java to run, so our first step is to install the Java Development Kit (JDK). Ubuntu 24.04 LTS includes the open-source OpenJDK by default. Install it using the following command:
sudo apt install default-jdkOnce the installation is complete, verify the Java version:
java -versionYou should see output similar to the following:
openjdk version "17.0.1" 2021-10-19OpenJDK Runtime Environment (build 17.0.1+12-Ubuntu-120.04)OpenJDK 64-Bit Server VM (build 17.0.1+12-Ubuntu-120.04, mixed mode, sharing)
Step 2: Download Apache Solr
Visit the official Apache Solr download page and copy the link to the latest stable release. At the time of writing, the latest version is 9.7.0. Download Solr using the wget command:
wget https://dlcdn.apache.org/solr/solr/9.7.0/solr-9.7.0.tgzThe Solr package will be downloaded to your current directory.
Step 3: Extract and Install Apache Solr
Extract the downloaded Solr package using the tar command:
tar xzf solr-9.7.0.tgz solr-9.7.0/bin/install_solr_service.sh --strip-components=2This command extracts the Solr installation script. Now, run the script to install Solr as a service:
sudo bash ./install_solr_service.sh solr-9.7.0.tgzThe installation script will set up Solr and configure it to run as a systemd service. It will also create a dedicated Solr user and necessary directories.
Step 4: Start and Enable Solr Service
With Solr installed, start the Solr service using the following command:
sudo systemctl start solrTo ensure Solr starts automatically on system boot, enable the service:
sudo systemctl enable solrVerify the status of the Solr service:
sudo systemctl status solrIf everything is working correctly, you should see the service status as “active (running)”.
Step 5: Verify Installation
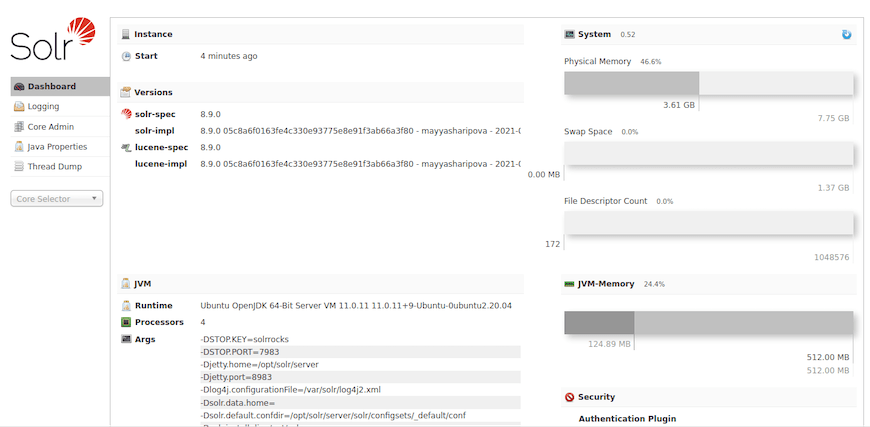
To access the Solr Admin Interface, open a web browser and navigate to http://your-server-ip:8983/solr. Replace your-server-ip with the IP address or domain name of your Ubuntu server.
If the installation was successful, you should see the Solr Admin Interface, which provides a web-based dashboard for managing Solr collections, indexing data, and performing searches.

Troubleshooting Tip
If you encounter issues accessing the Solr Admin Interface, ensure that port 8983 is open in your server’s firewall. You can allow access to the port using the following command:
sudo ufw allow 8983Step 6: Create a Solr Collection
To start using Solr, you need to create a collection. A collection is a logical index that holds your data and provides search capabilities. Create a new collection named “mycollection” using the default configuration set:
sudo su - solr -c "/opt/solr/bin/solr create -c mycollection -n data_driven_schema_configs"Solr will create the new collection and provide the necessary configuration files and directories.
Step 7: Secure Apache Solr (Optional)
By default, Solr allows access from any IP address. In a production environment, it’s crucial to secure Solr to prevent unauthorized access. Here are a few basic security measures you can implement:
- Configure Firewall: Restrict access to port 8983 to specific IP addresses or subnets using UFW (Uncomplicated Firewall).
- Enable Authentication: Set up basic authentication or integrate with an external authentication system like LDAP or Kerberos.
- Use SSL/TLS: Encrypt communication between clients and Solr by configuring SSL/TLS.
Congratulations! You have successfully installed Apache Solr. Thanks for using this tutorial for installing the Apache Solr on the Ubuntu 24.04 LTS system. For additional help or useful information, we recommend you check the official Apache website.