How To Install Apache Tomcat on Debian 12

In this tutorial, we will show you how to install Apache Tomcat on Debian 12. Apache Tomcat is a popular open-source software implementation of the Java Servlet, JavaServer Pages, Java Expression Language, and Java WebSocket technologies. It provides a pure Java HTTP web server environment for running web applications.
This article assumes you have at least basic knowledge of Linux, know how to use the shell, and most importantly, you host your site on your own VPS. The installation is quite simple and assumes you are running in the root account, if not you may need to add ‘sudo‘ to the commands to get root privileges. I will show you the step-by-step installation of the Apache Tomcat on Debian 12 (Bookworm).
Prerequisites
Before proceeding with the installation of Tomcat on Debian 12, ensure you meet the following requirements:
- A server running one of the following operating systems: Debian 12 (Bookworm).
- It’s recommended that you use a fresh OS install to prevent any potential issues.
- SSH access to the server (or just open Terminal if you’re on a desktop).
- An active internet connection. You’ll need an internet connection to download the necessary packages and dependencies.
- A user account with sudo privileges to execute administrative commands.
Install Apache Tomcat on Debian 12 Bookworm
Step 1. Before proceeding with the Tomcat installation, it’s crucial to ensure that your Debian system is up to date. This step helps to prevent potential compatibility issues and security vulnerabilities. Open a terminal and execute the following commands:
sudo apt update
sudo apt upgrade
Step 2. Installing Java.
Tomcat is written in Java, you’ll need to have a Java Development Kit (JDK) installed to provide the runtime environment. If you don’t have OpenJDK installed, you can set it up by running:
sudo apt install default-jdk
Verify the Java version with:
java -version
The output should display the installed Java version and runtime details.
Step 3. Installing Apache Tomcat on Debian 12.
- Installing Apache Tomcat from the Debian Repository
Install the main Tomcat package and the manager web application:
sudo apt install tomcat10 tomcat10-admin
After the installation, the Tomcat service should automatically start. Verify it’s running:
sudo systemctl status tomcat10
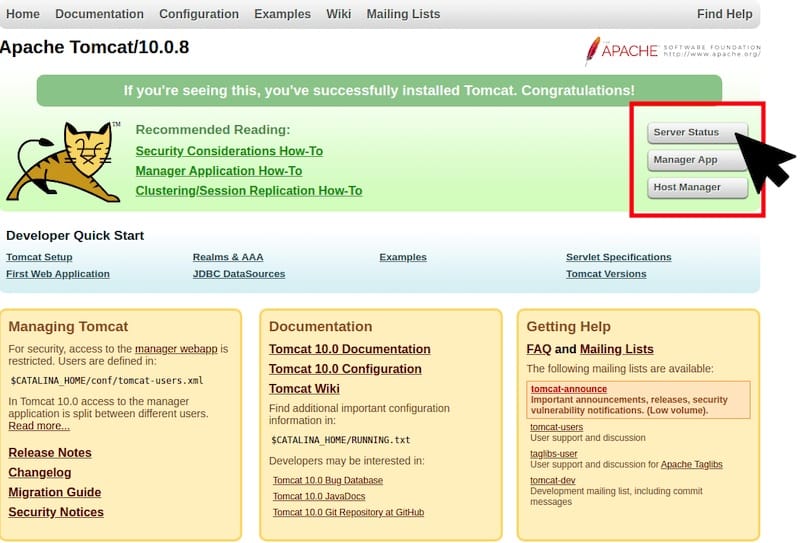
You can access the default Tomcat landing page by visiting http://your_server_ip:8080 in a web browser. You should see the Tomcat home page if everything went well.
- Installing Tomcat from Binary Distribution
While the Debian package repositories are convenient, they may not offer the latest Tomcat version. In that case, you can opt to install the latest binary distribution directly from the Apache Tomcat downloads page.
First, create a tomcat user and group which will be used to run the Tomcat server for better security:
sudo groupadd tomcat
sudo useradd -s /bin/false -g tomcat -d /opt/tomcat tomcat
Next, download the latest binary distribution from the official page:
cd /tmp
curl -O https://dlcdn.apache.org/tomcat/tomcat-10/v10.1.20/bin/apache-tomcat-10.1.20.tar.gz
sudo tar xvzf apache-tomcat-10.1.20.tar.gz -C /opt/tomcat --strip-components=1
Create a symbolic link to the latest Tomcat version to make future upgrades easier:
sudo ln -s /opt/tomcat/apache-tomcat-10.1.20 /opt/tomcat/latest
Change the ownership of the extracted Tomcat directory to the tomcat user and group:
sudo chown -R tomcat:tomcat /opt/tomcat
Next, create a systemd service file to manage the Tomcat server process:
sudo nano /etc/systemd/system/tomcat.service
Paste the following contents, replacing the JAVA_HOME path if needed:
[Unit]
Description=Tomcat 10 servlet container
After=network.target

[Service]
Type=forking

User=tomcat
Group=tomcat

Environment="JAVA_HOME=/usr/lib/jvm/java-11-openjdk-amd64"
Environment="CATALINA_PID=/opt/tomcat/latest/temp/tomcat.pid"
Environment="CATALINA_HOME=/opt/tomcat/latest"
Environment="CATALINA_BASE=/opt/tomcat/latest"
Environment="CATALINA_OPTS=-Xms512M -Xmx1024M -server -XX:+UseParallelGC"

ExecStart=/opt/tomcat/latest/bin/startup.sh
ExecStop=/opt/tomcat/latest/bin/shutdown.sh

[Install]
WantedBy=multi-user.target
Reload systemd to register the new service file:
sudo systemctl daemon-reload
Start the Tomcat service and enable it to start on system boot:
sudo systemctl start tomcat
sudo systemctl enable tomcat
You should now be able to access the Tomcat server at http://your_server_ip:8080.
Step 4. Setting up Nginx as a Reverse Proxy for Tomcat.
While Tomcat can serve web applications directly, it’s generally recommended to use a dedicated web server like Nginx as a reverse proxy. This provides several benefits:
- Improved performance by allowing Nginx to handle static content more efficiently
- Better security by allowing only proxy traffic to reach the Tomcat ports
- Load balancing capabilities for scaling across multiple Tomcat instances
Here’s how to set up Nginx as a reverse proxy for Tomcat:
First, install the Nginx package:
sudo apt install nginx
Create a new Nginx virtual host configuration file:
sudo nano /etc/nginx/conf.d/tomcat.conf
Add the following configuration, replacing your_domain.com with your server’s domain name:
upstream tomcatservers {
    server 127.0.0.1:8080;
}

server {
    listen 80;
    server_name your_domain.com;

    location / {
        proxy_pass http://tomcatservers;
        proxy_set_header X-Forwarded-Host $host;
        proxy_set_header X-Forwarded-Server $host;
        proxy_set_header X-Forwarded-For $proxy_add_x_forwarded_for;
    }
}
This defines an upstream group called tomcatservers with Tomcat running on localhost:8080. The server block listens on port 80 and proxies requests to the upstream.
Enable the required Nginx proxy modules:
sudo nginx-mod enable proxy_http
Verify the Nginx configuration and reload if no errors:
sudo nginx -t
sudo systemctl reload nginx
You should now be able to access your Tomcat applications via the Nginx reverse proxy at http://your_domain.com.

Congratulations! You have successfully installed Apache Tomcat. Thanks for using this tutorial to install the latest version of the Apache Tomcat on Debian 12 Bookworm. For additional help or useful information, we recommend you check the official Apache website.