How To Install Apache on Ubuntu 24.04 LTS

In this tutorial, we will show you how to install Apache on Ubuntu 24.04 LTS. Apache, the most widely used web server software, has been a cornerstone of the internet for decades. Its robustness, flexibility, and open-source nature have made it the go-to choice for hosting websites and applications. With the release of Ubuntu 24.04, a popular Linux distribution known for its stability and user-friendly interface, installing Apache has become even more straightforward.
This article assumes you have at least basic knowledge of Linux, know how to use the shell, and most importantly, you host your site on your own VPS. The installation is quite simple and assumes you are running in the root account, if not you may need to add ‘sudo‘ to the commands to get root privileges. I will show you the step-by-step installation of the Apache web server on Ubuntu 24.04 (Noble Numbat). You can follow the same instructions for Ubuntu 22.04 and any other Debian-based distribution like Linux Mint, Elementary OS, Pop!_OS, and more as well.
Prerequisites
- A server running one of the following operating systems: Ubuntu and any other Debian-based distribution like Linux Mint.
- It’s recommended that you use a fresh OS install to prevent any potential issues.
- SSH access to the server (or just open Terminal if you’re on a desktop).
- An active internet connection. You’ll need an internet connection to download the necessary packages and dependencies.
- An Ubuntu 24.04 system with root access or a user with sudo privileges.
Install Apache on Ubuntu 24.04 LTS Noble Numbat
Step 1. Updating the Package Repository.
To begin the installation process, we first need to update the package repository. This step ensures that we have access to the latest versions of the required packages. Open your terminal and run the following command:
sudo apt update
This command will fetch the latest package information from the Ubuntu repositories, allowing you to install the most recent version of Apache and its dependencies. Updating the package repository is crucial to maintaining the security and stability of your system.
Step 2. Installing Apache on Ubuntu 24.04.
With the package repository updated, we can now proceed with installing Apache. To do so, run the following command in your terminal:
sudo apt install apache2
This command will initiate the installation process, prompting you to confirm the installation by pressing ‘Y’ and then Enter. During the installation, the package manager will resolve and install any necessary dependencies, ensuring that Apache has all the required components to function properly. The installation process may take a few moments, depending on your internet connection speed and system resources.
Once the installation is complete, it’s essential to verify that Apache is running correctly. By default, Apache is configured to start automatically upon installation. To check the status of the Apache service, run the following command:
sudo systemctl status apache2
If Apache is running, you will see an output similar to the following:
● apache2.service - The Apache HTTP Server
Loaded: loaded (/lib/systemd/system/apache2.service; enabled; vendor preset: enabled)
Active: active (running) since Thu 2024-04-25 10:25:00 UTC; 5min ago
Docs: https://httpd.apache.org/docs/2.4/
Main PID: 12345 (apache2)
Tasks: 55 (limit: 2359)
Memory: 5.0M
CPU: 125ms
CGroup: /system.slice/apache2.service
├─12345 /usr/sbin/apache2 -k start
├─12346 /usr/sbin/apache2 -k start
└─12347 /usr/sbin/apache2 -k start
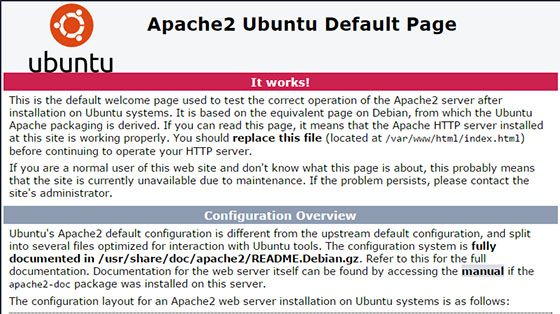
The output confirms that Apache is active and running. You can also test if Apache is accessible by opening a web browser and navigating to http://localhost or http://your_server_ip. If Apache is set up correctly, you will see the default Apache web page.

Step 3. Configuring Firewall with UFW.
To enhance the security of your Apache web server, it’s crucial to configure the firewall to allow only necessary traffic. Ubuntu 24.04 comes with a built-in firewall management tool called Uncomplicated Firewall (UFW). By default, UFW is disabled, so we need to enable it and configure the rules for Apache.
First, enable UFW with the following command:
sudo ufw enable
Next, allow incoming traffic on port 80 (HTTP) and port 443 (HTTPS) by running:
sudo ufw allow 'Apache Full'
This command will create the necessary rules to allow incoming traffic on both HTTP and HTTPS ports. Enabling the firewall with UFW adds an extra layer of security to your Apache web server, protecting it from unauthorized access attempts.
Step 4. Setting Up Virtual Hosts.
Virtual hosts allow you to host multiple websites on a single Apache server. Each virtual host can have its own domain name, document root, and configuration settings. To set up a virtual host, follow these steps:
sudo mkdir /var/www/your_domain
Create a sample index.html file in the new directory:
sudo nano /var/www/your_domain/index.html
Create a new virtual host configuration file:
sudo nano /etc/apache2/sites-available/your_domain.conf
Add the following configuration, replacing your_domain with your actual domain name:
<VirtualHost *:80>
    ServerName your_domain
    ServerAlias www.your_domain
    DocumentRoot /var/www/your_domain
    ErrorLog ${APACHE_LOG_DIR}/error.log
    CustomLog ${APACHE_LOG_DIR}/access.log combined
</VirtualHost>
Enable the new virtual host:
sudo a2ensite your_domain.conf
Disable the default Apache virtual host:
sudo a2dissite 000-default.conf
Restart Apache for the changes to take effect:
sudo systemctl restart apache2
Your virtual host is now set up and ready to serve your website. Repeat these steps for each additional website you want to host on your Apache server.
Step 5. Securing Apache with SSL/TLS.
In today’s digital landscape, securing your website with SSL/TLS encryption is essential to protect sensitive data and maintain user trust. Let’s Encrypt, a free and open Certificate Authority (CA), makes it easy to obtain and install SSL certificates for your Apache web server. To secure your website with SSL/TLS, follow these steps:
sudo apt install certbot python3-certbot-apache
Obtain and install the SSL certificate for your domain:
sudo certbot --apache -d your_domain -d www.your_domain
Test the automatic renewal process:
sudo certbot renew --dry-run
Congratulations! You have successfully installed Apache. Thanks for using this tutorial for installing the Apache web server on the Ubuntu 24.04 LTS system. For additional help or useful information, we recommend you check the Apache website.