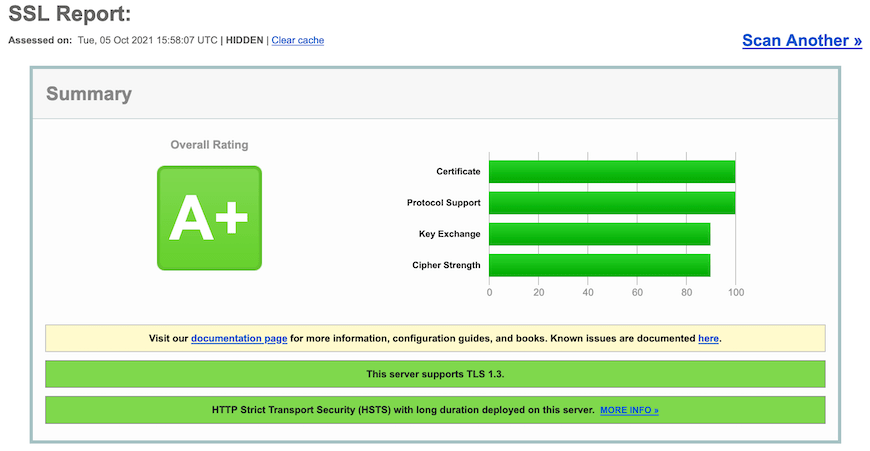
In this tutorial, we will show you how to install Apache with Let’s Encrypt SSL on Ubuntu 20.04 LTS. For those of you who didn’t know, Let’s Encrypt is a certificate authority that provides free SSL certificates for websites. All SSL certificates provided by Let’s Encrypt can be used for production/commercial purposes without any costs or fees. This guide will tell you about installing the Apache web server, installing the Certbot, generating an SSL certificate with Certbot, and creating additional SSL configuration to get the A+ from the SSL test SSL Labs.
This article assumes you have at least basic knowledge of Linux, know how to use the shell, and most importantly, you host your site on your own VPS. The installation is quite simple and assumes you are running in the root account, if not you may need to add ‘sudo‘ to the commands to get root privileges. I will show you the step-by-step installation of the Apache with free SSL on Ubuntu 20.04 (Focal Fossa). You can follow the same instructions for Ubuntu 18.04, 16.04, and any other Debian-based distribution like Linux Mint.
Prerequisites
- A server running one of the following operating systems: Ubuntu 20.04, 18.04, 16.04, and any other Debian-based distribution like Linux Mint.
- It’s recommended that you use a fresh OS install to prevent any potential issues.
- SSH access to the server (or just open Terminal if you’re on a desktop).
- A
non-root sudo useror access to theroot user. We recommend acting as anon-root sudo user, however, as you can harm your system if you’re not careful when acting as the root.
Install Apache with Let’s Encrypt SSL on Ubuntu 20.04 LTS Focal Fossa
Step 1. First, make sure that all your system packages are up-to-date by running the following apt commands in the terminal.
sudo apt update
sudo apt upgrade
Step 2. Installing Apache on Ubuntu 20.04.
By default, Apache is available on Ubuntu 20.04 base repository. Now we install the Apache webserver on the Ubuntu system by running the following command below:
sudo apt install apache2 apache2-utils
Before starting the configurations, make sure that Apache services are running on your system. Run the following command to check the apache services status:
sudo systemctl status apache2
sudo systemctl start apache2
sudo systemctl enable apache2
Step 3. Configure Firewall.
Allow access to port 80 on the firewall by running the below-given command:
sudo ufw allow 80
sudo ufw allow 443
sudo ufw enable
Step 4. Configure the Apache Virtual Host.
First, create a root directory to hold your website’s files:
sudo mkdir -p /var/www/html/your-domain.com/
Then, change the ownership and group of the directory:
sudo chown -R www-data:www-data /var/www/html/your-domain.com/
Let’s create an Apache virtual host to serve the HTTP version of your website:
sudo nano /etc/apache2/sites-available/your-domain.com.conf
Add the following line:
<VirtualHost *:80>

   ServerName your-domain.com
   ServerAlias www.your-domain.com
   ServerAdmin admin@your-domain.com
   DocumentRoot /var/www/html/your-domain.com

   ErrorLog ${APACHE_LOG_DIR}/your-domain.com_error.log
   CustomLog ${APACHE_LOG_DIR}/your-domain.com_access.log combined

   <Directory /var/www/html/your-domain.com>
      Options FollowSymlinks
      AllowOverride All
      Require all granted
   </Directory>

</VirtualHost>
Save and close, then restart the Apache webserver so that the changes take place:
sudo a2ensite your-domain.com.conf
sudo a2enmod ssl rewrite
sudo systemctl restart apache2
Step 5. Secure Apache with Let’s Encrypt SSL Free Certificate.
Before installing Certbot, we enable the universe repository to your system:
sudo apt install software-properties-common
sudo add-apt-repository universe
sudo apt update
Next, install Certbot for Apache on your Ubuntu system:
sudo apt install certbot python3-certbot-apache
Finally, use the Certbot command to create a Let’s Encrypt certificate and configure Apache to use the certificate:
sudo certbot --apache
Output:
-------------------------------------------------------------------------------
Congratulations! You have successfully enabled https://your-domain.com and
https://www.your-domain.com

You should test your configuration at:
https://www.ssllabs.com/ssltest/analyze.html?d=your-domain.com
https://www.ssllabs.com/ssltest/analyze.html?d=www.your-domain.com
-------------------------------------------------------------------------------

IMPORTANT NOTES:
- Congratulations! Your certificate and chain have been saved at:
/etc/letsencrypt/live/idroot.us/fullchain.pem
Your key file has been saved at:
/etc/letsencrypt/live/your-domain.com/privkey.pem
Your cert will expire on 2021-10-05. To obtain a new or tweaked
version of this certificate in the future, simply run certbot again
with the "certonly" option. To non-interactively renew *all* of
your certificates, run "certbot renew"
- If you like Certbot, please consider supporting our work by:

Donating to ISRG / Let's Encrypt: https://letsencrypt.org/donate
Donating to EFF: https://eff.org/donate-le
Step 5. Auto-Renewal Certbot SSL.
Let’s Encrypt certificates have a validity of 90 days, and you have to ensure they are renewed on time. The renewal process is now automated and thanks to the systemd service provided by the Certbot client. To test that this renewal process is working correctly, you can run:
sudo certbot renew --dry-run
Output:
Saving debug log to /var/log/letsencrypt/letsencrypt.log

- - - - - - - - - - - - - - - - - - - - - - - - - - - - - - - - - - - - - - - -
Processing /etc/letsencrypt/renewal/your-domain.com
- - - - - - - - - - - - - - - - - - - - - - - - - - - - - - - - - - - - - - - -
Account registered.
Simulating renewal of an existing certificate for your-domain.com and www.your-domain.com

- - - - - - - - - - - - - - - - - - - - - - - - - - - - - - - - - - - - - - - -
Congratulations, all simulated renewals succeeded:
  /etc/letsencrypt/live/your-domain.com/fullchain.pem (success)
- - - - - - - - - - - - - - - - - - - - - - - - - - - - - - - - - - - - - - - -
Step 7. Test SSL.
You can now go to ssllabs.com/ssltest/ and run an SSL test on your domain:

Congratulations! You have successfully installed Apache with a free SSL certificate. Thanks for using this tutorial for installing the Apache webserver Let’s Encrypt SSL on Ubuntu 20.04 LTS Focal Fossa system. For additional help or useful information, we recommend you check the official Apache website.