How To Install BalenaEtcher on AlmaLinux 9

In this tutorial, we will show you how to install BalenaEtcher on AlmaLinux 9. BalenaEtcher is a powerful and intuitive tool designed to create bootable USB drives and SD cards with ease. It is a cross-platform application that runs seamlessly on Linux, Windows, and macOS, ensuring a consistent experience across different operating systems. One of the key features of BalenaEtcher is its simplicity – the user interface is clean and straightforward, making it accessible to users of all skill levels. Additionally, BalenaEtcher is known for its reliability, ensuring that the flashing process is completed successfully without data corruption or errors. As an open-source project, BalenaEtcher benefits from a vibrant community of developers and users who continuously contribute to its improvement and stability.
AlmaLinux 9, a community-driven, free, and open-source operating system, is fully compatible with BalenaEtcher, providing users with a reliable and efficient solution for creating bootable media. In this comprehensive guide, we will walk you through the steps to install BalenaEtcher on AlmaLinux 9, ensuring that you can easily create bootable USB drives for your projects.
Prerequisites
- A server running one of the following operating systems: AlmaLinux 9.
- It’s recommended that you use a fresh OS install to prevent any potential issues.
- SSH access to the server (or just open Terminal if you’re on a desktop).
- A stable internet connection is required to download BalenaEtcher and its dependencies.
- Ensure at least 100MB of free disk space for the BalenaEtcher application.
- You’ll need root or sudo privileges to install K9s and make system-wide changes. Make sure you have the necessary permissions before starting the installation process.
Install BalenaEtcher on AlmaLinux 9
Step 1. Update Your System.
Before installing BalenaEtcher, it’s crucial to update your AlmaLinux 9 system packages to ensure compatibility and security. To do this, run the following command in your terminal:
sudo dnf clean all
sudo dnf update
This command will fetch the latest package information from the configured repositories and upgrade any outdated packages to their latest versions. The -y flag automatically answers “yes” to any prompts, streamlining the update process.
Step 2. Installing BalenaEtcher.
- Method 1: Using AppImage
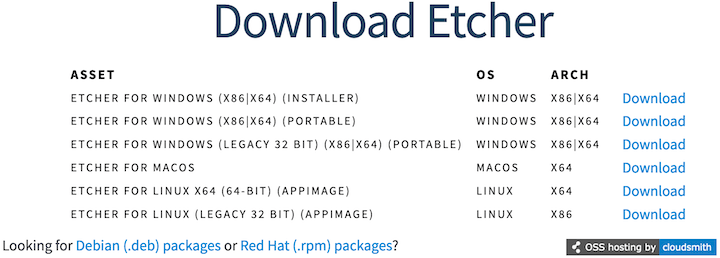
Navigate to the BalenaEtcher official website and select the Linux Version: Look for the Linux download option, specifically the AppImage format.

After downloading, it’s essential to verify the file’s integrity. Use the following command to calculate the SHA256 checksum:
sha256sum /path/to/balena-etcher-electron-x.x.x-linux-x64.AppImage
Compare the output with the checksum provided on the BalenaEtcher website to ensure file integrity.
Next, open a terminal and navigate to the directory containing the downloaded AppImage. Run the following command:
chmod +x balena-etcher-electron-x.x.x-linux-x64.AppImage
Execute the AppImage with:
./balena-etcher-electron-x.x.x-linux-x64.AppImage
For easier access, create a desktop shortcut:
cp balena-etcher-electron-x.x.x-linux-x64.AppImage ~/.local/bin/balena-etcher
echo -e '[Desktop Entry]\nName=BalenaEtcher\nExec=balena-etcher\nIcon=balena-etcher\nType=Application\nCategories=Utility;' > ~/.local/share/applications/balena-etcher.desktop
- Method 2: Using Repository
For a more integrated installation, you can use the BalenaEtcher repository:
curl -1sLf 'https://dl.cloudsmith.io/public/balena/etcher/setup.rpm.sh' | sudo -E bash
After adding the repository, install BalenaEtcher:
sudo dnf install balena-etcher-electron
Once installed, you can launch BalenaEtcher from the application menu or by running:
balena-etcher-electron
Both methods will successfully install BalenaEtcher on your AlmaLinux 9 system. Choose the one that best fits your preferences and system configuration.
Step 3. Creating a Bootable USB Drive with BalenaEtcher.
Now that BalenaEtcher is installed, let’s walk through the process of creating a bootable USB drive:
- Launch BalenaEtcher: Open the application from your desktop shortcut or application menu.
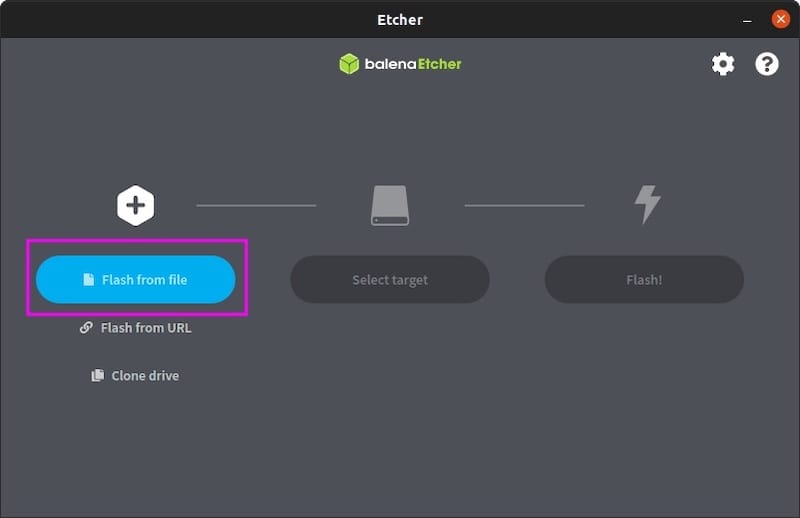
- Select Image: Click on “Flash from file” and choose your ISO image.
- Choose Target: Insert your USB drive and select it as the target in BalenaEtcher.
- Flash: Click the “Flash!” button to begin the process. BalenaEtcher will write the image and verify it automatically.
- Completion: Once finished, BalenaEtcher will notify you. Your bootable USB drive is now ready for use.
Remember to exercise caution when selecting the target drive to avoid overwriting important data.

Congratulations! You have successfully installed BalenaEtcher. Thanks for using this tutorial for installing the BalenaEtcher on your AlmaLinux 9 system. For additional help or useful information, we recommend you check the official BalenaEtcher website.