How To Install Bitwarden on AlmaLinux 10

Password security has never been more critical in today’s interconnected digital landscape. With cyber threats evolving rapidly and data breaches affecting millions of users annually, implementing a robust password management solution is essential for both individuals and organizations.
Bitwarden stands out as the premier open-source password management solution, offering end-to-end encryption, cross-platform compatibility, and most importantly, the ability to maintain complete control over your sensitive data through self-hosting. When paired with AlmaLinux 10 “Purple Lion,” you get an enterprise-grade, stable foundation that provides extended support and cutting-edge security features.
This comprehensive guide will walk you through every step of installing and configuring Bitwarden on AlmaLinux 10. You’ll learn how to set up a secure, self-hosted password management system that puts you in complete control of your data. The entire process typically takes 30-45 minutes and requires basic Linux administration knowledge.
By the end of this tutorial, you’ll have a fully functional, secure Bitwarden instance running on one of the most reliable Linux distributions available, complete with SSL encryption, proper security hardening, and backup strategies.
What is Bitwarden?
Bitwarden represents a paradigm shift in password management, combining enterprise-level security with open-source transparency. As a comprehensive password management solution, Bitwarden employs zero-knowledge architecture, ensuring that even Bitwarden’s servers cannot decrypt your sensitive information.
The platform’s core features include military-grade end-to-end encryption using AES-256 bit encryption, PBKDF2 password hashing, and salted cryptography. Cross-platform compatibility spans Windows, macOS, Linux, iOS, Android, and all major web browsers. The integrated password generator creates cryptographically secure passwords with customizable parameters, while secure sharing capabilities enable teams to collaborate safely.
Two-factor authentication support includes TOTP, FIDO2, YubiKey, and SMS options. The self-hosting option provides unparalleled control over your data, eliminating third-party dependencies and ensuring compliance with strict organizational security policies.
Unlike cloud-hosted solutions, self-hosting Bitwarden means your encrypted vault never leaves your infrastructure. This approach satisfies regulatory requirements, reduces attack surface area, and provides complete audit trails for security compliance.
Why Choose AlmaLinux 10 for Bitwarden Hosting?
AlmaLinux 10 “Purple Lion” delivers exceptional stability and security features specifically designed for production server environments. Built as a 1:1 binary compatible replacement for Red Hat Enterprise Linux 10, it provides enterprise-grade reliability without licensing costs.
Key security enhancements include post-quantum cryptography support, preparing your infrastructure for future cryptographic challenges. Updated SELinux policies and OpenSSH implementations provide enhanced access controls and secure remote administration. Secure Boot support for ARM platforms ensures system integrity from hardware to application layers.
Performance improvements include frame pointers enabled by default, facilitating better debugging and performance profiling. Extended x86-64-v2 architecture support optimizes performance on modern hardware while maintaining backward compatibility.
The 10-year extended support lifecycle makes AlmaLinux 10 ideal for production password management deployments. Community-driven development ensures transparency, rapid security updates, and long-term viability without vendor lock-in concerns.
Prerequisites and System Requirements
Hardware Requirements
Successful Bitwarden deployment requires adequate system resources. Minimum processor specifications include x64 architecture running at 1.4GHz or higher. Memory requirements start at 2GB RAM, though 4GB is recommended for production environments handling multiple concurrent users.
Storage needs begin at 12GB available disk space, accounting for AlmaLinux 10 installation, Docker images, and Bitwarden data. Network connectivity requires stable internet access for initial setup, updates, and Let’s Encrypt certificate management.
Software Requirements
Fresh AlmaLinux 10 installation provides the cleanest deployment environment. Root or sudo access enables system-level configurations and service management. Docker Engine and Docker Compose handle containerized Bitwarden deployment, while curl and wget utilities facilitate script downloads and system updates.
Network Requirements
Valid domain name pointing to your server’s IP address enables proper SSL certificate generation and external access. Ports 80 (HTTP) and 443 (HTTPS) must remain accessible for web interface access and Let’s Encrypt certificate validation. SSL certificate availability through Let’s Encrypt or custom certificate authority ensures encrypted communications.
Pre-Installation Checklist
Bitwarden installation requires unique installation ID and key from bitwarden.com/host. Domain DNS records must resolve correctly to your server’s IP address. Firewall configuration planning prevents connectivity issues post-installation. Email SMTP server credentials enable user notifications, password resets, and administrative communications.
Step 1: Update AlmaLinux 10 System
System updates form the foundation of secure Bitwarden deployment. Updated packages contain latest security patches and bug fixes, reducing potential attack vectors and ensuring compatibility with containerized applications.
Update all system packages using DNF package manager:
sudo dnf update -yInstall essential utilities required for Bitwarden installation:
sudo dnf install curl wget -yVerify AlmaLinux 10 version to confirm proper system identification:
cat /etc/almalinux-releaseReboot the system if kernel updates were installed to ensure all changes take effect properly.
Step 2: Configure Firewall Rules
Firewalld provides robust network security for AlmaLinux 10 systems. Proper firewall configuration allows necessary Bitwarden traffic while maintaining security boundaries.
Allow HTTP traffic for initial setup and Let’s Encrypt certificate validation:
sudo firewall-cmd --permanent --zone=public --add-service=httpEnable HTTPS traffic for secure password manager access:
sudo firewall-cmd --permanent --zone=public --add-service=httpsConfigure masquerading for Docker container networking:
sudo firewall-cmd --zone=public --add-masquerade --permanentReload firewall configuration to apply new rules:
sudo firewall-cmd --reloadVerify active firewall rules:
sudo firewall-cmd --list-allProper firewall configuration prevents unauthorized access while enabling legitimate Bitwarden functionality. Masquerading ensures Docker containers can communicate properly with external networks.
Step 3: Install Docker and Docker Compose
Bitwarden deployment relies on Docker containerization for consistent, portable application delivery. Docker Engine provides the runtime environment, while Docker Compose orchestrates multi-container applications.
Add official Docker repository to AlmaLinux 10:
sudo dnf config-manager --add-repo https://download.docker.com/linux/centos/docker-ce.repoInstall Docker Community Edition and dependencies:
sudo dnf install docker-ce docker-ce-cli containerd.io -yEnable Docker service to start automatically at boot:
sudo systemctl enable dockerStart Docker service immediately:
sudo systemctl start dockerVerify Docker installation and version:
docker versionDocker Compose installs automatically with modern Docker Engine versions, eliminating separate installation steps. Test Docker functionality by running a simple container to ensure proper operation.
Docker security considerations include regular image updates, network isolation, and resource limitations for production deployments.
Step 4: Create Dedicated Bitwarden User
Dedicated service accounts enhance security through privilege separation and access isolation. The bitwarden user account limits potential security exposure and follows Linux security best practices.
Create bitwarden system user account:
sudo adduser bitwardenSet strong password for bitwarden user account:
sudo passwd bitwardenCreate docker group if it doesn’t already exist:
sudo groupadd dockerAdd bitwarden user to docker group for container management:
sudo usermod -aG docker bitwardenCreate dedicated installation directory:
sudo mkdir /opt/bitwardenSet restrictive directory permissions (700) for security:
sudo chmod -R 700 /opt/bitwardenAssign directory ownership to bitwarden user:
sudo chown -R bitwarden:bitwarden /opt/bitwardenSwitch to bitwarden user for remaining installation steps, ensuring proper file ownership and permissions throughout the process.
Step 5: Obtain Bitwarden Installation Credentials
Bitwarden self-hosting requires unique installation credentials from the official hosting portal. These credentials authenticate your installation and enable access to official Docker images and updates.
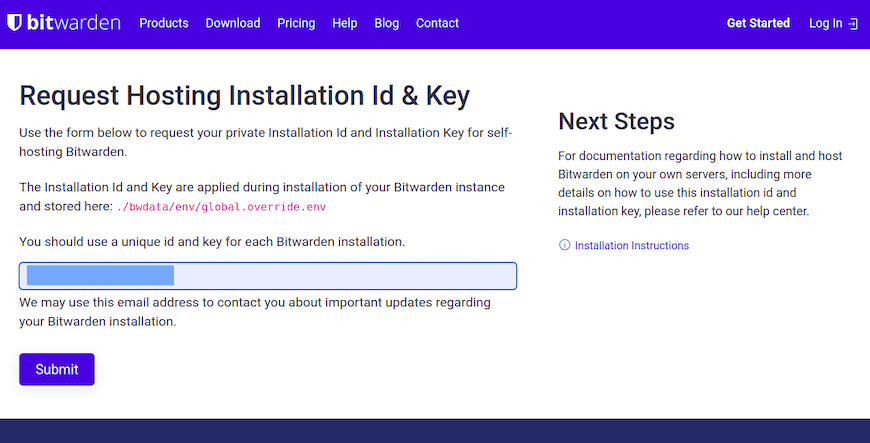
Navigate to Bitwarden host page in your web browser. The registration process requires a valid email address for credential generation and future communications.
Enter your email address in the provided field and select your preferred data region (US or EU). Click the Submit button to generate your unique credentials.

The system will display your Installation ID and Installation Key. These credentials authenticate your self-hosted instance and enable updates from official repositories. Store these credentials securely, as they’re required for installation and future updates.
Installation credentials link your self-hosted instance to Bitwarden’s infrastructure for licensing validation and update delivery. Treat these credentials as sensitive information and store them in secure credential management systems.
Step 6: Download and Run Bitwarden Installer
The official Bitwarden installation script automates deployment configuration and container orchestration. This script handles Docker image downloads, configuration file generation, and initial service setup.
Switch to bitwarden user account:
su - bitwardenNavigate to installation directory:
cd /opt/bitwardenDownload official Bitwarden installation script:
curl -Lso bitwarden.sh "https://func.bitwarden.com/api/dl/?app=self-host&platform=linux"Make installation script executable:
chmod 700 bitwarden.shExecute installation script:
./bitwarden.sh installThe installer prompts for several configuration parameters. Enter your fully qualified domain name (e.g., bitwarden.yourdomain.com) when prompted. Choose Let’s Encrypt SSL certificate option for automatic SSL configuration.
Provide your Installation ID and Installation Key when requested. Select your data region (US or EU) based on your location and compliance requirements.
For custom SSL certificates, choose the appropriate option and prepare certificate files in PEM format. Self-signed certificates are suitable only for testing environments due to browser security warnings.
The installer creates the bwdata directory structure containing configuration files, SSL certificates, database storage, and application logs. Understanding this structure helps with troubleshooting and maintenance.
If installation fails with “Unable to validate installation ID” error, verify internet connectivity and retry the installation process.
Step 7: Configure SSL Certificates
SSL certificates encrypt communications between clients and your Bitwarden server. Proper certificate configuration ensures data protection and browser compatibility.
Option 1: Let’s Encrypt (Recommended)
Let’s Encrypt provides free, automatically renewable SSL certificates. The Bitwarden installer integrates Let’s Encrypt certificate generation for seamless SSL configuration.
Benefits include automatic certificate generation during installation, automatic renewal handling, and wide browser compatibility. Provide a valid email address for expiration notifications and account management.
Option 2: Custom SSL Certificate
Custom certificates from commercial certificate authorities provide additional validation options. Place certificate files in ./bwdata/ssl/your.domain/ directory.
Required files include certificate.crt (public certificate), private.key (private key), and ca_bundle.crt (certificate authority chain). Ensure proper file permissions and ownership for security.
Option 3: Self-Signed Certificate
Self-signed certificates work for testing environments but generate browser security warnings. Production deployments should avoid self-signed certificates due to trust and security implications.
SSL Troubleshooting
Certificate validation errors often result from DNS misconfiguration or firewall restrictions. Verify domain resolution and port accessibility. Domain mismatch errors occur when certificate Common Name doesn’t match accessed domain.
Step 8: Configure Environment Variables
Bitwarden configuration customization occurs through environment variable files. The global.override.env file controls server behavior, integrations, and security settings.
Locate configuration file at /opt/bitwarden/bwdata/env/global.override.env. Edit using nano or preferred text editor:
nano ~/bwdata/env/global.override.envSMTP Configuration (Critical)
Email functionality requires SMTP server configuration. Set globalSettings__mail__smtp__host to your SMTP server hostname. Configure globalSettings__mail__smtp__port (typically 587 for TLS or 465 for SSL).
Enable SSL/TLS with globalSettings__mail__smtp__ssl=true. Provide authentication credentials via globalSettings__mail__smtp__username and globalSettings__mail__smtp__password.
Test SMTP configuration:
./bitwarden.sh checksmtpAdmin Portal Configuration
Set adminSettings__admins to administrator email addresses. Multiple administrators use comma-separated email addresses for shared administrative access.
Additional Configuration Options
Database settings customization enables external database connections. Domain override settings handle reverse proxy configurations. Log level adjustment assists with troubleshooting and monitoring.
Apply configuration changes with rebuild command:
./bitwarden.sh rebuildStep 9: Start Bitwarden Services
Bitwarden service startup initializes all required containers and establishes service dependencies. First-time startup downloads Docker images and initializes databases.
Start Bitwarden services:
./bitwarden.sh startInitial startup requires internet connectivity for Docker image downloads. Monitor startup progress through container status verification:
docker psExpected containers include bitwarden-web (web interface), bitwarden-api (API services), bitwarden-identity (authentication), bitwarden-admin (administration), bitwarden-mssql (database), and bitwarden-nginx (reverse proxy).
Check container logs for errors or warnings:
docker logs <container_name>Troubleshoot iptables/Docker isolation errors by restarting Docker service:
sudo systemctl restart dockerRestart Bitwarden after Docker service restart if necessary.
Step 10: Access Bitwarden Web Vault
Web interface access verifies successful installation and enables initial account creation. Navigate to https://your-domain.com in a web browser.
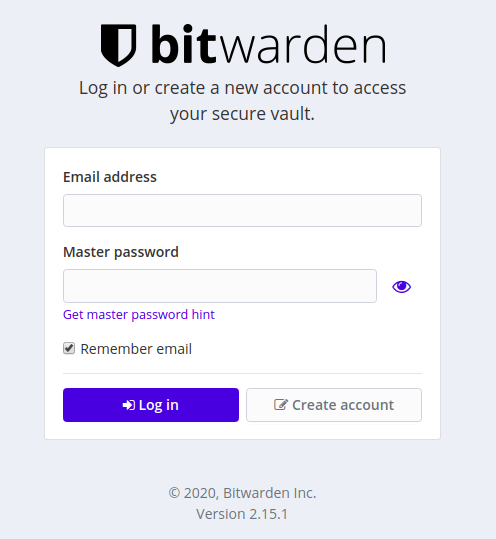
Accept SSL certificate if using self-signed certificates (testing only). The Bitwarden login page confirms proper installation and SSL configuration.
Click “Create Account” to establish the first user account. Account creation requires email address, full name, and master password. Master password requirements include minimum 8 characters with complexity recommendations for security.
Master password hints provide recovery assistance without compromising security. Submit account creation and check email for verification messages (requires SMTP configuration).
Login with master password to access the Bitwarden dashboard. Initial security settings configuration includes two-factor authentication enablement immediately after account creation.

Bitwarden dashboard provides vault management, security settings, and administrative controls for complete password management functionality.
Post-Installation Security Hardening
Enable Two-Factor Authentication
Immediate two-factor authentication configuration significantly enhances account security. Navigate to Account Settings > Security > Two-step Login.
Recommended 2FA methods include authenticator applications (Google Authenticator, Authy) and FIDO2 security keys for hardware-based authentication. Generate and securely store recovery codes for emergency access.
Configure SELinux (AlmaLinux 10 Specific)
SELinux provides mandatory access controls for enhanced system security. Check current SELinux status:
getenforceSELinux policy adjustments may be required for Docker container operations. Monitor SELinux audit logs for policy violations and create custom policies as needed.
Implement Backup Strategy
Comprehensive backup strategies protect against data loss and enable disaster recovery. Critical backup components include the complete bwdata directory, database dumps from MSSQL container, SSL certificates and private keys, and environment configuration files.
Automated backup scripts should run regularly with off-site storage for comprehensive protection. Test backup restoration procedures regularly to verify backup integrity and recovery processes.
Regular Updates
Bitwarden updates provide security patches and feature enhancements. Check for updates regularly:
./bitwarden.sh updateSchedule regular AlmaLinux 10 system updates and maintain current Docker versions for comprehensive security maintenance.
Monitoring and Logging
Container health monitoring with docker stats provides performance insights. Configure log rotation to manage disk space usage. Implement security audit logging for compliance and incident response capabilities.
Common Troubleshooting Issues
Port Conflict Errors
Port conflicts prevent service startup and cause binding errors. Identify port conflicts:
sudo netstat -tulpn | grep :443Modify port assignments in config.yml and apply changes with rebuild command. Consider stopping conflicting services or selecting alternative ports.
Docker Service Issues
Docker daemon failures prevent container operations. Verify Docker service status and restart if necessary. Permission denied errors often result from incorrect user group membership or file permissions.
Container networking problems may require Docker network reset or iptables rule adjustment.
SSL Certificate Problems
Certificate validation failures prevent secure connections. Let’s Encrypt rate limiting may delay certificate generation. Verify domain DNS resolution and accessibility.
Mixed content warnings indicate HTTP resources loading over HTTPS connections. Review application configuration and certificate installation.
SMTP Configuration Errors
Test SMTP configuration with built-in testing:
./bitwarden.sh checksmtpCommon SMTP authentication failures result from incorrect credentials or server settings. Verify firewall rules allow SMTP port access.
Database Connection Issues
MSSQL container startup failures prevent application functionality. Monitor container logs for initialization errors. Database migration errors may require container reset with data loss implications.
Login and Access Problems
Forgotten master passwords cannot be recovered due to zero-knowledge architecture. Email verification delays may result from SMTP configuration issues. Two-factor authentication lockout requires recovery code usage or administrator intervention.
Bitwarden Management Commands Reference
Bitwarden management script provides comprehensive service control. Essential commands include:
Start Bitwarden services:
./bitwarden.sh startStop all services:
./bitwarden.sh stopRestart services:
./bitwarden.sh restartUpdate to latest version:
./bitwarden.sh updateRebuild after configuration changes:
./bitwarden.sh rebuildView container logs:
docker logs <container_name>Validate SMTP configuration:
./bitwarden.sh checksmtpRegular management includes monitoring service status, reviewing logs for errors, and maintaining current versions for security and functionality.
Congratulations! You have successfully installed Bitwarden. Thanks for using this tutorial for installing the Bitwarden password manager on the AlmaLinux OS 10 system. For additional help or useful information, we recommend you check the official Bitwarden website.