How To Install Budgie Desktop on Ubuntu 24.04 LTS

In this tutorial, we will show you how to install Budgie Desktop on Ubuntu 24.04 LTS. Budgie Desktop, originally developed by the Solus project, has gained popularity for its clean and intuitive interface. It is designed to provide a user-friendly experience while offering advanced customization options for power users. Budgie Desktop integrates seamlessly with the GNOME stack, leveraging its stability and extensive application ecosystem. With its modern aesthetics and lightweight nature, Budgie Desktop strikes a perfect balance between simplicity and functionality, making it an attractive choice for Ubuntu users.
This article assumes you have at least basic knowledge of Linux, know how to use the shell, and most importantly, you host your site on your own VPS. The installation is quite simple and assumes you are running in the root account, if not you may need to add ‘sudo‘ to the commands to get root privileges. I will show you the step-by-step installation of the Budgie desktop environment on Ubuntu 24.04 (Noble Numbat). You can follow the same instructions for Ubuntu 22.04 and any other Debian-based distribution like Linux Mint, Elementary OS, Pop!_OS, and more as well.
Prerequisites
- A server running one of the following operating systems: Ubuntu and any other Debian-based distribution like Linux Mint.
- It’s recommended that you use a fresh OS install to prevent any potential issues.
- SSH access to the server (or just open Terminal if you’re on a desktop).
- An active internet connection. You’ll need an internet connection to download the necessary packages and dependencies.
- An Ubuntu 24.04 system with root access or a user with sudo privileges.
Install Budgie Desktop on Ubuntu 24.04 LTS
Step 1. Updating the Package Repository.
To ensure a smooth installation process, it’s essential to update your system packages to their latest versions. Open a terminal and run the following command:
sudo apt update
This will fetch the latest package information and upgrade any outdated packages to their newest versions.
Step 2. Installing Budgie desktop environment on Ubuntu 24.04.
- Method 1: Installing Budgie Desktop from Ubuntu Repositories
Once the package lists are updated, install the Budgie Desktop package by executing:
sudo apt install ubuntu-budgie-desktop
During the installation process, you may be asked to select a display manager. Choose either “gdm3” (GNOME Display Manager) or “lightdm” (Light Display Manager) based on your preference. If unsure, select “gdm3” as it is the default display manager for Ubuntu.
Once the installation is complete, restart your system to apply the changes:
sudo reboot
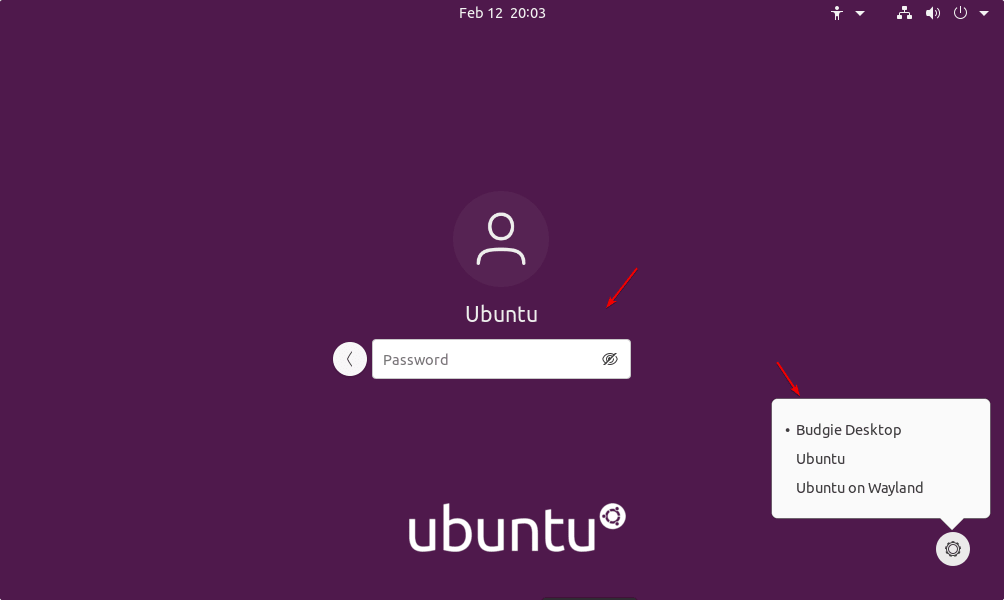
After the reboot, you will be presented with the login screen. Click on the gear icon next to the username field and select “Budgie Desktop” from the list of available desktop environments.
- Method 2: Using the Ubuntu Budgie Backports PPA
If you prefer to have the latest version of Budgie Desktop with additional features and improvements, you can use the Ubuntu Budgie Backports PPA. This method provides access to newer packages that may not be available in the official Ubuntu repositories. However, keep in mind that using PPAs comes with certain risks, as they are maintained by third-party developers and may not undergo the same level of testing as the official packages.
To install Budgie Desktop using the Ubuntu Budgie Backports PPA, follow these steps:
sudo add-apt-repository ppa:ubuntubudgie/backports
Next, install the Budgie Desktop package from the PPA:
sudo apt update
sudo apt install ubuntu-budgie-desktop
Follow the same steps as in Method 1 to select the display manager and complete the installation.

- Method 3: Installing Ubuntu Budgie as a Separate Distribution
If you prefer a pure Budgie Desktop experience without any remnants of the default Ubuntu desktop environment, you can opt to install Ubuntu Budgie as a separate distribution. Ubuntu Budgie is an official flavor of Ubuntu that comes pre-configured with the Budgie Desktop environment. To install Ubuntu Budgie, follow these steps:
-
- Visit the official Ubuntu Budgie website and download the latest ISO image for Ubuntu Budgie.
- Create a bootable USB drive using the downloaded ISO image. You can use tools like Etcher or Rufus to create the bootable media.
- Boot your system from the USB drive and follow the on-screen instructions to install Ubuntu Budgie. You can choose to install it alongside your existing Ubuntu installation or replace it entirely.
- Once the installation is complete, reboot your system and enjoy the pure Budgie Desktop experience on Ubuntu.
Installing Ubuntu Budgie as a separate distribution provides a seamless and integrated experience, as the entire system is built around the Budgie Desktop environment.
Congratulations! You have successfully installed Budgie Desktop. Thanks for using this tutorial for installing the Budgie desktop environment on the Ubuntu 24.04 LTS system. For additional help or useful information, we recommend you check the Budgie website.