
In this tutorial, we will show you how to install Cacti Monitoring on Ubuntu 18.04 LTS. For those of you who didn’t know, Cacti is an open-source, web-based network monitoring and graphing tool designed as a front-end application for the open-source, industry-standard data logging tool RRDtool. It is used by IT businesses and stores all of the necessary information about bandwidth, hard disk usage, CPU usage, load average, RAM statistics, etc in a MySQL database. Cacti create graphs and populate them with data. It offers SNMP support, 3rd party templates, and plugins and has built-in user authentications and user permission features.
This article assumes you have at least basic knowledge of Linux, know how to use the shell, and most importantly, you host your site on your own VPS. The installation is quite simple and assumes you are running in the root account, if not you may need to add ‘sudo‘ to the commands to get root privileges. I will show you the step-by-step installation of Cacti Monitoring on a Ubuntu 18.04 (Bionic Beaver) server.
Prerequisites
- A server running one of the following operating systems: Ubuntu 18.04 (Bionic Beaver).
- It’s recommended that you use a fresh OS install to prevent any potential issues.
- SSH access to the server (or just open Terminal if you’re on a desktop).
- A
non-root sudo useror access to theroot user. We recommend acting as anon-root sudo user, however, as you can harm your system if you’re not careful when acting as the root.
Install Cacti Monitoring on Ubuntu 18.04 LTS Bionic Beaver
Step 1. First, make sure that all your system packages are up-to-date by running the following apt-get commands in the terminal.
sudo apt-get update
sudo apt-get upgrade
Step 2. Install LAMP (Linux, Apache, MariaDB, and PHP) server.
A Ubuntu 18.04 LAMP server is required. If you do not have LAMP installed, you can follow our guide here. Also, install all required PHP modules:
apt-get install php7.1-cli php7.1-gd php7.1-opcache php7.1-mysql php7.1-json php7.1-mcrypt php7.1-xml php7.1-curl
Step 3. Configuring MariaDB for Cacti.
By default, MariaDB is not hardened. You can secure MariaDB using the mysql_secure_installation script. you should read and below each step carefully which will set a root password, remove anonymous users, disallow remote root login, and remove the test database and access to secure MariaDB:
mysql_secure_installation
Configure it like this:
- Set root password? [Y/n] y
- Remove anonymous users? [Y/n] y
- Disallow root login remotely? [Y/n] y
- Remove test database and access to it? [Y/n] y
- Reload privilege tables now? [Y/n] y
Next, we will need to log in to the MariaDB console and create a database for the Cacti. Run the following command:
mysql -u root -p
This will prompt you for a password, so enter your MariaDB root password and hit Enter. Once you are logged in to your database server you need to create a database for Cacti installation:
Ccreate database cacti;
GRANT ALL ON cacti.* TO cactiuser@localhost IDENTIFIED BY 'cactipassword';
flush privileges;
exit
The newly created database user (cactiuser) should have access to the mysql.time_zone_name Table. To do that, import the mysql_test_data_timezone.sql to MySQL database:
mysql -u root -p mysql < /usr/share/mysql/mysql_test_data_timezone.sql
Then, log in to MariaDB:
mysql -u root -p
Grant the permission to cactiuser:
GRANT SELECT ON mysql.time_zone_name TO cactiuser@localhost;
flush privileges;
exit
Step 4. Installing the Cacti packages.
Install SNMP and SNMP and RRDtools:
sudo apt-get install snmp snmpd snmp-mibs-downloader rrdtool
Now use the following command to install Cacti:
apt-get install cacti cacti-spine
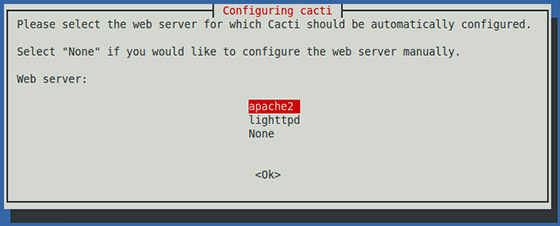
During the installation process, you will be prompted to configure Cacti with few options to select from available options. First of all, Choose the web server that you wish to use for configuring with Cacti like we are using Apache, and then press the ‘OK’ key to continue:

Now it will ask you for a web server that you will use, we choose Apache2 since that’s what we installed in the dependencies.
Next, it will ask to configure the Cacti database, select Yes.

Now it will ask for your root password of the MySQL/MariaDB database.

Once the installation process is complete, you will have to restart all services to reflect the changes made:
systemctl restart apache2.service
systemctl restart mysql.service
systemctl restart snmpd.service
Step 5. Accessing cacti.
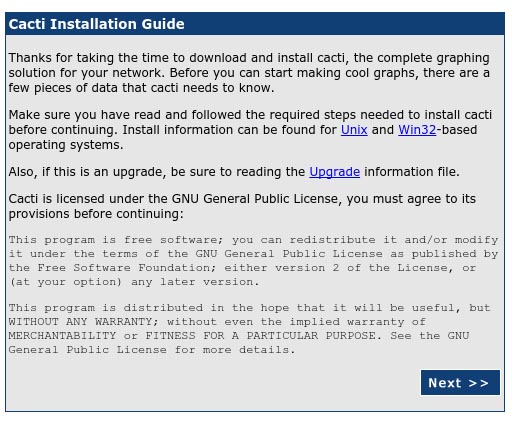
Cacti will be available on HTTP port 80 by default. Open your favorite browser and navigate to http://yourdomain.com/cacti or http://server-ip/cacti and complete the required steps to finish the installation. You will get the “Cacti Installation Guide” on the screen. Click on the ‘Next’ button.
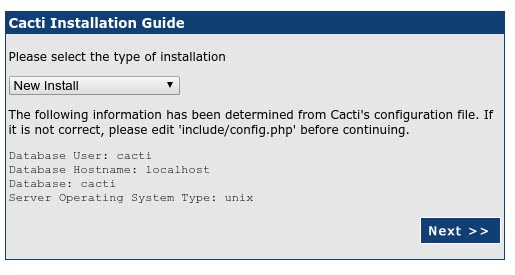
On the next screen, you will get drop-down button. Because of this fresh installation select, ‘New Install’ and click the ‘Next’ button.
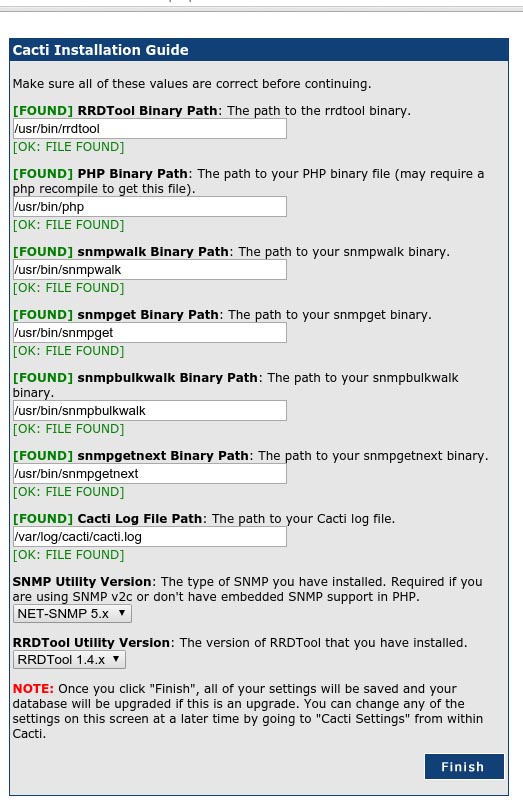
Cacti will now check for the packages it needs to run properly. Make sure all the checks appear with an “OK” status and then click Finish.
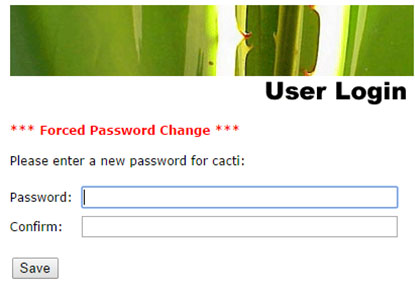
The next page is the login page. The first time you log into Cacti, use admin as username and password.
Congratulations! You have successfully installed Cacti. Thanks for using this tutorial for installing Cacti Monitoring on Ubuntu 18.04 LTS (Bionic Beaver) system. For additional help or useful information, we recommend you check the official Cacti Monitoring website.