In this tutorial, we will show you how to install Cinnamon on Ubuntu 18.04 LTS. For those of you who didn’t know, Cinnamon is a free and open-source desktop environment developed by the Linux Mint team. It is known for its simplicity, elegance, and ease of use, making it a popular choice among Linux users. Cinnamon is built on top of the GNOME 3 desktop environment but offers a more traditional desktop experience with a focus on simplicity and usability. It is highly customizable, allowing users to personalize their desktop environment to suit their preferences.
This article assumes you have at least basic knowledge of Linux, know how to use the shell, and most importantly, you host your site on your own VPS. The installation is quite simple and assumes you are running in the root account, if not you may need to add ‘sudo‘ to the commands to get root privileges. I will show you through the step-by-step installation of Cinnamon on a Ubuntu 18.04 (Bionic Beaver) server.
Prerequisites
- A server running one of the following operating systems: Ubuntu and any other Debian-based distribution like Linux Mint.
- It’s recommended that you use a fresh OS install to prevent any potential issues.
- SSH access to the server (or just open Terminal if you’re on a desktop).
- An active internet connection. You’ll need an internet connection to download the necessary packages and dependencies.
Install Cinnamon on Ubuntu 18.04 LTS Bionic Beaver
Step 1. First, make sure that all your system packages are up-to-date by running the following apt commands in the terminal.
sudo apt update
sudo apt upgrade
Step 2. Installing Cinnamon on Ubuntu 18.04.
A PPA (Personal Package Archive) is a collection of software packages maintained by a specific developer or team. In this case, we will add the Embrosyn PPA, which provides the latest version of Cinnamon. Run the following commands to add the Embrosyn PPA:
sudo add-apt-repository ppa:embrosyn/cinnamon
Now that the PPA is added, you can install Cinnamon using the following command:
sudo apt update
sudo apt install cinnamon-desktop-environment
This will install LightDM and configure it as the default display manager.
Step 3. Switch Display Manager to LightDM.
LightDM is a lightweight display manager that is recommended for use with Cinnamon. Run the following commands to install and configure LightDM:
sudo apt install lightdm
sudo dpkg-reconfigure lightdm
Once the installation is complete, reboot your system using the following command:
reboot
Step 4. Accessing Cinnamon.
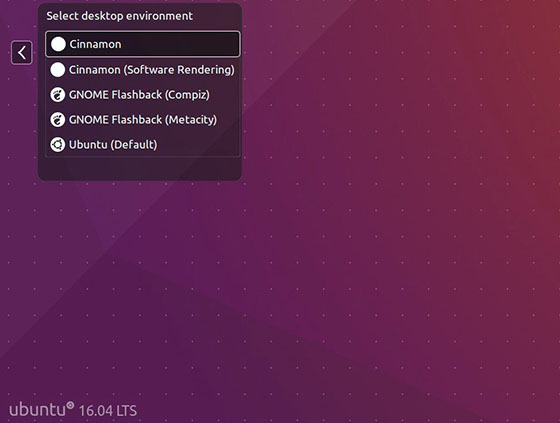
After the successful installation, When you log back on, at the login screen click on the wheel icon and select Cinnamon from the list.

Congratulations! You have successfully installed Cinnamon. Thanks for using this tutorial for installing Cinnamon on your Ubuntu 18.04 LTS Bionic Beaver system. For additional help or useful information, we recommend you check the official Cinnamon website.