How To Install ClipGrab on Debian 12

ClipGrab is a versatile, user-friendly tool that simplifies downloading videos from various online platforms. It is particularly useful for Debian users who need a reliable way to save and convert videos for offline viewing. This article provides a detailed, step-by-step guide on how to install ClipGrab on Debian 12, ensuring you can quickly start downloading your favorite content. Whether you’re looking save educational content, or simply enjoy media offline, ClipGrab offers a convenient solution. Discover the best methods to get ClipGrab up and running on your Debian system, along with tips for configuration, troubleshooting, and maintenance. Let’s dive in!
Why ClipGrab is Essential for Debian Users
ClipGrab stands out as a valuable asset for Debian users due to its ease of use and powerful features. Unlike some command-line tools, ClipGrab provides a graphical interface, making it accessible to users of all skill levels. The software supports downloads from popular platforms like Vimeo, and Facebook. ClipGrab allows users to convert videos into various formats such as MP4, MP3, and more, making it highly adaptable for different needs. Users can easily manage video quality, download settings, and output formats to suit their preferences. This combination of simplicity and functionality makes ClipGrab an ideal choice for managing online video content on Debian systems.
Key Features of ClipGrab
- Multi-Platform Support: ClipGrab works seamlessly across various operating systems, including Debian, Windows, and macOS.
- Broad Video Site Compatibility: Supports downloading from Vimeo, Facebook, and many other video hosting sites.
- Format Conversion: Converts videos to multiple formats, including MPEG4, MP3, and more.
- Quality Selection: Allows users to select the desired video quality before downloading.
- User-Friendly Interface: Features an intuitive interface for easy navigation and operation.
Prerequisites for Installing ClipGrab on Debian 12
Before you begin the installation process, ensure that your Debian 12 system meets the necessary prerequisites. These include having a stable internet connection, root or sudo privileges, and the required dependencies. Properly preparing your system will help ensure a smooth and successful installation. Below are the key prerequisites you should verify before proceeding.
System Requirements
- Operating System: Debian 12 (Bookworm)
- Internet Connection: Stable internet access for downloading packages and dependencies.
- Privileges: Root or sudo privileges to install software.
Required Dependencies
ClipGrab relies on several dependencies to function correctly. These dependencies include ffmpeg, python3, and wget. Installing these dependencies before installing ClipGrab will prevent potential issues during the installation process. Here’s how to ensure these dependencies are installed.
sudo apt update
sudo apt install wget python3 ffmpeg
This command updates the package list and installs wget, python3, and ffmpeg, which are essential for ClipGrab to operate effectively.
Detailed Installation Methods
There are multiple methods to install ClipGrab on Debian 12, each with its own advantages. This guide will cover two primary methods: installing via AppImage and manually setting up dependencies. Choose the method that best suits your technical expertise and system configuration. Both methods are detailed to provide a comprehensive understanding of the installation process.
Method 1: AppImage Installation
The AppImage method is one of the simplest ways to install ClipGrab on Debian 12. An AppImage is a self-contained package that includes all the necessary dependencies to run the application. This eliminates the need to manually install dependencies, making it a convenient option for many users.
Downloading the AppImage File
First, download the ClipGrab AppImage file from the official ClipGrab website or a trusted source. Use the wget command to download the file directly from the command line.
wget https://download.clipgrab.org/ClipGrab-3.9.11-x86_64.AppImage
This command downloads the latest version of ClipGrab AppImage to your current directory. Be sure to check the ClipGrab website for the most recent version number and update the command accordingly.
Making the AppImage Executable
Once the AppImage file is downloaded, you need to make it executable. This allows you to run the AppImage as a program. Use the chmod command to add execute permissions to the file.
chmod +x ClipGrab-3.9.11-x86_64.AppImage
This command grants the necessary permissions to execute the AppImage file.
Creating Application Shortcuts
To make ClipGrab easily accessible, you can create an application shortcut. This involves creating a .desktop file and placing it in the appropriate directory. First, create a new .desktop file using a text editor.
nano ~/.local/share/applications/clipgrab.desktop
Add the following content to the file, adjusting the paths as necessary:
[Desktop Entry]
Name=ClipGrab
Comment=Download videos from various online platforms
Exec=/path/to/ClipGrab-3.9.11-x86_64.AppImage
Icon=/path/to/clipgrab.png
Terminal=false
Type=Application
Categories=AudioVideo;
Replace /path/to/ClipGrab-3.9.11-x86_64.AppImage with the actual path to your downloaded AppImage file. You can also add an icon by specifying the path to a .png file for the Icon field. Save the file and make it executable.
chmod +x ~/.local/share/applications/clipgrab.desktop
This creates a desktop entry that allows you to launch ClipGrab from your application menu.
Setting Up Proper Permissions
Ensure that the AppImage file has the necessary permissions to access system resources. While the chmod +x command grants execute permissions, you may need to adjust other permissions if you encounter issues. Verify that the file is owned by your user and that it has read permissions.
ls -l ClipGrab-3.9.11-x86_64.AppImage
This command displays the file’s permissions and ownership. If necessary, change the ownership using the chown command.
sudo chown $USER:$USER ClipGrab-3.9.11-x86_64.AppImage
This ensures that the file is owned by your user, preventing permission-related errors.
Method 2: Manual Dependencies Setup
The manual dependencies setup method involves installing ClipGrab by ensuring all required dependencies are in place. This method provides more control over the installation process and can be useful if you prefer to manage dependencies manually.
System Update Commands
Before installing any new software, it’s crucial to update your system. This ensures that you have the latest package information and updates installed. Use the following commands to update your system.
sudo apt update && sudo apt upgrade
This command updates the package list and upgrades any outdated packages on your system.
Installing Required Packages
ClipGrab requires specific packages to function correctly. These packages include wget, python3, and ffmpeg. Install these packages using the apt install command.
sudo apt install wget python3 ffmpeg
This command installs the necessary dependencies for ClipGrab.
Setting Up Video Codecs
ClipGrab relies on video codecs to handle different video formats. Ensure that the necessary codecs are installed on your system. The ffmpeg package provides many common codecs, but you may need to install additional codecs depending on the video formats you plan to use.
sudo apt install libavcodec-extra
This command installs additional codecs that may be required for ClipGrab to function correctly.
Configuration Steps for ClipGrab on Debian 12
After installing ClipGrab, you can configure it to better integrate with your desktop environment and customize its settings. This section covers how to create a desktop entry, set up application icons, configure file associations, and adjust post-installation settings.
Desktop Integration
Integrating ClipGrab with your desktop environment makes it easier to launch and use the application. This involves creating a desktop entry and setting up an application icon.
Creating a Desktop Entry
A desktop entry allows you to launch ClipGrab from your application menu. Create a .desktop file in the ~/.local/share/applications/ directory.
nano ~/.local/share/applications/clipgrab.desktop
Add the following content to the file, adjusting the paths as necessary:
[Desktop Entry]
Name=ClipGrab
Comment=Download videos from various online platforms
Exec=clipgrab
Icon=/usr/share/icons/hicolor/scalable/apps/clipgrab.png
Terminal=false
Type=Application
Categories=AudioVideo;
Ensure that the Exec field points to the correct executable (usually just clipgrab if it’s in your PATH) and that the Icon field points to a valid icon file. Save the file and make it executable.
chmod +x ~/.local/share/applications/clipgrab.desktop
This creates a desktop entry for ClipGrab.
Setting Up Application Icon
To ensure that ClipGrab has a visible icon in your application menu, you need to set up an application icon. You can download an icon file and place it in the appropriate directory.
sudo wget -O /usr/share/icons/hicolor/scalable/apps/clipgrab.png https://clipgrab.org/img/clipgrab-logo.png
This command downloads the ClipGrab logo and places it in the /usr/share/icons/hicolor/scalable/apps/ directory. You may need to adjust the path depending on your system’s icon theme.
Configuring File Associations
File associations allow you to open video files directly with ClipGrab. This can be configured through your desktop environment’s settings. Open your system settings and navigate to the “Default Applications” or “File Associations” section. Associate video file types like .mp4, .avi, and .mkv with ClipGrab.
Adding to Application Menu
After creating the desktop entry, ClipGrab should automatically appear in your application menu. If it doesn’t, you may need to update your application menu cache. This can be done by logging out and logging back in, or by running the following command.
sudo update-desktop-database
This command updates the application menu cache, ensuring that ClipGrab appears in your application menu.
Post-Installation Setup
After completing the installation and desktop integration, there are several post-installation settings you can configure to optimize ClipGrab for your needs.
First-Run Configuration
When you first launch ClipGrab, you may be prompted to configure some initial settings. This includes setting the default download directory, video quality preferences, and format conversion settings. Take the time to review these settings and adjust them to your liking.
Setting Download Directory
The download directory is where ClipGrab saves downloaded videos. To set the download directory, open ClipGrab and navigate to the settings menu. Choose a location that is easily accessible and has sufficient storage space.
Configuring Video Quality Preferences
ClipGrab allows you to select the desired video quality before downloading. You can set a default video quality in the settings menu. Choose a quality that balances file size and video clarity.
Format Conversion Settings
ClipGrab can convert videos to various formats. Configure the format conversion settings to specify the desired output format and quality. This allows you to automatically convert videos to your preferred format after downloading.
Usage Guide for ClipGrab on Debian 12
Once ClipGrab is installed and configured, you can start using it to download videos from various online platforms. This section provides a basic usage guide, including how to download your first video, select video quality, choose output formats, and manage downloads.
Basic Operations
Downloading videos with ClipGrab is straightforward. Follow these steps to download your first video.
Downloading Your First Video
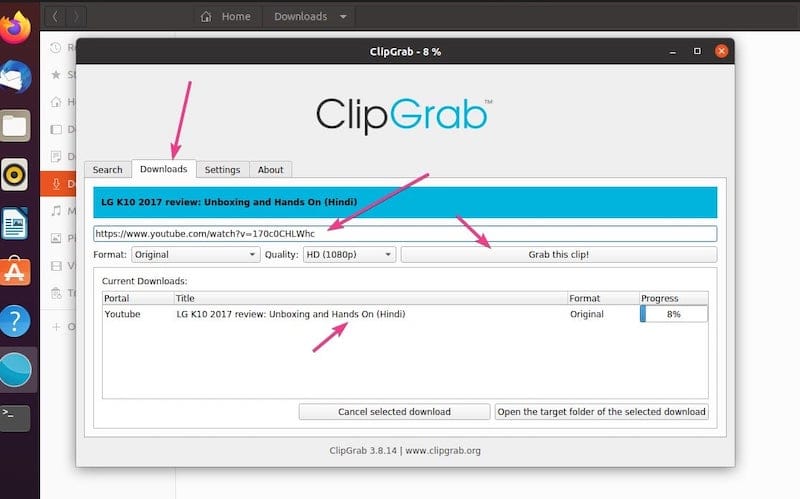
- Copy the Video Link: Copy the URL of the video you want to download from your web browser.
- Paste the Link into ClipGrab: Open ClipGrab and paste the link into the “Video URL” field.
- Select Download Format and Quality: Choose the desired video quality and output format from the available options.
- Grab the Clip: Click the “Grab this clip!” button to start the download.
ClipGrab will download the video and save it to the specified download directory.

Congratulations! You have successfully installed ClipGrab. Thanks for using this tutorial to install the latest version of the ClipGrab on Debian 12 “Bookworm” system. For additional help or useful information, we recommend you check the official ClipGrab website.