How To Install Clonezilla on Fedora 41

Clonezilla is a powerful, free, and open-source disk imaging and cloning tool that provides reliable backup and recovery solutions for your Fedora system. Whether you need to migrate your installation to a larger drive, create system backups, or deploy multiple identical systems, Clonezilla offers robust functionality that meets diverse needs. This guide will walk you through various methods to install Clonezilla on Fedora 41, explain its key features, and provide detailed instructions for creating and restoring backups.
What is Clonezilla?
Clonezilla is a partition and disk imaging/cloning program similar to commercial solutions like Norton Ghost or Acronis True Image. It saves and restores only used blocks in hard drives, making it highly efficient for backup operations. Clonezilla comes in two editions:
- Clonezilla Live – A bootable GNU/Linux distribution that runs from CD/DVD or USB flash drives without installing anything to your hard drive. This version is perfect for individual machine backups and restoration.
- Clonezilla Server Edition (SE) – Designed for mass deployment, allowing you to clone many computers simultaneously through a network.
Clonezilla supports numerous file systems, including ext2, ext3, ext4, reiserfs, xfs, jfs, btrfs, f2fs, nilfs2, FAT, NTFS, HFS+, UFS, minix, and VMFS. This wide compatibility makes it an excellent choice for Fedora 41 users who need reliable backup solutions.
Key features that make Clonezilla stand out include:
- Efficient operation by saving and restoring only used blocks
- Support for various file systems
- Ability to clone disks or partitions
- Options for local or network-based backups
- Multi-casting capabilities for deploying to multiple machines
- Strong compression options to save storage space
- Encryption support for secure backups
Prerequisites for Installing Clonezilla on Fedora 41
Before proceeding with the installation, ensure your system meets these requirements:
- A Fedora 41 system with sufficient disk space (at least 500MB for Clonezilla itself)
- Administrative (sudo) privileges
- Internet connection for downloading packages
- External storage media for backups (if not using network storage)
- Basic knowledge of Linux command line operations
It’s also highly recommended to back up any critical data before working with disk cloning tools. While Clonezilla is designed to be safe, having backups provides additional protection against unexpected issues.
Method 1: Installing Clonezilla via COPR Repository
The COPR (Cool Other Package Repo) repository provides an easy way to install Clonezilla directly on your Fedora 41 system. This method allows you to run Clonezilla without needing to boot from external media.
Step 1: Enable the Clonezilla COPR Repository
Open a terminal and run the following command to enable the sergiomb/clonezilla repository:
sudo dnf copr enable sergiomb/clonezillaThis command adds the repository that contains the Clonezilla package specifically built for Fedora systems.
Step 2: Update Package Information
Update your system’s package information to include the newly added repository:
sudo dnf updateStep 3: Install Clonezilla
Now install Clonezilla using the dnf package manager:
sudo dnf install clonezillaThe system will download and install Clonezilla along with any required dependencies.
Step 4: Verify Installation
To verify that Clonezilla was installed correctly, run:
clonezilla --versionThis should display the version information for the installed Clonezilla package.
Troubleshooting COPR Installation Issues
If you encounter issues with the COPR repository, try these solutions:
- Ensure your internet connection is stable
- Check if the repository is accessible by running
sudo dnf repolist - If the repository appears disabled, re-enable it with
sudo dnf copr enable sergiomb/clonezilla - Clear dnf cache with
sudo dnf clean alland try again
Method 2: Creating a Bootable Clonezilla Live USB
Creating a bootable Clonezilla Live USB drive is an excellent option for performing system backups without installing anything on your main system. This method is particularly useful for backing up your entire Fedora 41 installation.
Step 1: Download the Clonezilla Live ISO
Visit the official Clonezilla website and download the latest stable ISO file. For most modern systems running Fedora 41, choose the “alternative” amd64 version, which is based on Ubuntu and supports newer hardware with better driver compatibility.
Step 2: Install Required Utilities
You’ll need tools to create the bootable USB. Fedora provides several options:
sudo dnf install fedora-media-writerAlternatively, you can install other tools:
sudo dnf install kde-isoimage-writerOr for command-line enthusiasts:
sudo dnf install syslinux squashfs-toolsStep 3: Create the Bootable USB Drive
Using Fedora Media Writer:
- Launch Fedora Media Writer
- Select “Custom Image”
- Navigate to and select the downloaded Clonezilla ISO
- Insert your USB drive
- Select your USB drive from the list
- Click “Write to Disk”
Using dd command (advanced users):
First, identify your USB drive:
lsblkThen, write the ISO to the USB drive (replace /dev/sdX with your actual USB device, e.g., /dev/sdb):
sudo dd if=/path/to/clonezilla-live.iso of=/dev/sdX bs=4M status=progress && syncWarning: Be extremely careful with the dd command. Using the wrong output device can result in data loss.
Step 4: Verify the Bootable USB
After creating the bootable USB, you can verify it by:
- Rebooting your computer
- Entering the boot menu (typically by pressing F12, F2, or Esc during startup)
- Selecting the USB drive to boot from
- Confirming that Clonezilla Live loads correctly
Method 3: Installing Clonezilla from Source
For users who prefer to compile software from source or need the very latest features, installing Clonezilla from source code is an option. This method provides more control but requires additional technical knowledge.
Step 1: Install Build Dependencies
First, install the necessary development tools and dependencies:
sudo dnf install git make gcc automake autoconf libtool gettext-devel perl-devel perl-ExtUtils-MakeMaker perl-XML-Parser ntfsprogs dosfstoolsStep 2: Clone the Clonezilla Repository
Clone the Clonezilla repository from GitHub:
git clone https://github.com/stevenshiau/clonezilla.git
cd clonezilla
Step 3: Compile and Install
Run the following commands to compile and install Clonezilla:
./configure
make
sudo make install
Step 4: Verify Installation
Check if Clonezilla was installed correctly:
clonezilla --versionUsing Clonezilla on Fedora 41
Once you have Clonezilla installed, you can start using it for various backup and cloning operations. Here’s how to get started with basic operations.
Launching Clonezilla
If you installed Clonezilla via COPR or from source, you can launch it from the terminal:
sudo clonezillaFor the bootable USB method, you’ll need to:
- Boot from the Clonezilla Live USB
- Select “Clonezilla live (Default settings)”
- Choose your preferred language
- Select your keyboard layout
- Choose whether to start Clonezilla in text or graphical mode

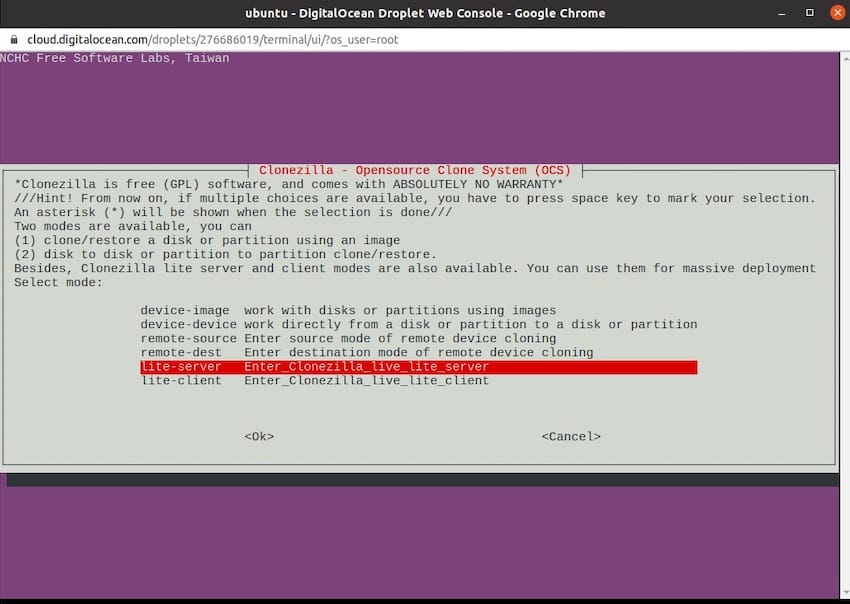
Understanding the Clonezilla Interface
Clonezilla primarily uses a text-based interface with menus that you navigate using arrow keys, Tab, and Enter. The main menu offers several options:
- device-device: Clone directly from one disk to another
- device-image: Save a disk or partition to an image
- restore-parts: Restore a partition from an image
- Expert mode: Access advanced options
Setting Up Your First Backup
For a basic backup operation:
- Select “device-image” to create an image of your disk
- Choose where to save the image (local disk, SSH server, Samba server, etc.)
- Select the source disk or partition to back up
- Choose a name for your image
- Select compression options (zstd is recommended for a good balance of speed and compression)
- Confirm your selections and start the backup process
Creating System Backups with Clonezilla
Creating comprehensive system backups is one of the primary uses for Clonezilla. Here’s a detailed guide to backing up your entire Fedora 41 system.
Preparing for Backup
Before starting a backup:
- Close all unnecessary applications
- Disable internet connections and background services (like Syncthing, Nextcloud, VPNs)
- Connect external storage with sufficient space
- If possible, perform the backup from a Clonezilla Live USB rather than from the running system
Step-by-Step Backup Process
- Boot from Clonezilla Live USB and select “Clonezilla live (Default settings)”
- Choose “device-image” from the main menu
- Select where to save the image:
- local_dev: For external drives
- ssh_server: For network backups via SSH
- samba_server: For Windows shares
- Mount the target storage and select the directory to save the image
- Choose the source disk to back up (typically something like /dev/sda or /dev/nvme0n1)
- Enter a name for the image (descriptive names with dates are recommended)
- Choose compression options:
- z9p (zstd): Recommended for a good balance of speed and compression
- z1p: Faster but less compression
- z9: Maximum compression but slower
- Select “Beginner mode” for standard options or “Expert mode” for advanced settings
- Confirm your selections and start the backup
Compression and Storage Considerations
When creating backups, consider these factors:
- Higher compression saves space but takes longer
- For SSDs, higher compression may be preferable as it reduces write operations
- Network backups may benefit from less compression to reduce CPU load
- Estimate approximately 40-60% of used disk space for the final image size with default compression
Scheduling Regular Backups
For automated backups, you can create scripts that use Clonezilla in non-interactive mode. Here’s a basic example:
#!/bin/bash
# Schedule with cron: 0 2 * * 0 /path/to/backup-script.sh

BACKUP_DIR="/mnt/backups"
DATE=$(date +%Y-%m-%d)
SOURCE_DISK="/dev/sda"
IMAGE_NAME="fedora41-backup-$DATE"

# Mount backup location
mount /dev/backup_drive /mnt/backups

# Run Clonezilla in non-interactive mode
clonezilla -q -batch -c -z9p -i $SOURCE_DISK $BACKUP_DIR/$IMAGE_NAME

# Unmount backup location
umount /mnt/backups
Restoring from Clonezilla Backups
Restoring your system from a Clonezilla backup is straightforward but requires careful attention to detail to avoid data loss.
Step-by-Step Restoration Process
- Boot from the Clonezilla Live USB
- Select “Clonezilla live (Default settings)”
- Choose “device-image” from the main menu
- Select the storage location where your backup is stored
- Navigate to and select the backup image
- Choose “Restore disk” or “Restore partition” depending on your needs
- Select the target disk or partition where you want to restore the backup
- Choose whether to check the image before restoring (recommended)
- Confirm your selections and start the restoration process
Handling Different Disk Sizes
When restoring to a disk with a different size than the original:
- For larger disks: Use the “-k1” option (proportional resizing) to automatically resize partitions to use the additional space
- For smaller disks: Ensure the used space in the backup is less than the capacity of the new disk
- For complex partition layouts: Consider using Expert mode and manually adjusting partition sizes
Congratulations! You have successfully installed Clonezilla. Thanks for using this tutorial to install the latest version of the Clonezilla partition and disk on Fedora 41. For additional help or useful information, we recommend you check the official Clonezilla website.