How To Install CloudPanel on Ubuntu 24.04 LTS

In the world of web hosting and server management, having a reliable control panel can significantly streamline your workflow. CloudPanel is an open-source server management tool designed to simplify the deployment and management of web applications. This guide will walk you through the process of installing CloudPanel on Ubuntu 24.04 LTS, ensuring you have a robust platform for managing your web services efficiently.
Prerequisites
System Requirements
Before diving into the installation, it’s essential to ensure that your server meets the minimum hardware specifications:
- CPU: At least 1 CPU core (2 or more recommended for production).
- RAM: Minimum of 1 GB (2 GB or more recommended).
- Disk Space: At least 10 GB of free disk space.
Software Requirements
CloudPanel is compatible with specific software environments. Ensure you have the following:
- Operating System: Ubuntu 24.04 LTS (64-bit).
- SSH Access: Required for remote management.
- Network Connectivity: Ensure your server is connected to the internet.
Access Requirements
You must have root access to your server. This can be achieved by logging in as the root user or using a user account with sudo privileges. It’s advisable to use SSH keys for a secure connection instead of passwords.
Preparing Your Server
Creating an Instance
If you’re setting up CloudPanel on a cloud service provider, follow these steps to create a virtual server instance:
- Select your preferred cloud provider (e.g., AWS, DigitalOcean, Vultr).
- Create a new instance with Ubuntu 24.04 LTS as the operating system.
- Select the appropriate plan based on your system requirements.
- Configure firewall settings to allow SSH connections on port 22.
Accessing Your Instance via SSH
Once your instance is running, access it using SSH. Open your terminal and execute the following command:
ssh -i path_to_your_private_key root@yourIpAddressThis command connects you to your server securely. Replace `path_to_your_private_key` with the path to your SSH key and `yourIpAddress` with your server’s IP address.
Updating the System
Before installing any software, it’s crucial to update your package repository and upgrade existing packages. Run the following commands:
apt update && apt -y upgradeThis ensures that all packages are up-to-date, providing better security and performance.
Installing Essential Packages
You need some essential packages before running the CloudPanel installer. Install them using this command:
apt -y install curl wget sudoThis command installs curl and wget, which are necessary for downloading files from the internet.
Installing CloudPanel
Downloading the Installer Script
The next step is to download the CloudPanel installation script. Use curl to fetch it directly from their repository:
curl -sS https://installer.cloudpanel.io/ce/v2/install.sh -o install.shVerifying the Installer Script
For security reasons, it’s essential to verify the integrity of the downloaded script. You can do this by checking its checksum. First, obtain the checksum value from CloudPanel’s official website, then run:
echo "checksum_value install.sh" | sha256sum -cIf everything is correct, you should see a message indicating that the checksum matches.
Running the Installer
You are now ready to run the installer script. Execute it with superuser privileges as follows:
sudo bash install.shThis command initiates the installation process for CloudPanel. Follow any prompts that appear during installation.
Choosing a Database Engine
During installation, you’ll be prompted to select a database engine. CloudPanel supports MySQL and MariaDB. Choose one based on your preferences and requirements for performance and compatibility.
Configuring CloudPanel
Accessing CloudPanel Dashboard
Your installation should complete successfully if there are no errors during setup. You can access the CloudPanel dashboard by navigating to:
https://your_server_ip:8443This URL will direct you to the login page of CloudPanel. Make sure to replace `your_server_ip` with your actual server IP address.

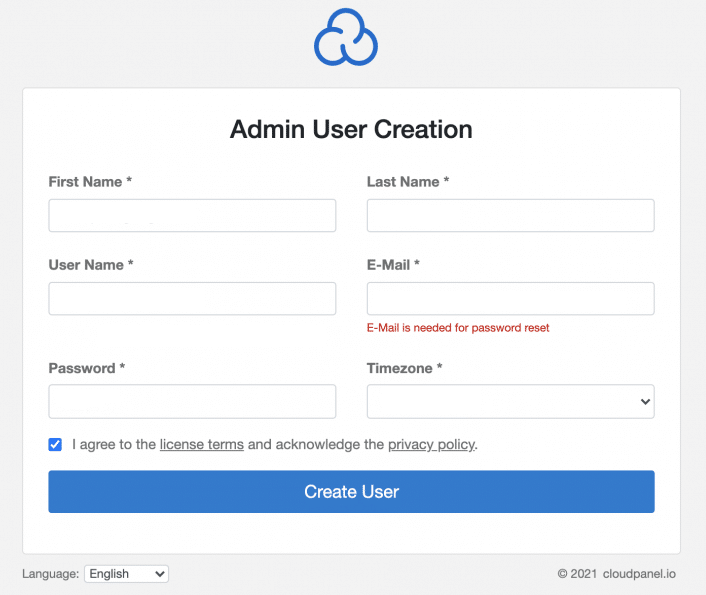
Initial Setup Process
The initial setup wizard will guide you through configuring your admin account and other essential settings:
- Create an admin username and password.
- Select your preferred language and timezone.
- Add any additional configurations as prompted by the wizard.
Security Configuration
A secure installation is crucial for protecting your data and applications. Here are some security measures to implement:
-
- Firewall Settings: Configure UFW (Uncomplicated Firewall) to allow only necessary ports (e.g., 80, 443, 8443).
ufw allow OpenSSH
ufw allow 80/tcp
ufw allow 443/tcp
ufw allow 8443/tcp
ufw enable
- Password Management: Use strong passwords for all accounts and consider implementing two-factor authentication (2FA) if supported.
- SFTP Access: Limit FTP access and use SFTP for secure file transfers.
Post-Installation Steps
Verifying Installation Success
systectl status cloudpanel.service
If everything is functioning properly, you should see an “active (running)” status message. If not, check error logs located in `/var/log/cloudpanel/` for troubleshooting information.
Setting Up Your First Project
You can now create your first project or website within CloudPanel’s dashboard:
-
- Select “Projects” from the sidebar menu.
Congratulations! You have successfully installed CloudPanel. Thanks for using this tutorial for installing CloudPanel hosting control panel on Ubuntu 24.04 LTS system. For additional help or useful information, we recommend you check the official CloudPanel website.