![]()
In this tutorial, we will show you how to install CyberPanel on openSUSE. If you’re looking for a powerful and user-friendly web hosting control panel for your openSUSE server, CyberPanel is an excellent choice. CyberPanel is a web-based control panel that simplifies the management of websites, databases, email accounts, and more. It supports both OpenLiteSpeed and LiteSpeed Enterprise web servers, providing a fast and secure hosting environment.
This article assumes you have at least basic knowledge of Linux, know how to use the shell, and most importantly, you host your site on your own VPS. The installation is quite simple and assumes you are running in the root account, if not you may need to add ‘sudo‘ to the commands to get root privileges. I will show you the step-by-step installation of the CyberPanel on openSUSE.
Prerequisites
- A server running one of the following operating systems: openSUSE (Leap or Tumbleweed)
- Familiarity with basic Linux commands and openSUSE’s package management system (
zypper) is also beneficial, as you’ll be interacting with the command line during the installation process. - You will need access to the terminal to execute commands. openSUSE provides the Terminal application for this purpose. It can be found in your Applications menu.
- You’ll need an active internet connection to download Postfix and its dependencies.
- You’ll need administrative (root) access or a user account with sudo privileges.
Install CyberPanel on openSUSE
Step 1. Update openSUSE packages: Ensure that your openSUSE server is up to date by running the following command:
sudo zypper refresh
sudo zypper update
Step 2. Create a Non-Root User.
For security reasons, it’s recommended to create a non-root user with sudo privileges to perform administrative tasks. This helps prevent accidental damage to your system and reduces the risk of security vulnerabilities. Follow these steps to create a new user:
sudo useradd -m -s /bin/bash your_username
sudo passwd your_username
sudo usermod -aG wheel your_username
Replace your_username with the desired username.
Step 3. Installing CyberPanel on openSUSE.
Now download the CyberPanel installation script by running the following command:
wget https://cyberpanel.net/install.sh
Make the installation script executable:
chmod +x install.sh
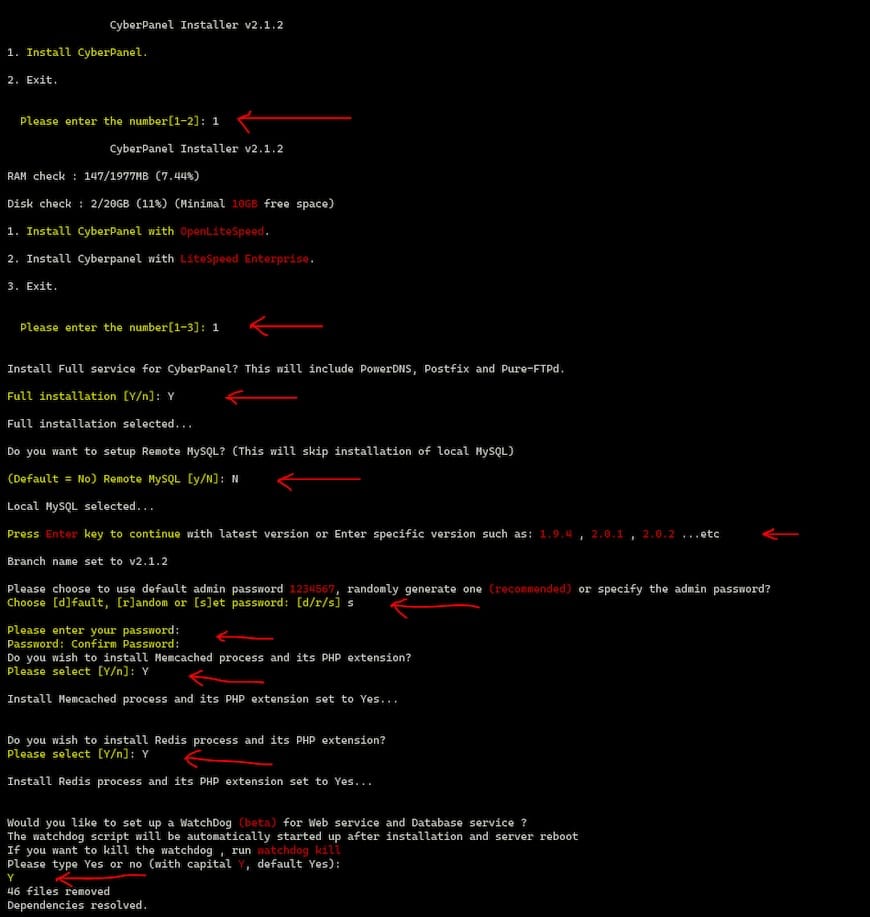
Run the installation script as the root user:
sudo ./install.sh
Step 4. Configure Firewall.
Open required ports in the firewall: CyberPanel requires certain ports to be open for proper functioning. Run the following commands to open the necessary ports:
sudo firewall-cmd --permanent --add-port=80/tcp
sudo firewall-cmd --permanent --add-port=443/tcp
sudo firewall-cmd --permanent --add-port=8090/tcp
sudo firewall-cmd --permanent --add-port=7080/tcp
sudo firewall-cmd --permanent --add-port=5000/tcp
sudo firewall-cmd --reload
These commands open ports 80 (HTTP), 443 (HTTPS), 8090 (CyberPanel), 7080 (OpenLiteSpeed), and 5000 (LiteSpeed Enterprise).
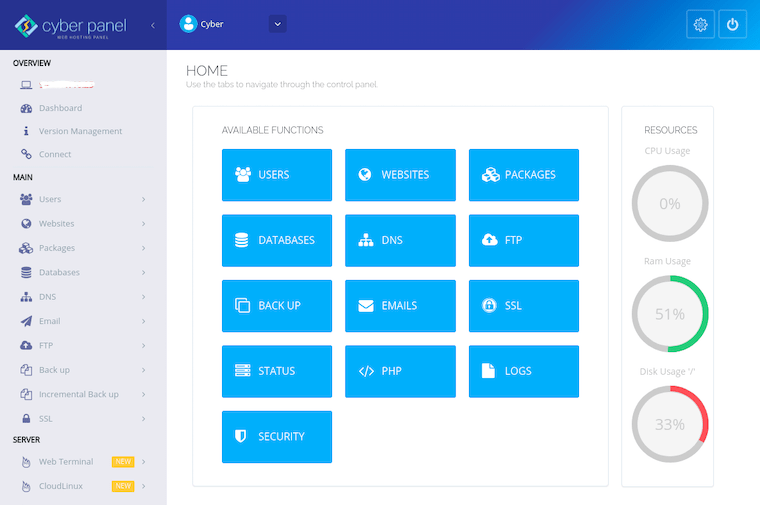
Step 5. Accessing CyberPanel Web UI.
Once the installation is finished, you can access the CyberPanel web interface by opening a web browser and navigating to https://your_server_ip:8090. Replace your_server_ip with your server’s public IP address.
Log in using the admin username “admin” and the password you set during the installation process.
Step 6. Troubleshooting Common Issues
While CyberPanel is designed to be user-friendly and reliable, you may encounter some issues during the installation or while using the control panel. Here are some common problems and their solutions:
- Installation errors: If you encounter errors during the installation process, ensure that your server meets the minimum requirements and that you have followed the preparation steps correctly. Check the installation log for specific error messages and consult the CyberPanel documentation or community forums for guidance.
- Website not loading: If your website fails to load after installing CyberPanel, verify that your domain’s DNS settings are correctly configured and pointing to your server’s IP address. Also, check that the website’s files are present in the correct directory and that the necessary permissions are set.
- Email sending/receiving problems: If you experience issues with sending or receiving emails, ensure that your domain’s DNS records (MX, SPF, DKIM) are properly configured. Check the email server logs for any error messages and verify that the email ports (25, 465, 587) are open in your server’s firewall.
- Resetting lost admin password: If you forget your CyberPanel admin password, you can reset it by running the following command as the root user:
cyberpanel adminPass your_new_password
- Getting support: If you encounter any issues that you can’t resolve on your own, don’t hesitate to reach out to the CyberPanel community for assistance. You can find support forums, documentation, and other resources on the official CyberPanel website.
Congratulations! You have successfully installed CyberPanel. Thanks for using this tutorial for installing CyberPanel on your openSUSE system. For additional or useful information, we recommend you check the official CyberPanel website.
[su_box title=”VPS Manage Service Offer” style=”bubbles” box_color=”#000000″ radius=”10″]If you don’t have time to do all of this stuff, or if this is not your area of expertise, we offer a service to do “VPS Manage Service Offer”, starting from $10 (Paypal payment). Please contact us to get the best deal![/su_box]