How To Install DokuWiki on Ubuntu 24.04 LTS

DokuWiki is a versatile, open-source wiki software that doesn’t require a database, making it lightweight and easy to use. It’s perfect for creating documentation, knowledge bases, and collaborative platforms. In this guide, we’ll walk you through the process of installing DokuWiki on Ubuntu 24.04 LTS, ensuring you have a secure and functional wiki up and running in no time.
Prerequisites
Before we dive into the installation process, make sure you have the following:
- A server running Ubuntu 24.04 LTS with root access
- A domain name pointing to your server’s IP address
- Basic familiarity with the Linux command line
We’ll be installing the following software during this process:
- Apache web server (or Nginx, if preferred)
- PHP and required extensions
- Certbot for SSL certificate management
Step 1: Update System Packages
Before we begin the installation, it’s crucial to ensure that your system packages are up-to-date. This helps prevent potential conflicts and ensures you have the latest security patches.
sudo apt update
sudo apt upgrade -y
These commands will update the package lists and upgrade all installed packages to their latest versions.
Step 2: Install Apache Web Server
For this guide, we’ll use Apache as our web server. If you prefer Nginx, you can adapt the instructions accordingly.
sudo apt install apache2 -yAfter installation, start and enable Apache to run on boot:
sudo systemctl start apache2
sudo systemctl enable apache2
Verify that Apache is running:
sudo systemctl status apache2Step 3: Install PHP and Extensions
DokuWiki requires PHP and several extensions to function properly. Let’s install them:
sudo apt install php libapache2-mod-php php-xml php-gd php-json php-mbstring -yAfter installation, restart Apache to load the PHP module:
sudo systemctl restart apache2Step 4: Download and Extract DokuWiki
Now, let’s download the latest stable version of DokuWiki and extract it to the web server’s root directory.
cd /tmp
wget https://download.dokuwiki.org/src/dokuwiki/dokuwiki-stable.tgz
sudo tar xvf dokuwiki-stable.tgz -C /var/www/html/
sudo mv /var/www/html/dokuwiki-* /var/www/html/dokuwiki
Set the appropriate permissions for the DokuWiki directory:
sudo chown -R www-data:www-data /var/www/html/dokuwiki
sudo chmod -R 755 /var/www/html/dokuwiki
Step 5: Configure Apache for DokuWiki
Create a new Apache configuration file for DokuWiki:
sudo nano /etc/apache2/sites-available/dokuwiki.confAdd the following configuration, replacing your_domain.com with your actual domain name:
<VirtualHost *:80>
    ServerName your_domain.com
    ServerAdmin webmaster@localhost
    DocumentRoot /var/www/html/dokuwiki

    <Directory /var/www/html/dokuwiki>
        Options FollowSymLinks
        AllowOverride All
        Require all granted
    </Directory>

    ErrorLog ${APACHE_LOG_DIR}/error.log
    CustomLog ${APACHE_LOG_DIR}/access.log combined
</VirtualHost>
Save and close the file. Then, enable the new site configuration and disable the default Apache configuration:
sudo a2ensite dokuwiki.conf
sudo a2dissite 000-default.conf
sudo systemctl restart apache2
Step 6: Secure DokuWiki with Let’s Encrypt SSL
To ensure secure communication between users and your DokuWiki installation, let’s set up SSL using Let’s Encrypt.
First, install Certbot:
sudo apt install certbot python3-certbot-apache -yNow, obtain and install an SSL certificate:
sudo certbot --apache -d your_domain.comFollow the prompts to complete the certificate installation. Certbot will automatically update your Apache configuration to use HTTPS.
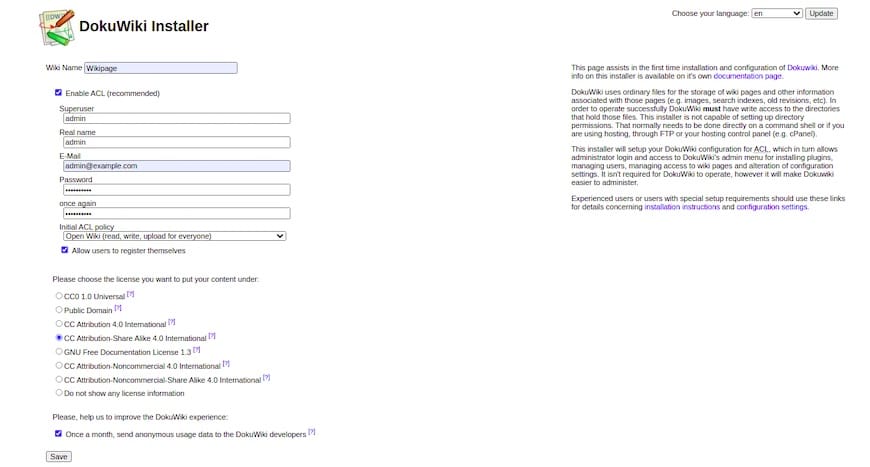
Step 7: Complete DokuWiki Installation via Web Interface
With the server configuration complete, it’s time to finish the DokuWiki installation through the web interface.
Open your web browser and navigate to https://your_domain.com/install.php. You’ll see the DokuWiki installation page. Fill in the required information:
- Wiki Name: Choose a name for your wiki
- Superuser: Create an admin username
- Real Name: Enter your full name
- E-Mail: Provide your email address
- Password: Set a strong password for the admin account
- Initial ACL Policy: Choose between Open Wiki, Public Wiki, or Closed Wiki
After filling in the details, click “Save” to complete the installation.

Step 8: Post-installation Security and Configuration
To enhance the security of your DokuWiki installation, follow these additional steps:
1. Remove the install.php file:
sudo rm /var/www/html/dokuwiki/install.php2. Configure access control by editing the conf/acl.auth.php file:
sudo nano /var/www/html/dokuwiki/conf/acl.auth.phpAdjust the permissions according to your needs. For example:
*               @ALL          1
*               @user         8
*               @admin        16
This configuration grants read access to all users, edit access to registered users, and full access to admins.
3. Enable and configure the authentication backend by editing conf/local.php:
sudo nano /var/www/html/dokuwiki/conf/local.phpAdd or modify the following lines:
$conf['authtype'] = 'authplain';
$conf['superuser'] = '@admin';
Troubleshooting Common Issues
If you encounter any problems during the installation or configuration process, here are some common issues and their solutions:
1. Permission Errors
If you see permission errors, ensure that the web server has the correct ownership and permissions for the DokuWiki directory:
sudo chown -R www-data:www-data /var/www/html/dokuwiki
sudo chmod -R 755 /var/www/html/dokuwiki
2. PHP Extensions Missing
If DokuWiki complains about missing PHP extensions, install them using:
sudo apt install php-{extension_name}Replace {extension_name} with the required extension (e.g., xml, gd, json, mbstring).
3. Apache Not Serving DokuWiki
If Apache isn’t serving your DokuWiki installation, check the Apache configuration and ensure the virtual host is set up correctly. You can also check the Apache error logs:
sudo tail -f /var/log/apache2/error.logCongratulations! You have successfully installed DokuWiki. Thanks for using this tutorial for installing the DokuWiki with LAMP on Ubuntu 24.04 LTS system. For additional help or useful information, we recommend you check the DokuWiki website.