How To Install Gitea on Fedora 40

In this tutorial, we will show you how to install Gitea on Fedora 40. Gitea is a lightweight, open-source, self-hosted Git service that provides a user-friendly interface for managing repositories, collaborating with team members, and streamlining your development workflow. With its low resource requirements and easy installation process, Gitea is an ideal solution for individuals and organizations looking to set up their own Git hosting platform.
This article assumes you have at least basic knowledge of Linux, know how to use the shell, and most importantly, you host your site on your own VPS. The installation is quite simple and assumes you are running in the root account, if not you may need to add ‘sudo‘ to the commands to get root privileges. I will show you the step-by-step installation of the Gitea on a Fedora 40.
Prerequisites
Before we dive into the installation process, ensure that you have the following prerequisites in place:
- A server running one of the following operating systems: Fedora 40.
- It’s recommended that you use a fresh OS install to prevent any potential issues.
- You will need access to the terminal to execute commands. Fedora 40 provides the Terminal application for this purpose. It can be found in your Applications menu.
- A stable internet connection to download the necessary packages.
- A non-root sudo user or access to the root user. We recommend acting as a non-root sudo user, however, as you can harm your system if you’re not careful when acting as the root.
Install Gitea on Fedora 40
Step 1. Update the System.
To ensure a smooth installation and minimize potential issues, it’s crucial to update your Fedora 40 system to the latest stable version. Open a terminal and execute the following command:
sudo dnf clean all
sudo dnf update
This command will fetch and install any available updates for your system packages, providing you with the most recent bug fixes, security patches, and performance improvements.
Step 2. Installing Dependencies.
Gitea relies on a few dependencies to function properly. Install the required packages by running the following command:
sudo dnf install git wget curl
This command will install Git, wget, and curl on your system. Git is essential for version control and repository management, while wget and curl are useful tools for downloading files and making HTTP requests.
Step 3. Installing Gitea on Fedora 40.
First, visit the official Gitea website and navigate to the downloads page. Locate the latest Linux x86-64 binary release and copy the download link:
wget https://dl.gitea.com/gitea/1.21.4/gitea-1.21.4-linux-amd64
Make the downloaded binary executable:
chmod +x gitea
Move the Gitea binary to a global path for easy access:
sudo mv gitea /usr/local/bin/gitea
Step 4. Create a System User for Gitea.
To enhance security and isolate Gitea’s processes, create a dedicated system user and group for Gitea:
sudo adduser --system --shell /bin/bash --group --disabled-password --home /home/gitea gitea
This command creates a new user named “gitea” with a home directory at “/home/gitea“. The user is set up as a system account with a disabled password and a default shell of “/bin/bash“.
Step 5. Configure Gitea Directories.
Create the necessary directories for Gitea and set the appropriate ownership and permissions:
sudo mkdir -p /var/lib/gitea/{custom,data,log}
Set ownership of the directories to the “gitea” user and group:
sudo chown -R gitea:gitea /var/lib/gitea
Set the appropriate permissions for the directories:
sudo chmod -R 750 /var/lib/gitea
Create a directory for Gitea’s configuration file:
sudo mkdir /etc/gitea
Set ownership and permissions for the configuration directory:
sudo chown root:gitea /etc/gitea
sudo chmod 770 /etc/gitea
These steps ensure that Gitea has the necessary directories and permissions to store its data, logs, and configuration files securely.
Step 6. Create a Systemd Service File.
To manage Gitea as a system service, create a systemd service file:
sudo nano /etc/systemd/system/gitea.service
Add the following content to the file:
[Unit]
Description=Gitea (Git with a cup of tea)
After=syslog.target
After=network.target

[Service]
RestartSec=2s
Type=simple
User=gitea
Group=gitea
WorkingDirectory=/var/lib/gitea/
ExecStart=/usr/local/bin/gitea web -c /etc/gitea/app.ini
Restart=always
Environment=USER=gitea HOME=/home/gitea GITEA_WORK_DIR=/var/lib/gitea

[Install]
WantedBy=multi-user.target
Save the file and exit the text editor.
To start Gitea and ensure that it runs automatically on system startup, use the following commands:
sudo systemctl daemon-reload
Enable the Gitea service to start automatically on boot:
sudo systemctl enable gitea
Start the Gitea service:
sudo systemctl start gitea
Verify that the Gitea service is running correctly:
sudo systemctl status gitea
Step 7. Set Up Nginx as a Reverse Proxy.
To access Gitea through a web server, set up Nginx as a reverse proxy:
sudo dnf install nginx
Create a new Nginx configuration file for Gitea:
sudo nano /etc/nginx/conf.d/gitea.conf
Add the following content to the file:
server {
    listen 80;
    server_name example.com;

    location / {
        proxy_pass http://localhost:3000;
        include /etc/nginx/proxy_params;
    }
}
Save the file and exit the text editor, then test the Nginx configuration for syntax errors:
nginx -t
Reload Nginx to apply the changes:
sudo systemctl reload nginx
Step 8. Configure Firewall.
To allow access to Gitea through the firewall, open the necessary ports:
sudo firewall-cmd --permanent --zone=public --add-service=http
sudo firewall-cmd --permanent --zone=public --add-service=https
Reload the firewall to apply the changes:
sudo firewall-cmd --reload
Step 9. Accessing Gitea Web Interface.
Open a web browser and navigate to your Gitea instance using the domain name or server IP address (e.g., http://example.com).
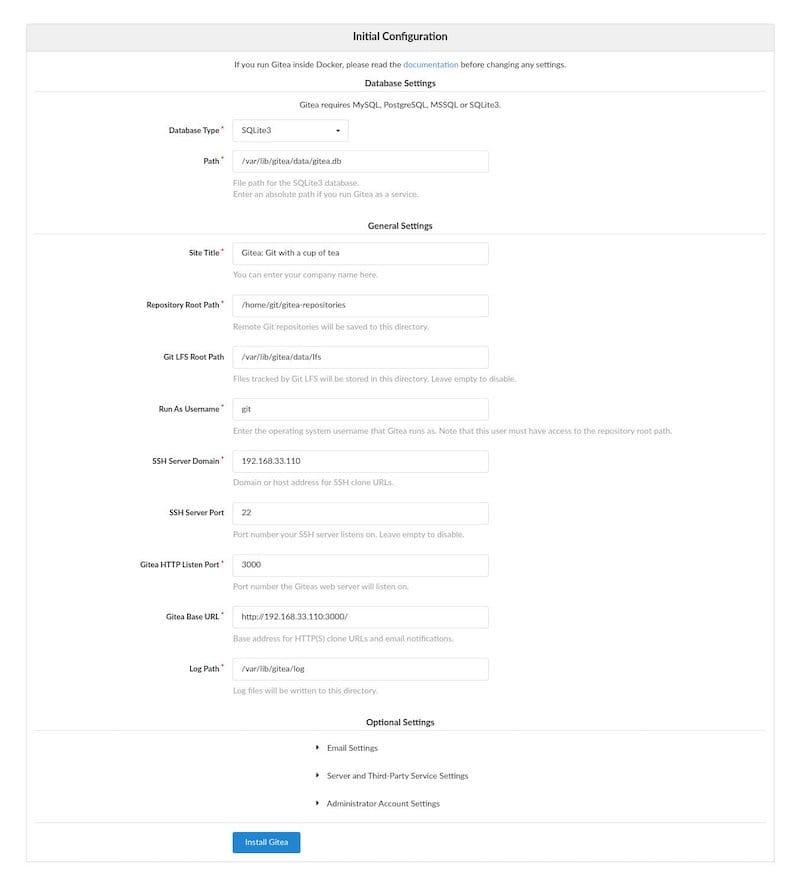
You will be greeted with the Gitea installation page. Fill in the required information, such as the database settings, admin account details, and repository root path.

Congratulations! You have successfully installed Gitea. Thanks for using this tutorial for installing the Gitea on your Fedora 40 system. For additional or useful information, we recommend you check the official Gitea website.