How To Install Gitea on Ubuntu 24.04 LTS

In this tutorial, we will show you how to install Gitea on Ubuntu 24.04 LTS. Gitea is a powerful, open-source, self-hosted Git service that provides a user-friendly interface for managing repositories, collaborating with team members, and streamlining your development workflow. With its lightweight design and cross-platform compatibility, Gitea is an excellent choice for individuals and organizations looking to host their own Git service without the complexity and resource overhead of other solutions.
This article assumes you have at least basic knowledge of Linux, know how to use the shell, and most importantly, you host your site on your own VPS. The installation is quite simple and assumes you are running in the root account, if not you may need to add ‘sudo‘ to the commands to get root privileges. I will show you the step-by-step installation of the Gitea on Ubuntu 24.04 (Noble Numbat). You can follow the same instructions for Ubuntu 22.04 and any other Debian-based distribution like Linux Mint, Elementary OS, Pop!_OS, and more as well.
Prerequisites
- A server running one of the following operating systems: Ubuntu and any other Debian-based distribution like Linux Mint.
- It’s recommended that you use a fresh OS install to prevent any potential issues.
- SSH access to the server (or just open Terminal if you’re on a desktop).
- An active internet connection. You’ll need an internet connection to download the necessary packages and dependencies.
- An Ubuntu 24.04 system with root access or a user with sudo privileges.
Install Gitea on Ubuntu 24.04 LTS Noble Numbat
Step 1. Updating the Package Repository.
First, update and upgrade all system packages to the latest versions. This ensures that you have the most recent security updates and software versions.
sudo apt update
sudo apt upgrade
These commands will update the package lists and upgrade any installed packages to their latest versions.
Step 2. Installing Dependency Packages.
To install the necessary packages, run the following commands:
sudo apt update
sudo apt install git sqlite3 nginx
Verify the Git installation by checking its version:
git --version
Step 3. Create a Dedicated Git User.
To enhance security and isolate Gitea from other system processes, create a dedicated user for running Gitea:
sudo adduser --system --shell /bin/bash --gecos 'Git Version Control' --group --disabled-password --home /home/git git
This command creates a new user named “git” with a home directory at /home/git, belonging to a group also named “git“. The user is set as a system account with no password and uses /bin/bash as the default shell.
Step 4. Installing Gitea on Ubuntu 24.04.
Visit the official Gitea website and download the latest binary release suitable for your system architecture. For this guide, we’ll use the gitea-1.22.0-linux-amd64 binary:
wget https://dl.gitea.com/gitea/1.22.0/gitea-1.22.0-linux-amd64
Next, create the necessary directories for Gitea and set the appropriate permissions:
sudo mkdir -p /var/lib/gitea/{custom,data,log}
sudo chown -R git:git /var/lib/gitea/
sudo chmod -R 750 /var/lib/gitea/
sudo mkdir /etc/gitea
sudo chown root:git /etc/gitea
sudo chmod 770 /etc/gitea
These commands create the required directory structure for Gitea, assign ownership to the “git” user and group, and set the appropriate permissions for each directory.
Step 5. Configure Gitea.
To configure Gitea, you can either use the web installer or manually edit the configuration file. For this guide, we’ll use the manual method. Create a new configuration file named app.ini in the /etc/gitea directory:
sudo nano /etc/gitea/app.ini
Add the following content to the file, adjusting the values as needed:
[database]
DB_TYPE = sqlite3
PATH = /var/lib/gitea/data/gitea.db

[repository]
ROOT = /var/lib/gitea/data/repositories

[server]
APP_DATA_PATH = /var/lib/gitea/data
DOMAIN = your-domain.com
SSH_DOMAIN = your-domain.com
HTTP_PORT = 3000
ROOT_URL = https://your-domain.com/
DISABLE_SSH = false
SSH_PORT = 22
SSH_LISTEN_PORT = 22
LFS_START_SERVER = true

[mailer]
ENABLED = false

[service]
REGISTER_EMAIL_CONFIRM = false
ENABLE_NOTIFY_MAIL = false
DISABLE_REGISTRATION = false
ENABLE_CAPTCHA = true
REQUIRE_SIGNIN_VIEW = false

[picture]
DISABLE_GRAVATAR = false

[session]
PROVIDER = file

[log]
MODE = file
LEVEL = info
ROOT_PATH = /var/lib/gitea/log
Save the file and exit the editor, then reload the systemd configuration, enable the Gitea service to start at boot, and start the service:
sudo systemctl daemon-reload
sudo systemctl enable gitea
sudo systemctl start gitea
Verify that the Gitea service is running:
sudo systemctl status gitea
If everything is set up correctly, you should see an output indicating that the Gitea service is active and running.
Step 6. Configure Nginx as a Reverse Proxy.
To access Gitea using your domain name and enable SSL/TLS, configure Nginx as a reverse proxy. Create a new Nginx configuration file for Gitea:
sudo nano /etc/nginx/sites-available/gitea
Add the following content to the file, replacing your-domain.com with your actual domain name:
server {
    listen 80;
    server_name your-domain.com;

    location / {
        proxy_pass http://localhost:3000;
        proxy_set_header Host $host;
        proxy_set_header X-Real-IP $remote_addr;
        proxy_set_header X-Forwarded-For $proxy_add_x_forwarded_for;
        proxy_set_header X-Forwarded-Proto $scheme;
    }
}
Save the file and exit the editor, then enable the Nginx configuration by creating a symbolic link:
sudo ln -s /etc/nginx/sites-available/gitea /etc/nginx/sites-enabled/
Test the Nginx configuration for syntax errors:
sudo nginx -t
If no errors are reported, restart Nginx to apply the changes:
sudo systemctl restart nginx
Step 7. Secure Gitea with SSL/TLS.
To secure your Gitea installation with SSL/TLS certificates, install Certbot and obtain a Let’s Encrypt certificate:
sudo apt install certbot python3-certbot-nginx
Run Certbot to obtain and configure the SSL/TLS certificate for your domain:
sudo certbot --nginx -d your-domain.com
Follow the prompts to provide an email address and agree to the Let’s Encrypt terms of service. Choose whether to redirect HTTP traffic to HTTPS when prompted.
Step 8. Access the Gitea Web Interface.
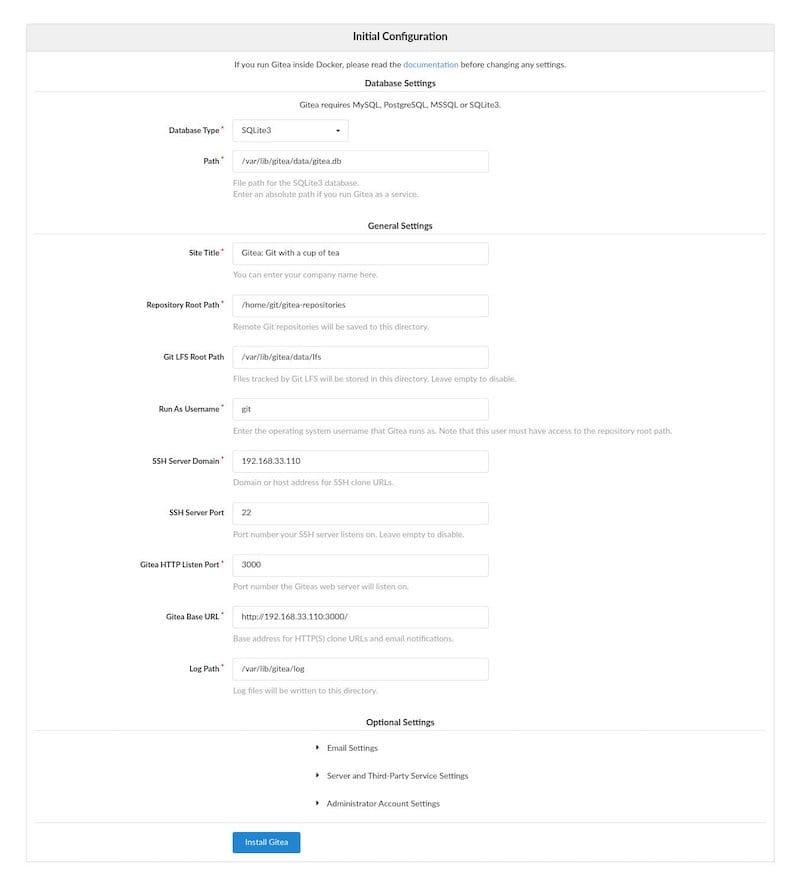
Open a web browser and navigate to your domain name (e.g., https://your-domain.com). You should be greeted with the Gitea installation page.

Fill in the required information, such as the database settings (which should be pre-populated based on your app.ini configuration), admin account details, and any other relevant settings.
Congratulations! You have successfully installed Gitea. Thanks for using this tutorial for installing the Gitea on the Ubuntu 24.04 LTS system. For additional help or useful information, we recommend you check the Gitea website.