How To Install GNS3 on Debian 12

In this tutorial, we will show you how to install GNS3 on Debian 12. GNS3 (Graphical Network Simulator-3) is a powerful network simulation software that allows users to design, configure, and test complex network topologies in a virtual environment. It is an essential tool for network engineers, students, and enthusiasts who want to gain hands-on experience with various network devices and protocols without the need for physical hardware.
This article assumes you have at least basic knowledge of Linux, know how to use the shell, and most importantly, you host your site on your own VPS. The installation is quite simple and assumes you are running in the root account, if not you may need to add ‘sudo‘ to the commands to get root privileges. I will show you the step-by-step installation of the GNS3 on Debian 12 (Bookworm).
Prerequisites
Before proceeding with the installation of GNS3 on Debian 12, ensure you meet the following requirements:
- A server running one of the following operating systems: Debian 12 (Bookworm).
- It’s recommended that you use a fresh OS install to prevent any potential issues.
- SSH access to the server (or just open Terminal if you’re on a desktop).
- An active internet connection. You’ll need an internet connection to download the necessary packages and dependencies.
- A user account with sudo privileges to execute administrative commands.
Install GNS3 on Debian 12 Bookworm
Step 1. Before proceeding with the GNS3 installation, it’s crucial to update your Debian 12 system to ensure you have the latest security patches and bug fixes. Open a terminal and run the following commands:
sudo apt update
sudo apt upgrade
Step 2. Installing Necessary Dependencies.
GNS3 requires several dependencies to function properly. Install the following packages using the apt package manager:
sudo apt install python3 python3-pip python3-pyqt5 python3-pyqt5.qtsvg python3-pyqt5.qtwebsockets \
qemu qemu-kvm qemu-utils libvirt-clients libvirt-daemon-system virtinst \
wireshark ubridge cpulimit dynamips
These packages include Python, Qt, QEMU, Dynamips, and other essential libraries and tools.
Step 3. Installing GNS3 on Debian 12.
GNS3 maintains a Personal Package Archive (PPA) repository for easy installation on Debian-based systems. Add the GNS3 PPA by running the following command:
sudo add-apt-repository ppa:gns3/ppa
After adding the PPA, update the package list to include the newly added repository:
sudo apt update
Install the GNS3 server and GUI packages using the following command:
sudo apt install gns3-server gns3-gui
Step 4. Launching GNS3 on Debian.
Once successfully installed, open a terminal and run the following command to launch GNS3:
gns3
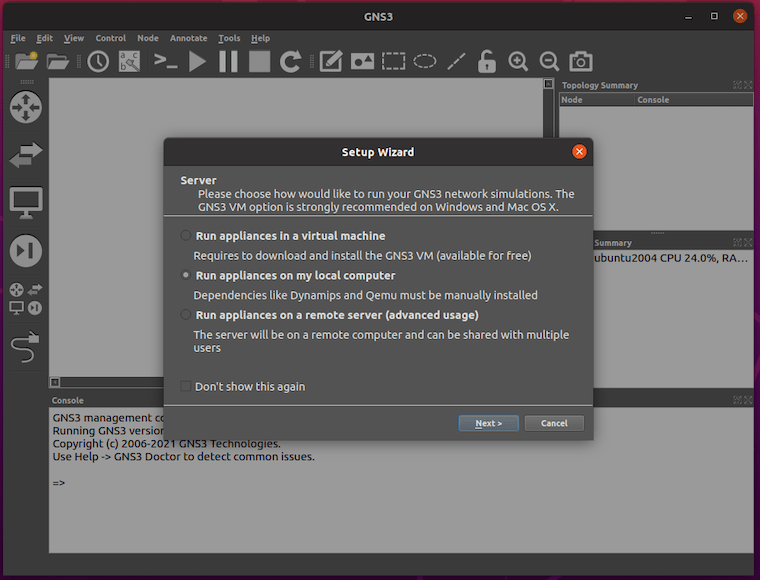
Follow the prompts in the setup wizard. When asked about the “Server type,” select the “Run appliances in a virtual machine” option to utilize the GNS3 VM.

Step 5. Troubleshooting Common Issues
During the installation and usage of GNS3, you may encounter some common issues. Here are a few troubleshooting tips:
- “uBridge requires root permissions” error: If you encounter this error, make sure you have added your user to the
ubridgegroup as mentioned in the installation steps. Log out and log back in for the changes to take effect. - “Could not connect to the local server” issue: This error occurs when GNS3 fails to connect to the local server. Ensure that the local server is enabled in the GNS3 preferences and that the specified port is not being used by any other application.
- “Dynamips failed to allocate memory” error: This error indicates insufficient memory allocation for the Dynamips emulator. Increase the available RAM for the GNS3 VM or adjust the appliance settings to allocate more RAM to the specific device.
- Missing dependencies or package conflicts: If you encounter issues related to missing dependencies or package conflicts, double-check that you have installed all the necessary packages mentioned in the prerequisites section. If the issue persists, try updating the packages to their latest versions.
Congratulations! You have successfully installed GNS3. Thanks for using this tutorial to install the latest version of the GNS3 on Debian 12 Bookworm. For additional help or useful information, we recommend you check the official GNS3 website.