How To Install Iotop on Ubuntu 22.04 LTS

In this tutorial, we will show you how to install Iotop on Ubuntu 22.04 LTS. In the realm of system monitoring, iotop is a powerful tool that every Linux user should be familiar with. This utility allows you to monitor real-time disk I/O usage details and provides a bird’s eye view of how your system interacts with your storage devices.
This article assumes you have at least basic knowledge of Linux, know how to use the shell, and most importantly, you host your site on your own VPS. The installation is quite simple and assumes you are running in the root account, if not you may need to add ‘sudo‘ to the commands to get root privileges. I will show you the step-by-step installation of the iotop monitor disk activity on Ubuntu 22.04. You can follow the same instructions for Ubuntu 22.04 and any other Debian-based distribution like Linux Mint, Elementary OS, Pop!_OS, and more as well.
Prerequisites
- A server running one of the following operating systems: Ubuntu 22.04, 20.04, and any other Debian-based distribution like Linux Mint.
- It’s recommended that you use a fresh OS install to prevent any potential issues.
- Access the terminal on your Ubuntu system, where we’ll execute the commands for a seamless Roundcube installation.
- An active internet connection. You’ll need an internet connection to download the necessary packages and dependencies for Iotop.
- A
non-root sudo useror access to theroot user. We recommend acting as anon-root sudo user, however, as you can harm your system if you’re not careful when acting as the root.
Install Iotop on Ubuntu 22.04 LTS Jammy Jellyfish
Step 1. Updating Your Ubuntu System.
Keeping your system updated is a crucial aspect of maintaining a secure and stable operating environment. To update your system, open your terminal and type the following commands:
sudo apt update
sudo apt upgrade
Step 2. Installing iotop on Ubuntu 22.04.
Once your system is updated, you can proceed to install iotop. Use the following command to install iotop:
sudo apt install iotop
The system will prompt you to confirm the installation. Press ‘Y‘ to proceed.
Step 3. Launching iotop on Ubuntu.
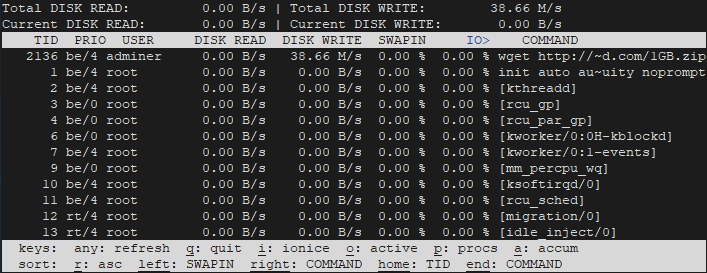
To launch iotop, simply type iotop in your terminal. You’ll be greeted with a real-time display of your system’s I/O usage.

The iotop interface is divided into several columns, each representing different information about your system’s I/O usage. Here’s a quick rundown:
- PID: The process ID
- User: The user running the process
- Disk Read/Write: The amount of data the process has read/written
- Swapin: The percentage of time the process spent swapping in and waiting on I/O
- IO: The percentage of time the process spent on I/O
Step 4. Using iotop for System Monitoring.
- Basic Usage of iotop
To monitor real-time I/O usage, simply run iotop. The display will update every second, providing a real-time view of your system’s I/O usage.
- Advanced Usage of iotop
For more detailed information, you can use iotop with different options and flags. For example, iotop -o will only show processes that are currently doing I/O. iotop -b will run iotop in batch mode, useful for logging I/O usage.
Congratulations! You have successfully installed iotop monitoring. Thanks for using this tutorial for installing the iotop monitor disk activity on the Ubuntu system. For additional help or useful information, we recommend you check the official Iotop website.