How To Install iTunes on Ubuntu

In this tutorial, we will show you how to install iTunes on Ubuntu. iTunes, the popular media player and digital content management software developed by Apple has long been a staple for many music and podcast enthusiasts. However, for Ubuntu users, the lack of a native iTunes application can be a significant inconvenience. Fortunately, with the help of Wine, a compatibility layer that allows Windows applications to run on Unix-like operating systems, it is possible to install and use iTunes on Ubuntu.
In this comprehensive guide, we will walk you through the process of installing iTunes on Ubuntu, from setting up Wine to configuring iTunes for optimal performance. We will also cover basic usage, syncing devices, and troubleshooting common issues. By the end of this article, you will have a fully functional iTunes setup on your Ubuntu system, ready to manage your media library and sync your devices.
Prerequisites
- A server running one of the following operating systems: Ubuntu and any other Debian-based distribution like Linux Mint.
- It’s recommended that you use a fresh OS install to prevent any potential issues.
- SSH access to the server (or just open Terminal if you’re on a desktop).
- An active internet connection. You’ll need an internet connection to download the necessary packages and dependencies.
- Sufficient storage space to accommodate your media files and the iTunes application.
- An Ubuntu 24.04 system with root access or a user with sudo privileges.
Install iTunes on Ubuntu
Step 1. Updating the Package Repository.
Before installing iTunes, it’s a good practice to update your system’s package list and upgrade any existing packages to their latest versions. Open a terminal and execute the following commands:
sudo apt update
sudo apt upgrade
This command will fetch the latest package information from the Ubuntu repositories, allowing you to install the most recent version of Wine and its dependencies. Updating the package repository is crucial to maintaining the security and stability of your system.
Step 2. Installing Wine on Ubuntu
Wine, an acronym for “Wine Is Not an Emulator,” is a crucial component in our quest to install iTunes on Ubuntu. Wine allows Windows applications to run on Unix-like operating systems, including Linux distributions such as Ubuntu. Let’s dive into the installation process step by step.
To install the latest stable version of Wine, you need to add the WineHQ repository to your Ubuntu sources list. Run the following commands:
sudo dpkg --add-architecture i386
wget -nc https://dl.winehq.org/wine-builds/winehq.key
sudo apt-key add winehq.key
sudo add-apt-repository 'deb https://dl.winehq.org/wine-builds/ubuntu/ focal main'
With the repository added, you can now install Wine using the following command:
sudo apt update && sudo apt install --install-recommends winehq-stable
After the installation is complete, verify that Wine is properly installed by running the following command:
wine --version
Step 4. Downloading iTunes.
Now that you have Wine installed, it’s time to download the iTunes installer. Apple provides various versions of iTunes, but for optimal compatibility with Ubuntu, we recommend using iTunes 12.8.0.150.
wget https://secure-appldnld.apple.com/itunes12/091-81692-20180709-A4DF288B-8929-401F-AD73-4189359D8A6B/iTunes64Setup.exe
Step 4. Configuring Wine for iTunes.
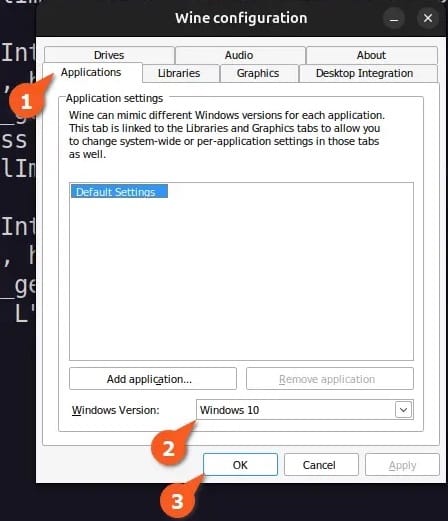
Before installing iTunes, it’s recommended to configure Wine to ensure optimal compatibility with the application. Follow these steps:
winecfg
In the Wine configuration window, click on the “Applications” tab.
Click on the “Add application” button and navigate to the location where you saved the iTunes installer (iTunesSetup.exe).

In the “Version” dropdown, select “Windows 10” and click “OK” to save the changes.
Step 4. Installing iTunes on Ubuntu.
Open the Terminal and navigate to the directory where you saved the iTunes installer using the cd command. For example:
cd ~/Downloads
Run the iTunes installer using Wine:
wine iTunesSetup.exe
Follow the on-screen instructions to complete the installation process. This may include accepting the license agreement, choosing the installation location, and selecting any additional features you want to install.
Once the installation is complete, you may be prompted to configure your media library and other iTunes settings. Follow the prompts to set up your iTunes library according to your preferences.
Step 5. Using iTunes on Ubuntu.
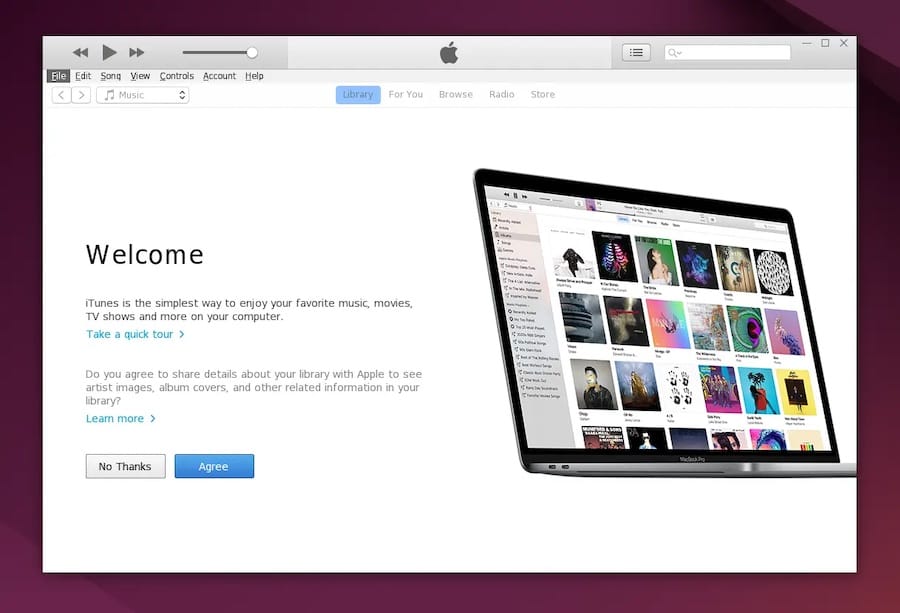
With iTunes successfully installed, it’s time to start using the application on your Ubuntu system. Let’s explore the basics of launching iTunes, navigating its interface, and syncing your devices.

Congratulations! You have successfully installed iTunes. Thanks for using this tutorial for installing the iTunes on the Ubuntu 24.04 LTS system. For additional help or useful information, we recommend you check the Ubuntu website.