In this tutorial, we will show you how to install Jenkins on AlmaLinux 8. For those of you who didn’t know, Jenkins is an open-source continuous integration tool that helps to automate the software build, testing, and deployments involved in the software development process. It is written in Java. The Jenkins base supports numerous tools including SVN, Ant, Maven, and JUnit. The community can add additional functions with the help of plugins. This means that Jenkins can be customized for each project. Also for projects with other languages/technologies such as B. PHP, Ruby, or .NET
This article assumes you have at least basic knowledge of Linux, know how to use the shell, and most importantly, you host your site on your own VPS. The installation is quite simple and assumes you are running in the root account, if not you may need to add ‘sudo‘ to the commands to get root privileges. I will show you through the step-by-step installation of the Jenkins on an AlmaLinux 8. You can follow the same instructions for Rocky Linux.
Prerequisites
- A server running one of the following operating systems: AlmaLinux 8, CentOS, or Rocky Linux 8.
- It’s recommended that you use a fresh OS install to prevent any potential issues.
- A
non-root sudo useror access to theroot user. We recommend acting as anon-root sudo user, however, as you can harm your system if you’re not careful when acting as the root.
Install Jenkins on AlmaLinux 8
Step 1. First, let’s start by ensuring your system is up-to-date.
sudo dnf update
sudo dnf install epel-release
Step 2. Installing Java.
Jenkins requires Java JRE v8 or v11. So, install Java using the command below:
sudo dnf install java-11-openjdk
Verify the Java version:
java --version
Step 3. Installing Jenkins on AlmaLinux 8.
Now we add the Jenkins repository to your AlmaLinux/Rocky Linux. First, import the Jenkins key to the system:
rpm --import https://pkg.jenkins.io/redhat-stable/jenkins.io.key
Next, add create the repository:
cd /etc/yum.repos.d/
curl -O https://pkg.jenkins.io/redhat-stable/jenkins.repo
Then, install Jenkins using the following command:
sudo dnf makecache
sudo dnf install jenkins
Once installed, start and verify the status of Jenkins by executing the commands:
sudo systemctl start jenkins
sudo systemctl status jenkins
Step 4. Configure Firewall.
Configure the FirewallD to allow external machines to access the Jenkins:
sudo firewall-cmd --permanent --add-port=8080/tcp
sudo firewall-cmd --reload
Step 5. Create Admin Password.
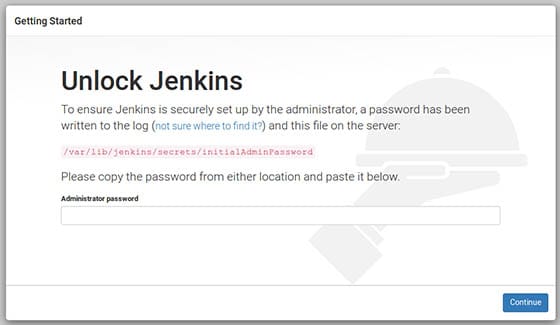
Jenkins will create a password for the Admin user, to find that runt the below command and then copy the same:
sudo cat /var/lib/jenkins/secrets/initialAdminPassword
Step 6. Accessing Jenkins Web Interface.
Once complete step installation, open a browser either on your local system or on any other system that can access the IP address of the system where the Jenkins server has been installed:
http://server-ip-address:8080

Congratulations! You have successfully installed Jenkins. Thanks for using this tutorial for installing Jenkins on your AlmaLinux 8 system. For additional help or useful information, we recommend you check the official Jenkins website.