How To Install Jenkins on Manjaro

In this tutorial, we will show you how to install Jenkins on Manjaro. Jenkins, an open-source automation server, is a vital tool in the realm of continuous integration and continuous delivery (CI/CD). Its power lies in its ability to streamline and automate various aspects of the software development lifecycle, from building and testing code to deploying applications. If you’re a Manjaro Linux user looking to harness the capabilities of Jenkins, you’re in the right place.
This article assumes you have at least basic knowledge of Linux, know how to use the shell, and most importantly, you host your site on your own VPS. The installation is quite simple and assumes you are running in the root account, if not you may need to add ‘sudo‘ to the commands to get root privileges. I will show you the step-by-step installation of Jenkins on a Manjaro Linux.
Prerequisites
- A server or desktop running one of the following operating systems: Manjaro, and other Arch-based distributions.
- It’s recommended that you use a fresh OS install to prevent any potential issues.
- SSH access to the server (or just open Terminal if you’re on a desktop).
- An active internet connection. You’ll need an internet connection to download the necessary packages and dependencies for Jenkins.
- A
non-root sudo useror access to theroot user. We recommend acting as anon-root sudo user, however, as you can harm your system if you’re not careful when acting as the root.
Install Jenkins on Manjaro
Step 1. Before diving into the Jenkins installation, it’s crucial to make sure your Manjaro system is up to date. Open a terminal and execute the following commands:
sudo pacman -Syu
sudo pacman -S base-devel
Step 2. Installing Java Development Kit (JDK).
Jenkins runs on Java, so we need to ensure that the Java Development Kit (JDK) is installed. Execute the following command to install OpenJDK, a free and open-source implementation of the Java Platform:
sudo pacman -S jdk-openjdk
Step 3. Installing Jenkins on Manjaro.
To install Jenkins on Manjaro, we’ll need to add the Jenkins repository to our package manager. You can do this by running the following command:
echo -e "[jenkins]\nServer = https://pkg.jenkins.io/archlinux/\$arch/" | sudo tee -a /etc/pacman.conf
Update your system’s package list using the following command:
sudo pacman -Sy
With the repository added and the GPG key imported, we can proceed to install Jenkins:
sudo pacman -S jenkins
Now that Jenkins is installed, we’ll start the Jenkins service and configure it to start automatically at boot:
sudo systemctl start jenkins
sudo systemctl enable jenkins
Step 4. Configure Firewall.
If you have a firewall enabled on your Manjaro system, you’ll need to open port 8080 to allow external access to Jenkins:
sudo ufw allow 8080/tcp
This command adds a rule to the Uncomplicated Firewall (UFW) to permit incoming traffic on port 8080.
Step 5. Accessing Jenkins Web UI.
With Jenkins installed and configured, it’s time to access the Jenkins web interface and complete the setup. Open your preferred web browser and navigate to the following URL:
http://localhost:8080
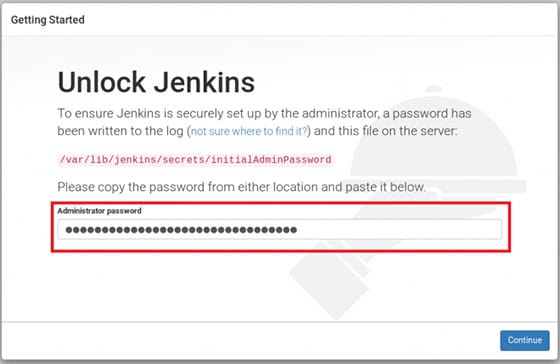
Upon accessing the URL, you’ll be greeted with a page asking for an initial admin password. To obtain this password, open your terminal and run:
sudo cat /var/lib/jenkins/secrets/initialAdminPassword

Congratulations! You have successfully installed Jenkins. Thanks for using this tutorial to install the latest version of Jenkins on the Manjaro system. For additional help or useful information, we recommend you check the official Jenkins website.