How To Install Jenkins on openSUSE

In this tutorial, we will show you how to install Jenkins on openSUSE. Jenkins is a popular open-source automation server that helps developers and DevOps teams streamline their continuous integration and continuous delivery (CI/CD) pipelines. It offers a wide range of plugins and integrations, making it a versatile tool for building, testing, and deploying software projects. openSUSE, on the other hand, is a stable and user-friendly Linux distribution known for its reliability and flexibility.
This article assumes you have at least basic knowledge of Linux, know how to use the shell, and most importantly, you host your site on your own VPS. The installation is quite simple and assumes you are running in the root account, if not you may need to add ‘sudo‘ to the commands to get root privileges. I will show you the step-by-step installation of the Jenkins open-source automation server on openSUSE.
Prerequisites
- A server running one of the following operating systems: openSUSE (Leap or Tumbleweed)
- Familiarity with basic Linux commands and openSUSE’s package management system (
zypper) is also beneficial, as you’ll be interacting with the command line during the installation process. - You will need access to the terminal to execute commands. openSUSE provides the Terminal application for this purpose. It can be found in your Applications menu.
- You’ll need an active internet connection to download Jenkins and its dependencies.
- You’ll need administrative (root) access or a user account with sudo privileges.
Install Jenkins on openSUSE
Step 1. Update the package repositories to ensure you have access to the latest software versions:
sudo zypper refresh
sudo zypper update
Step 2. Installing Jenkins on openSUSE.
To ensure the authenticity and integrity of the Jenkins packages, we’ll start by importing the Jenkins repository key. This key is used to verify the digital signature of the packages, providing an additional layer of security. To import the key, open a terminal and execute the following command:
sudo rpm --import https://pkg.jenkins.io/redhat-stable/jenkins.io.key
This command retrieves the Jenkins repository key from the official Jenkins website and imports it into your system’s RPM keyring. By importing the key, you establish trust between your system and the Jenkins repository, ensuring that the packages you install are genuine and have not been tampered with.
By default, openSUSE does not include Jenkins packages in its standard repositories. To make Jenkins available for installation, we need to add the Jenkins repository to our system. Depending on your preference, you can choose between the stable or nightly builds of Jenkins. The stable repository provides well-tested and reliable versions of Jenkins, suitable for production environments. On the other hand, the nightly repository offers the latest features and bug fixes but may be less stable and more prone to issues.
To add the Jenkins stable repository, run the following command:
sudo zypper addrepo -f https://pkg.jenkins.io/opensuse-stable jenkins
If you prefer to use the nightly builds, use this command instead:
sudo zypper addrepo -f https://pkg.jenkins.io/opensuse jenkins
With the Jenkins repository added to your system, you’re now ready to install the Jenkins package. To do so, simply run the following command:
sudo zypper install jenkins
Once the installation is complete, you’ll find the Jenkins files and directories located in the /var/lib/jenkins directory, which serves as the Jenkins home directory. This directory stores all the Jenkins configuration files, job definitions, and build artifacts.
To manage the Jenkins service, you can use the following commands:
### To start Jenkins ###
sudo systemctl start jenkins

### To stop Jenkins ###
sudo systemctl stop jenkins

### To restart Jenkins ###
sudo systemctl restart jenkins
These commands allow you to control the Jenkins service using the systemd init system, which is the default init system in openSUSE.
Step 4. Accessing Jenkins Web UI.
To access the Jenkins web interface, open a web browser and navigate to http://localhost:8080. If you’re accessing Jenkins from a remote machine, replace localhost with the IP address or domain name of your openSUSE server.
On your first visit to the Jenkins web interface, you’ll be prompted to complete the initial setup wizard. This wizard will guide you through the process of creating an admin user and configuring basic settings.
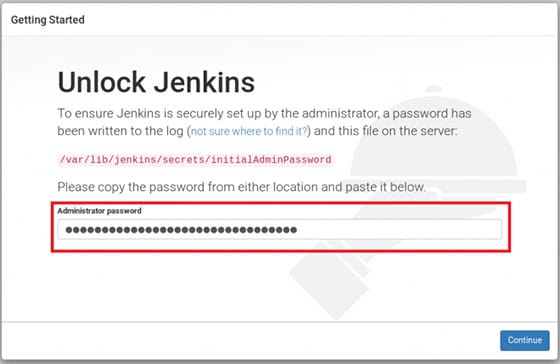
As part of the initial setup, you’ll need to provide an initial admin password to unlock Jenkins. This password is generated automatically during the installation and stored in a file on your system. To retrieve the password, run the following command:
sudo cat /var/lib/jenkins/secrets/initialAdminPassword

Copy the password displayed in the terminal and paste it into the “Administrator password” field in the Jenkins web interface.
Congratulations! You have successfully installed Jenkins. Thanks for using this tutorial for installing Jenkins on your openSUSE system. For additional or useful information, we recommend you check the official Jenkins website.