How To Install Jira on Ubuntu 24.04 LTS

Jira, developed by Atlassian, is a powerful project management tool widely used by teams across various industries. Its robust features for issue tracking, agile project management, and workflow customization make it an invaluable asset for organizations of all sizes. In this comprehensive guide, we’ll walk you through the process of installing Jira on Ubuntu 24.04, ensuring you have a smooth setup experience.
Prerequisites
Before diving into the installation process, it’s crucial to ensure your system meets the necessary requirements. This preparation will help avoid potential roadblocks and ensure a successful Jira installation.
System Requirements
- Hardware: A minimum of 4GB RAM (8GB recommended for better performance), dual-core CPU, and at least 20GB of free disk space.
- Operating System: Ubuntu 24.04 LTS (Long Term Support) installed and updated.
- Software: Java 11 or later, and a database server (MySQL 5.7+ or PostgreSQL 10+).
User Permissions
To perform the installation tasks, you’ll need root or sudo privileges on your Ubuntu system. This allows you to install packages, modify system configurations, and set up services.
Step 1: Update System and Install Dependencies
Begin by ensuring your Ubuntu system is up-to-date and has all the necessary dependencies installed. This step is crucial for maintaining system security and ensuring compatibility with Jira.
Update System Packages
Open a terminal and run the following commands:
sudo apt update
sudo apt upgrade -y
These commands update the package lists and upgrade all installed packages to their latest versions.
Install Required Dependencies
Next, install the essential packages that Jira depends on:
sudo apt install wget unzip fontconfig -yThis command installs wget (for downloading files), unzip (for extracting compressed files), and fontconfig (for font management).
Step 2: Install Java
Jira requires Java to run. We’ll install OpenJDK, an open-source implementation of the Java Platform.
Java Installation
First, check if Java is already installed:
java -versionIf Java is not installed or the version is outdated, install OpenJDK 11:
sudo apt install openjdk-11-jdk -yAfter installation, verify the Java version:
java -versionYou should see output indicating Java 11 is installed.
Step 3: Install and Configure Database
Jira requires a database to store its data. You can choose between MySQL and PostgreSQL. We’ll use MySQL in this guide, but the process is similar for PostgreSQL.
Install MySQL
Install MySQL server with the following command:
sudo apt install mysql-server -ySecure MySQL Installation
Run the MySQL secure installation script to set a root password and remove insecure default settings:
sudo mysql_secure_installationFollow the prompts to set a strong root password and answer ‘Y’ to all security questions.
Create a Database for Jira
Log into MySQL as root:
sudo mysql -u root -pCreate a database and user for Jira:
CREATE DATABASE jiradb CHARACTER SET utf8mb4 COLLATE utf8mb4_bin;
CREATE USER 'jirauser'@'localhost' IDENTIFIED BY 'strong_password';
GRANT ALL PRIVILEGES ON jiradb.* TO 'jirauser'@'localhost';
FLUSH PRIVILEGES;
EXIT;
Replace ‘strong_password’ with a secure password of your choice.
Step 4: Download and Install Jira
Now that we have our environment prepared, let’s download and install Jira.
Download Jira Installer
Visit the Atlassian website to get the latest download URL for Jira Software. Use wget to download the installer:
wget https://www.atlassian.com/software/jira/downloads/binary/atlassian-jira-software-X.X.X-x64.binReplace ‘X.X.X’ with the latest version number available.
Prepare Installer for Execution
Make the installer executable:
chmod +x atlassian-jira-software-X.X.X-x64.binRun the Installer
Execute the installer with sudo:
sudo ./atlassian-jira-software-X.X.X-x64.binFollow the on-screen prompts. You can choose between express install (which uses default settings) or custom install (which allows you to specify installation directory, ports, etc.).
Step 5: Configure Jira
After installation, you’ll need to configure Jira through its web interface.
Initial Configuration via Web Interface
Open a web browser and navigate to:
http://localhost:8080If you’re accessing Jira from a different machine, replace ‘localhost‘ with your server’s IP address or domain name.

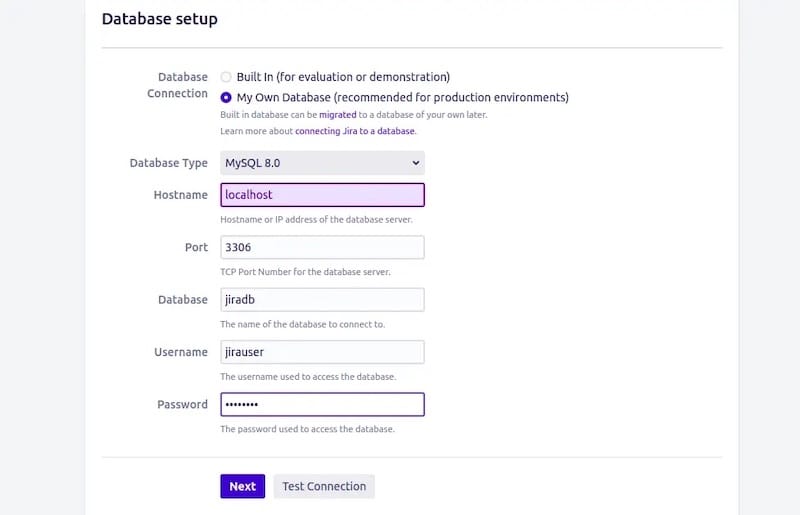
Database Connection Setup
In the setup wizard:
- Choose “I’ll set it up myself”
- Select “My Own Database” and choose MySQL
- Enter the database details:
- Database Name: jiradb
- Username: jirauser
- Password: [the password you set earlier]
- Host: localhost
- Port: 3306
- Test the connection and proceed if successful
Application Properties Configuration
Set up your application properties:
- Application Title: Choose a name for your Jira instance
- Mode: Choose between private or public mode
- Base URL: Set the URL users will use to access Jira
Step 6: Start and Access Jira
Once configuration is complete, you can start using Jira.
Start Jira Service
If Jira isn’t already running, start it with:
sudo /etc/init.d/jira startAccessing the Web Interface
Access Jira by navigating to:
http://your_server_ip:8080Replace ‘your_server_ip‘ with your actual server IP or domain name.
Troubleshooting Common Issues
Even with careful installation, you might encounter some issues. Here are solutions to common problems:
Port Conflicts
If Jira fails to start due to a port conflict, edit the server.xml file:
sudo nano /opt/atlassian/jira/conf/server.xmlChange the port number in the Connector element and restart Jira.
Database Connection Issues
If you encounter database connection problems:
- Verify MySQL is running:
sudo systemctl status mysql - Check database credentials in Jira’s configuration
- Ensure the jirauser has proper permissions on the jiradb database
Java-related Errors
If you see Java-related errors in Jira’s logs:
- Verify Java is correctly installed:
java -version - Ensure JAVA_HOME is set correctly in Jira’s configuration
Log Files for Error Diagnosis
When troubleshooting, check Jira’s log files located at:
/opt/atlassian/jira/logs/atlassian-jira.logThese logs often contain valuable information for diagnosing and resolving issues.
Congratulations! You have successfully installed Jira. Thanks for using this tutorial for installing the Jira project management tool on your Ubuntu 24.04 LTS system. For additional or useful information, we recommend you check the official Jira website.