How To Install Joomla on Linux Mint 22

Joomla stands out as one of the most popular open-source Content Management Systems (CMS), renowned for its user-friendly interface and robust feature set. Whether building a blog or a corporate website, Joomla’s flexibility and rich extension library make it a great choice for developers and beginners alike. This guide focuses on a step-by-step approach to install and configure Joomla on Linux Mint 22, ensuring a secure and optimized environment for your future projects.
Setting up a CMS on a Linux Mint system requires a solid foundation, especially if aiming for minimal downtime, dependable security, and strong performance. Every step in this guide—from system updates to administrative privileges—lays the groundwork for efficient content management. By following best practices and recommended configurations, administrators can confidently manage their Joomla site with an emphasis on reliability. Ready to bring your web development ideas to life? Read on to discover how to install Joomla on Linux Mint 22.
Prerequisites
Before attempting any major software installation, it’s crucial to confirm that the operating system and hardware meet the minimum requirements. For Linux Mint 22, ensure that you have a stable internet connection and administrator privileges, which allow you to install and configure packages. A standard Linux Mint desktop or server environment typically suits Joomla’s needs, but verifying disk space (at least a few gigabytes free for Joomla’s files and database content) is essential.
At its core, Joomla needs a LAMP stack to run smoothly. LAMP refers to Linux, Apache, MySQL/MariaDB, and PHP. While Linux Mint 22 naturally fits the Linux requirement, you still need to install Apache, configure the database server (MySQL or MariaDB), and install PHP along with any recommended extensions. Additionally, confirm that your system clock is accurate; a synced system clock helps avoid potential security or SSL certificate issues.
Finally, remember to gather login credentials for your web server and database. This includes root privileges for MySQL or MariaDB as well as sufficient permissions for the user account you’ll create for Joomla later. With these prerequisites in place, the main installation process becomes clearer and far more manageable.
Preparing the Environment
System Updates
Start by updating the system packages on Linux Mint 22. Running the latest updates not only resolves security vulnerabilities but also ensures optimal compatibility with Joomla and LAMP components. Launch a terminal window and enter:
sudo apt update && sudo apt upgrade -y
Wait until the system finishes downloading and installing all available updates. A reboot might be necessary if a kernel update occurs. Reboot your system with:
sudo reboot
Once the system restarts, log back in, open your terminal, and proceed to set up the required software.
LAMP Stack Installation
Joomla relies on a web server to deliver content, a database to store data, and PHP to run scripts. Apache remains a popular web server choice in many Linux environments, though alternatives like Nginx exist. For this tutorial, Apache is used for simplicity.
Install Apache and enable it to run on system startup:
sudo apt install apache2
sudo systemctl enable apache2
sudo systemctl start apache2
Next, install MySQL or MariaDB. MariaDB is a preferred choice in some distributions, but MySQL works just as well for Joomla.
sudo apt install mariadb-server mariadb-client
sudo systemctl enable mariadb
sudo systemctl start mariadb
To ensure PHP scripts run correctly in Joomla, install PHP with commonly used modules:
sudo apt install php php-common php-mysql php-xml php-gd php-curl php-mbstring php-zip php-intl
Verify the PHP version by entering:
php -v
If you see the correct PHP version, you’re ready to move on. Together, these components provide a solid LAMP infrastructure, forming the core environment where Joomla will reside. Double-check that Apache, MariaDB, and PHP are all functioning properly before moving forward.
Database Configuration
A properly configured database is crucial for Joomla to store and organize content. By default, MariaDB or MySQL runs with a root account that should be secured. If you haven’t already secured your installation, consider running:
sudo mysql_secure_installation
During this process, follow the prompts to set a strong password for the root user and remove any anonymous accounts or test databases.
Next, log in as the root user to create a dedicated database and user for Joomla:
sudo mysql -u root -p
After typing your password, you’ll enter the MySQL/MariaDB shell. Create a new database:
CREATE DATABASE joomla_db;
Then, create a new user with a secure password:
CREATE USER 'joomla_user'@'localhost' IDENTIFIED BY 'StrongPasswordHere';
Grant this user all privileges on the new database:
GRANT ALL PRIVILEGES ON joomla_db.* TO 'joomla_user'@'localhost';
FLUSH PRIVILEGES;
EXIT;
This combination of a specialized database and user adds a layer of security: Joomla only accesses the data it needs without direct root privileges. Always remember your chosen username and password; you’ll need them during the Joomla web-based installation. With the database successfully configured, the Joomla environment is almost set and poised for the next step: retrieving and installing Joomla itself.
Joomla Installation Process
Downloading Joomla
Before installing Joomla, ensure that you’re obtaining the official and most up-to-date release. Go to the Joomla website to check for the latest stable version. In your terminal, move into the Apache web directory, often located at /var/www/html:
cd /var/www/html
Download Joomla (replace the URL if there’s a more recent version):
wget https://downloads.joomla.org/cms/joomla5/5-2-3/Joomla_5-2-3-Stable-Full_Package.zip
The downloaded file typically arrives in a compressed format, such as a ZIP or tar.gz file. Extract the contents:
unzip Joomla_5-2-3-Stable-Full_Package.zip
If unzip is not installed, install it via:
sudo apt install unzip
Then remove the original compressed archive to keep the directory clean:
rm Joomla_5-2-3-Stable-Full_Package
After extraction, you’ll have a folder that contains all Joomla files. For simplicity, rename that folder to something more recognizable, such as joomla. This name will also reflect the URL path:
mv Joomla_5-2-3-Stable-Full_Package joomla
Web Server Configuration
Proper server configurations allow Joomla to run smoothly and respond correctly to requests. Assign the correct file permissions to grant Joomla the ability to create files and handle uploads securely:
sudo chown -R www-data:www-data /var/www/html/joomla
sudo chmod -R 755 /var/www/html/joomla
These commands allow Apache to manage the Joomla directory without giving excessive privileges to unintended users. If you plan to host Joomla on a specific domain or subdomain, it’s beneficial to set up an Apache virtual host. Create a new config file:
sudo nano /etc/apache2/sites-available/joomla.conf
Add the following content, adjusting example.com to your domain:
<VirtualHost *:80>
    ServerName example.com
    DocumentRoot /var/www/html/joomla

    <Directory /var/www/html/joomla>
        Options FollowSymLinks
        AllowOverride All
        Require all granted
    </Directory>

    ErrorLog ${APACHE_LOG_DIR}/joomla_error.log
    CustomLog ${APACHE_LOG_DIR}/joomla_access.log combined
</VirtualHost>
Save and exit, then enable the site and rewrite functionality:
sudo a2ensite joomla.conf
sudo a2enmod rewrite
sudo systemctl restart apache2
For security best practices and user trust, consider setting up HTTPS. One common way is to use a Let’s Encrypt certificate:
sudo apt install certbot python3-certbot-apache
sudo certbot --apache -d example.com
This script generates a valid SSL certificate and configures Apache to serve your Joomla site over HTTPS. HTTPS support not only helps SEO but also keeps data transfer secure.
Web-Based Installation
With the files in place and Apache properly pointing to Joomla, open a web browser and visit:
http://example.com or http://your_server_ip/joomla
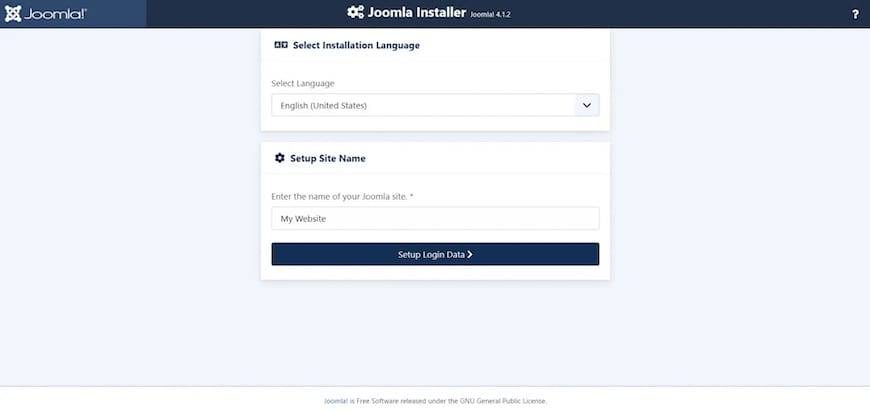
The Joomla installation wizard appears, guiding you through the setup. Provide the following information:
- Site name and description
- Admin email address
- Admin username and secure password
- Database details: the “Database Type,” “Host Name,” “User,” “Password,” and “Database Name”
Once complete, Joomla will connect to the newly created database and configure tables. After the wizard finalizes the installation, you’ll have access to Joomla’s administrator control panel, typically found at http://example.com/administrator. Log in with the credentials you provided to customize the site and install additional components.

Post-Installation Steps
Security Measures
Security remains a top priority for any website. After installation, update file permissions and ensure that your Joomla site can’t be tampered with. While 755 permissions on directories and 644 on files are standard, certain configuration directories or files might require stricter settings. If possible, move the configuration file (configuration.php) outside the webroot or update its permissions so it isn’t publicly writable.
To bolster security:
- Enable a firewall. On Linux Mint 22,
ufw(Uncomplicated Firewall) can quickly filter traffic:
sudo apt install ufw
sudo ufw allow 'Apache Full'
sudo ufw enable
- Run security scans. Check for vulnerabilities using trusted tools or plugins.
- Regularly apply updates to the server and Joomla core.
- Use strong passwords for both Joomla and system accounts.
Performance Optimization
Performance adjustments keep your Joomla site running smoothly and efficiently:
- Enable Caching: In your Joomla control panel, navigate to “System > Global Configuration > System” and activate caching. This speeds up page loads by storing frequently accessed data in memory.
- Optimize PHP Settings: Adjust
php.inifor highermemory_limitandupload_max_filesizeif your site handles large uploads or resource-hungry components. - MySQL/MariaDB Tweaks: Tweaking the
/etc/mysql/my.cnfto align with your usage can optimize memory usage and query speed. Increase query cache size or buffer pool size to match site traffic.
Administrators who prioritize performance also consider implementing a Content Delivery Network (CDN) to serve static files globally. Combining caching and optimized PHP configurations, your Joomla site will handle surges in traffic better without sacrificing response time. Consider these steps essential for a professional-grade site that retains user engagement.
Congratulations! You have successfully installed Joomla. Thanks for using this tutorial for installing the Joomla CMS on Linux Mint 22 system. For additional help or useful information, we recommend you check the Joomla website.