How To Install KDE Plasma on Ubuntu 24.04 LTS

In this tutorial, we will show you how to install KDE Plasma on Ubuntu 24.04 LTS. Ubuntu 24.04 LTS is a powerful and user-friendly Linux distribution that offers a stable and secure computing environment. One of the great aspects of using Linux is the ability to customize your desktop environment to suit your preferences and workflow. KDE Plasma is a popular and feature-rich desktop environment that provides a modern, efficient, and visually appealing interface for your Ubuntu system.
This article assumes you have at least basic knowledge of Linux, know how to use the shell, and most importantly, you host your site on your own VPS. The installation is quite simple and assumes you are running in the root account, if not you may need to add ‘sudo‘ to the commands to get root privileges. I will show you the step-by-step installation of the KDE Plasma desktop environment on Ubuntu 24.04 (Noble Numbat). You can follow the same instructions for Ubuntu 22.04 and any other Debian-based distribution like Linux Mint, Elementary OS, Pop!_OS, and more as well.
Prerequisites
- A server running one of the following operating systems: Ubuntu and any other Debian-based distribution like Linux Mint.
- It’s recommended that you use a fresh OS install to prevent any potential issues.
- SSH access to the server (or just open Terminal if you’re on a desktop).
- An active internet connection. You’ll need an internet connection to download the necessary packages and dependencies.
- An Ubuntu 24.04 system with root access or a user with sudo privileges.
Install KDE Plasma on Ubuntu 24.04 LTS
Step 1. Preparing Your System.
Before installing any new software, it’s always a good practice to update and upgrade your system to ensure you have the latest security patches, bug fixes, and compatibility improvements. Open a terminal window and run the following commands:
sudo apt update
sudo apt upgrade
The sudo apt update command refreshes the package list from the Ubuntu repositories, while sudo apt upgrade installs any available updates for your installed packages. This process may take a few minutes, depending on the number of updates available and your internet connection speed.
Step 2. Installing KDE Plasma Desktop Environment on Ubuntu 24.04.
KDE Plasma offers different package options to cater to various user needs and preferences. The three main packages are:
-
- KDE Full: This is the most comprehensive package that includes the full suite of KDE applications, utilities, and extras. It provides a complete KDE experience out of the box but may consume more disk space and system resources.
- KDE Standard: This package offers a balanced mix of essential KDE applications and components, providing a solid foundation for a KDE Plasma desktop without the extra bells and whistles.
- KDE Plasma Desktop: This is the minimal package that includes only the core KDE Plasma desktop environment and a few essential utilities. It’s ideal for users who prefer a lightweight setup and want to handpick their applications.
Now that you have chosen your desired KDE Plasma package, it’s time to proceed with the installation. In the terminal, run the following command:
sudo apt install kde-full
During the installation, you may see a lot of output in the terminal, indicating the progress and status of the package installation. Don’t worry if you see some warning messages or minor errors; these are usually normal and won’t affect the installation process.
Step 3. Select the Display Manager.
Once the KDE Plasma installation is complete, you will be prompted to select a display manager. A display manager is responsible for handling the login screen and starting the desktop environment.
KDE Plasma recommends using SDDM (Simple Desktop Display Manager) as it is lightweight, fast, and integrates well with the KDE ecosystem. When prompted, use the arrow keys to select “sddm” and press Enter to confirm your choice.
If you later decide to switch to a different display manager, you can do so by running the following command:
sudo dpkg-reconfigure sddm
This command will bring up the display manager selection prompt again, allowing you to choose a different option.
Step 4. Reboot and Log into KDE Plasma.
After selecting the display manager, it’s time to reboot your system to apply the changes and start using KDE Plasma. In the terminal, run the following command:
sudo reboot
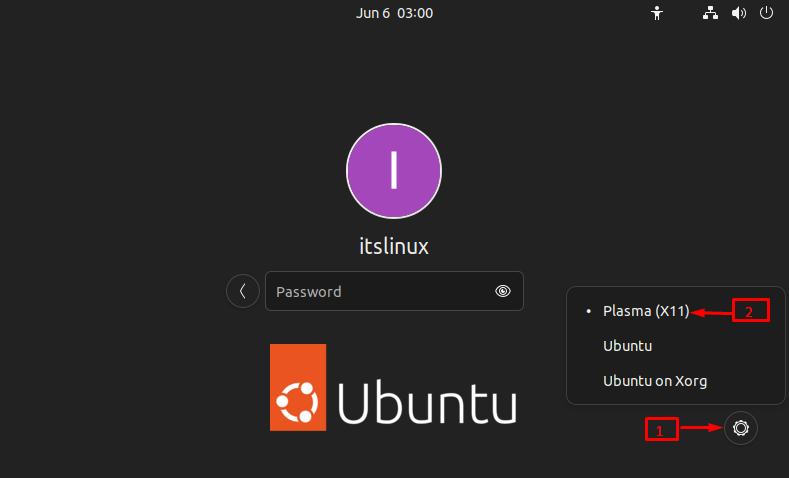
Your system will restart, and you will be presented with the login screen. By default, the login screen will display the available desktop environments, including KDE Plasma and GNOME (the default Ubuntu desktop environment).

Click on your username and select “Plasma” from the desktop environment options. Enter your password and click the login button or press Enter to log into your newly installed KDE Plasma desktop.
Congratulations! You have successfully installed KDE Plasma. Thanks for using this tutorial for installing the KDE Plasma desktop environment on the Ubuntu 24.04 LTS system. For additional help or useful information, we recommend you check the KDE Plasma website.