How To Install Kooha Screen Recorder on Linux Mint 22

In this tutorial, we will show you how to install Kooha Screen Recorder on Linux Mint 22. Screen recording has become an essential tool for content creators, educators, and IT professionals using Linux distributions. Kooha stands out as an elegant solution specifically designed for Linux users who need a straightforward screen recording application without overwhelming complexity. This comprehensive guide will walk you through installing and configuring Kooha Screen Recorder on Linux Mint 22, covering every aspect from initial setup to advanced usage techniques.
What is Kooha Screen Recorder?
Kooha is a modern, lightweight screen recording application developed specifically for Linux systems. Its name has become synonymous with simplicity in the Linux screen recording ecosystem. Unlike complex alternatives that overwhelm users with excessive options, Kooha embraces a minimalist philosophy that prioritizes ease of use without sacrificing essential functionality.
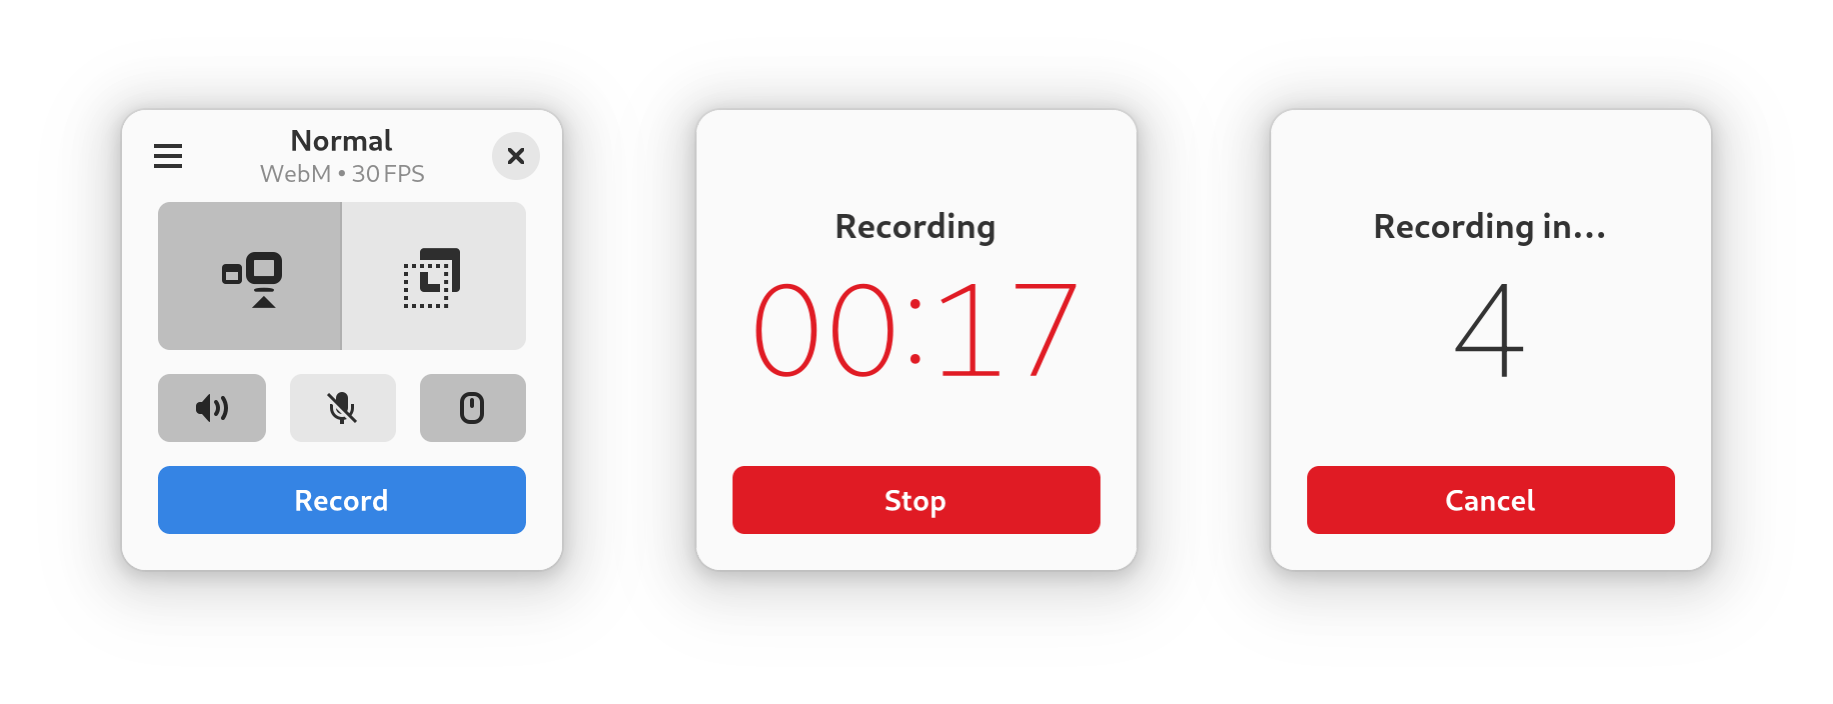
The core strength of Kooha lies in its streamlined interface that allows users to start recording immediately with minimal configuration. This screen recorder supports a variety of powerful features:
- Simultaneous recording of microphone and desktop audio
- Comprehensive format support including WebM, MP4, GIF, and Matroska formats
- Flexible recording options for capturing a specific monitor, window, or screen section
- Customizable settings for save locations, pointer visibility, frame rate, and recording delay
- Experimental hardware-accelerated encoding for improved performance
What truly sets Kooha apart is its compatibility with both X11 and Wayland display servers, ensuring it works seamlessly across modern Linux distributions including Linux Mint 22. This accessibility makes it an ideal choice for users who prioritize functionality without complexity.
Prerequisites for Installation
Before installing Kooha Screen Recorder on Linux Mint 22, ensure your system meets the necessary requirements and preparations:
System Requirements
- Linux Mint 22 (or another Debian-based distribution)
- Active internet connection
- At least 5MB of free disk space for the application (plus additional space for recordings)
- Administrator (sudo) privileges
Preparing Your System
First, update your system packages to ensure you have the latest dependencies and security patches:
sudo apt update
sudo apt upgrade
This step is crucial for preventing potential compatibility issues during installation. Additionally, verify your display server type (X11 or Wayland) as Kooha supports both, but certain features may vary between them.
Method 1: Installing Kooha via Flatpak (Recommended)
Flatpak is the recommended installation method for Kooha on Linux Mint 22, providing a sandboxed environment that ensures better security and compatibility across different Linux distributions.
Installing Flatpak
First, check if Flatpak is already installed on your Linux Mint 22 system. If not, install it using:
sudo apt install flatpakAdding the Flathub Repository
Next, add the Flathub repository which hosts the Kooha application:
flatpak remote-add --if-not-exists flathub https://flathub.org/repo/flathub.flatpakrepoThis command adds the Flathub repository to your system’s list of available software sources.
Installing Kooha via Flatpak
Now, install Kooha using the following command:
flatpak install flathub io.github.seadve.KoohaThe system will download and install Kooha along with any required dependencies. This process typically takes a few minutes depending on your internet connection speed.
Verifying Installation
Once installation completes, launch Kooha from your application menu or using the terminal:
flatpak run io.github.seadve.KoohaThe application should start, confirming successful installation. Flatpak installations receive automatic updates when new versions become available through the Flathub repository.
Method 2: Installing Kooha via Snap
Snap packages offer another convenient way to install Kooha on Linux Mint 22, though Flatpak is generally preferred for this application.
Enabling Snap Support
Linux Mint doesn’t include Snap support by default. To enable it:
sudo apt install snapd
sudo systemctl enable --now snapd.socket
You may need to restart your system after this step to ensure Snap is properly integrated.
Installing Kooha via Snap
Once Snap is configured, install Kooha using:
sudo snap install koohaThe system will download and install the Snap package. The installation creates appropriate desktop integration, allowing you to launch Kooha from your application menu.
Considerations for Snap Installation
While functional, the Snap version may have slightly different behavior than the Flatpak version regarding:
- File system access (due to Snap’s stricter confinement)
- Integration with system themes
- Startup time (Snap packages sometimes launch more slowly)
Nevertheless, the core functionality remains identical between installation methods.
Method 3: Building Kooha from Source
For users who prefer the latest features or need specific customizations, building Kooha from source code is a viable option.
Installing Build Dependencies
First, install the necessary development tools and dependencies:
sudo apt install git meson ninja-build libgstreamer1.0-dev libgstreamer-plugins-base1.0-dev libgtk-4-dev libadwaita-1-devThese packages provide the foundation needed to compile Kooha from its source code.
Cloning the Repository
Next, clone the official Kooha repository:
git clone https://github.com/SeaDve/Kooha.git
cd Kooha
Building and Installing
Use Meson and Ninja to build and install the application:
meson setup builddir
cd builddir
ninja
sudo ninja install
This process compiles the application and installs it system-wide. Building from source provides several advantages:
- Access to the latest features and improvements
- Ability to modify the source code for custom requirements
- Optimization for your specific system architecture
Building from source is recommended for advanced users who are comfortable with command-line operations and troubleshooting potential build issues.
Configuring Kooha for Optimal Use
After installation, configuring Kooha properly ensures the best recording experience tailored to your needs.
Accessing Preferences
Launch Kooha and click on the menu button (three lines) in the top-right corner, then select “Preferences” to access configuration options.
Output Format Configuration
Kooha supports multiple output formats, each with distinct advantages:
- WebM: Excellent quality with smaller file sizes, ideal for web sharing
- MP4: Maximum compatibility across devices and platforms
- GIF: Perfect for short, animated clips without audio
- Matroska: Advanced container format with extensive metadata support
Select your preferred format based on your intended use case. For general purpose recording, MP4 provides the best balance of quality and compatibility.
Audio Source Settings
Configure your audio recording preferences:
- Microphone only: Captures your voice without system sounds
- Desktop audio only: Records application sounds without your voice
- Both sources: Combines microphone and system audio
Test your audio configuration before important recordings to ensure proper levels and clarity.
Performance Optimization
For smoother recordings, adjust these performance settings:
- Frame Rate: Higher values (30-60 fps) provide smoother video but require more processing power
- Hardware Acceleration: Enable experimental hardware encoding for better performance on compatible systems
- Recording Delay: Set a countdown delay to prepare before recording begins
These settings directly impact both recording quality and system performance during capture sessions.
Using Kooha Screen Recorder
Kooha’s interface prioritizes simplicity without sacrificing functionality. Here’s how to make the most of this powerful tool.
Starting a Recording
- Launch Kooha from your application menu
- Select your preferred recording area (full screen, specific monitor, or custom region)
- Choose audio source (microphone, desktop audio, or both)
- Click the red “Record” button to begin
The interface displays your current settings, including format and frame rate, directly on the main screen for quick reference.

Selecting Recording Area
Kooha offers flexible options for defining your recording area:
- Full Screen: Captures your entire desktop
- Monitor Selection: Records a specific monitor in multi-display setups
- Custom Region: Allows selecting a precise area of the screen
The area selector window is resizable, and Kooha remembers your previously selected regions between sessions, streamlining your workflow for consistent recording areas.
Managing Recordings
During recording, Kooha displays a floating control panel with options to:
- Pause/resume the recording
- Stop and save the recording
- Monitor recording duration
When stopping a recording, Kooha processes and saves the file automatically. Recent updates have improved this process with visible progress indicators and enhanced performance for long recording sessions.
Keyboard Shortcuts
Learn these essential keyboard shortcuts to streamline your recording workflow:
- Ctrl+R: Start/stop recording
- Ctrl+P: Pause/resume recording
- Ctrl+S: Save current recording
- Ctrl+Q: Quit application
Mastering these shortcuts significantly improves your productivity when creating screen recordings.
Troubleshooting Common Issues
Even with Kooha’s streamlined design, users may occasionally encounter technical challenges. Here are solutions to common problems:
Recording Fails to Start
If recording doesn’t begin when expected:
- Verify your display server compatibility (X11/Wayland)
- Check system permissions for screen recording
- Ensure no other screen recording applications are running
- Restart Kooha and try again
For persistent issues, try switching between installation methods (Flatpak/Snap) as they use different system integration approaches.
Audio Problems
For audio recording issues:
- Confirm microphone permissions are granted to Kooha
- Check system audio settings and input/output device selection
- Verify PulseAudio or PipeWire is running correctly
- For desktop audio issues, ensure the correct system audio server is configured
Recent Kooha updates have specifically addressed audio stuttering and corruption in long recordings, improving audio reliability significantly.
Performance Issues During Recording
If you experience lag or stuttering during recording:
- Lower the frame rate in preferences
- Close resource-intensive background applications
- Enable hardware acceleration if your system supports it
- Reduce the recording area size
- Select a less demanding output format (WebM instead of MP4)
Remember that screen recording is resource-intensive, particularly at higher resolutions and frame rates.
Advanced Tips and Tricks
Master these advanced techniques to elevate your screen recording capabilities with Kooha.
Command-line Usage
Control Kooha directly from the terminal for scripted recordings:
# For Flatpak installation
flatpak run io.github.seadve.Kooha --record --area=0,0,1920,1080 --format=mp4 --fps=30 --output=/home/user/recording.mp4

# For Snap installation
kooha --record --area=0,0,1920,1080 --format=mp4 --fps=30 --output=/home/user/recording.mp4
Command-line operation enables integration with other scripts and automation tools.
Creating High-Quality GIFs
To create smooth, optimized GIFs:
- Set your frame rate to 15-20 fps in preferences
- Select GIF as your output format
- Record a short, focused clip (under 30 seconds)
- For further optimization, use tools like GIMP or ImageMagick to reduce colors
These settings balance quality and file size for shareable animations.
System Integration
Enhance Kooha’s integration with your Linux Mint workflow:
- Add Kooha to startup applications for immediate availability
- Create custom keyboard shortcuts at the system level for quick recording access
- Configure default save locations to automatically organize recordings by project
These integrations make screen recording a seamless part of your productivity system.
Congratulations! You have successfully installed Kooha. Thanks for using this tutorial for installing Kooha Screen Recorder on Linux Mint 22 system. For additional help or useful information, we recommend you check the offcial Kooha website.