How To Install KVM on Debian 13

Virtualization technology has transformed how administrators deploy and manage computing resources. KVM (Kernel-based Virtual Machine) stands as one of the most powerful virtualization solutions available for Linux systems, offering robust performance and enterprise-grade reliability. Debian 13, codenamed Trixie, provides an excellent foundation for running KVM, combining stability with cutting-edge packages that make virtualization setup straightforward and efficient. This comprehensive guide walks through every step needed to install and configure KVM on Debian 13, from verifying hardware compatibility to creating virtual machines and implementing security best practices.
Whether setting up a home lab, deploying a production environment, or exploring virtualization for the first time, this tutorial provides actionable instructions that work. The process involves checking system requirements, installing necessary packages, configuring services, and verifying the installation. By following these steps, anyone can transform a Debian 13 system into a powerful virtualization host capable of running multiple operating systems simultaneously.
What is KVM and Why Use It on Debian 13?
KVM transforms Linux into a Type 2 hypervisor by leveraging hardware virtualization extensions built into modern processors. The technology consists of loadable kernel modules—kvm.ko for core virtualization infrastructure, plus processor-specific modules like kvm-intel.ko or kvm-amd.ko—that enable full virtualization capabilities. When combined with QEMU (Quick Emulator), KVM creates a complete virtualization platform where each virtual machine operates with private virtualized hardware including network cards, disks, and graphics adapters.
Debian 13 Trixie offers several advantages for KVM deployment. The distribution provides stable, well-tested packages while including recent versions of virtualization tools. The extensive Debian documentation and community support make troubleshooting straightforward. As an open-source solution, KVM eliminates licensing costs while delivering performance that rivals proprietary alternatives. The tight integration between KVM and the Linux kernel means updates and security patches arrive through normal system maintenance channels.
Prerequisites and System Requirements
Hardware Requirements
Successful KVM installation begins with compatible hardware. The processor must support hardware virtualization extensions—Intel VT-x for Intel CPUs or AMD-V for AMD processors. Most processors manufactured after 2010 include these features, though they may require BIOS activation. A 64-bit processor is strongly recommended for optimal compatibility and performance.
Memory requirements depend on the intended workload. A minimum of 2GB RAM allows basic operation, but 4GB or more is recommended when running multiple virtual machines simultaneously. Storage needs vary based on the number and size of virtual machines planned. Allocate at least 20GB of free disk space on the /var partition for VM storage. SSD storage significantly improves virtual machine performance compared to traditional hard drives.
Software Requirements
The system needs a functioning Debian 13 installation—either desktop or server edition works perfectly. Users must have root access or sudo privileges to install packages and configure system services. Active internet connectivity is essential for downloading KVM packages and dependencies during installation. Keeping system packages current before beginning the installation process prevents compatibility issues and ensures access to security updates.
Step 1: Verify Hardware Virtualization Support
Checking CPU Virtualization Extensions
Before installing any packages, confirm the processor supports virtualization. Open a terminal and execute this command:
grep -E -c '(vmx|svm)' /proc/cpuinfoThis command searches for virtualization flags in the CPU information. Any number greater than zero indicates virtualization support is present and enabled. The vmx flag identifies Intel processors with VT-x enabled, while svm indicates AMD processors with AMD-V support.
For visual confirmation with color highlighting, run:
grep -E --color '(vmx|svm)' /proc/cpuinfoThis displays matching virtualization flags in color, making them easy to spot.
Verifying Kernel Module Availability
Check whether KVM modules are available in the running kernel:
zgrep CONFIG_KVM /boot/config-$(uname -r)Look for CONFIG_KVM=m or CONFIG_KVM=y in the output. The “m” indicates KVM is available as a loadable module, while “y” means it’s compiled directly into the kernel. Either result confirms KVM support.
Enabling Virtualization in BIOS/UEFI
If the CPU check returns zero or no output, virtualization may be disabled in the system firmware. Restart the computer and enter the BIOS/UEFI setup—typically by pressing F2, F10, Delete, or Esc during boot. The exact key varies by manufacturer.
Navigate to advanced CPU settings or security settings where virtualization options typically reside. Look for settings labeled “Intel Virtualization Technology,” “Intel VT-x,” “AMD-V,” or “SVM Mode”. Enable the option, save changes, and exit. The system will reboot with virtualization support active.
Step 2: Update System Packages
Updating Package Repository
Begin with a system update to ensure access to the latest package versions. Execute:
sudo apt updateThis command refreshes the package index from Debian repositories. Enter the administrator password when prompted. The system will download current package information, preparing for installations.
Upgrading Existing Packages
Apply available updates to installed packages:
sudo apt upgrade -yThe -y flag automatically confirms the upgrade process. This step may take several minutes depending on the number of packages requiring updates. Updating before installing KVM prevents conflicts between old system libraries and new virtualization components.
Checking for System Reboot Requirements
Some updates require a system restart to take effect, particularly kernel updates. Check if a reboot is necessary:
[ -f /var/run/reboot-required ] && echo "Reboot required"If the message appears, restart the system before proceeding. After rebooting, log back in and continue with the installation.
Step 3: Install KVM, QEMU, and Essential Packages
Core KVM and QEMU Installation
Install the primary virtualization stack with a single command:
sudo apt install qemu-kvm libvirt-daemon-system libvirt-clients bridge-utils virt-manager -yThis installs the essential components for KVM virtualization.
Understanding Each Package Component
Each package serves a specific purpose in the virtualization environment. The qemu-kvm package provides the user-level KVM emulator that handles communication between the host system and virtual machines. It delivers the actual virtualization capabilities.
The libvirt-daemon-system package installs the management daemon that controls virtual machines and interacts with the hypervisor. This service runs in the background, managing VM lifecycle operations. Libvirt-clients provides command-line tools for managing libvirt resources, including the essential virsh utility.
Bridge-utils contains tools for creating and managing network bridges, enabling virtual machines to communicate with external networks. The virt-manager package installs a graphical desktop application for creating and managing virtual machines through an intuitive interface.
Additional Recommended Packages
Expand functionality with supplementary tools:
sudo apt install virtinst virt-viewer libguestfs-tools libosinfo-bin ovmf qemu-utils -yThe virtinst package provides command-line utilities like virt-install and virt-clone for VM provisioning. Virt-viewer offers a lightweight graphical console for connecting to virtual machine displays. Libguestfs-tools extends management capabilities with tools for offline VM manipulation.
Libosinfo-bin maintains a database of operating system information, helping virt-manager optimize VM settings for different OS types. The ovmf package enables UEFI firmware support for virtual machines, necessary for modern operating systems requiring UEFI boot. Qemu-utils includes utilities for managing disk images, such as qemu-img for creating and converting virtual disk files.
Step 4: Load and Enable KVM Kernel Modules
Loading the vhost_net Module
The vhost_net module improves network performance for virtual machines. Load it manually:
sudo modprobe vhost_netThis command loads the module into the running kernel. The vhost_net module moves network processing from user space to kernel space, significantly improving throughput.
Verifying Module Loading
Confirm the module loaded successfully:
lsmod | grep vhostThe output should display vhost_net and related modules. Additionally, verify KVM modules are active:
lsmod | grep kvmThis shows kvm_intel or kvm_amd depending on the processor type, along with the base kvm module.
Configuring Modules to Load at Boot
Make the vhost_net module load automatically during system startup:
echo vhost_net | sudo tee -a /etc/modulesThis appends vhost_net to the modules configuration file. The system will load this module automatically on every boot, ensuring consistent network performance for virtual machines.
Step 5: Configure and Start Libvirt Service
Starting the Libvirtd Daemon
Activate the libvirt management daemon:
sudo systemctl start libvirtdThis launches the virtualization management service. The libvirtd daemon manages all aspects of virtual machines, from creation to resource allocation to network configuration.
Enabling Libvirtd at System Boot
Configure libvirtd to start automatically:
sudo systemctl enable libvirtd.serviceThis ensures the virtualization infrastructure is available immediately after system boot. Virtual machines set to autostart will launch automatically when libvirtd initializes.
Verifying Libvirtd Service Status
Check the service is running properly:
sudo systemctl status libvirtdLook for “active (running)” in green text. If the service shows as inactive or failed, review system logs with journalctl -xe to identify configuration issues.
Adding User to Libvirt Groups
Grant the current user permission to manage virtual machines without sudo:
sudo usermod -aG libvirt,kvm $USERThis adds the user to both the libvirt and kvm groups. Log out completely and log back in for the group membership to take effect. Verify membership with:
groupsThe output should include both libvirt and kvm in the list of groups.
Step 6: Verify KVM Installation
Using Virsh Commands
Test libvirt connectivity with the virsh utility:
virsh list --allA functioning installation displays an empty table showing no virtual machines exist yet. This confirms libvirt can communicate with KVM properly.
Checking KVM Version
Verify installed versions:
kvm --versionThis displays the QEMU version, as kvm is a wrapper around QEMU. Check virt-manager version as well:
virt-manager --versionTesting Default Network
Libvirt creates a default NAT network for virtual machines. Verify it’s active:
virsh net-list --allThe default network should show as “active”. If it’s inactive, start it with:
virsh net-start defaultEnable autostart for the default network:
virsh net-autostart defaultThis ensures networking remains available for virtual machines after system reboots.
Step 7: Configure Network Bridge (Optional but Recommended)
Understanding Network Modes
KVM supports two primary networking modes. NAT (Network Address Translation) is the default mode where virtual machines share the host’s IP address. This works well for basic scenarios but limits direct external access to VMs.
Bridge networking creates a virtual network bridge that connects VMs directly to the physical network. Virtual machines receive IP addresses from the network DHCP server and appear as separate devices on the network. Choose bridged networking when VMs need to be accessible from other network devices or when running server workloads.
Creating a Network Bridge Manually
Edit the network configuration file:
sudo nano /etc/network/interfacesAdd bridge configuration (adjust interface names and IP addresses for your network):
auto br0
iface br0 inet static
    address 192.168.1.100
    netmask 255.255.255.0
    gateway 192.168.1.1
    bridge_ports eth0
    bridge_stp off
    bridge_fd 0
    bridge_maxwait 0

iface eth0 inet manual
This creates a bridge named br0 that includes the physical interface eth0. The bridge receives the static IP configuration while the physical interface operates in manual mode. Save the file and restart networking:
sudo systemctl restart networkingExercise caution with this step—incorrect configuration can break network connectivity. Having console access is advisable before modifying network settings remotely.
Verifying Bridge Configuration
Confirm the bridge exists and includes the correct interface:
brctl showThe output displays all network bridges and their associated interfaces. The br0 bridge should list eth0 (or your physical interface) as a member.
Virtual machines can now connect to the bridge network, giving them direct network access alongside the host system.
Step 8: Create Your First Virtual Machine
Method 1: Using Virt-Manager (GUI)
Launch Virtual Machine Manager from the applications menu or by running virt-manager in a terminal. The graphical interface provides an intuitive way to create and manage virtual machines.
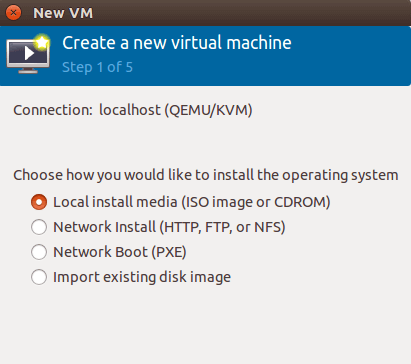
Click the “Create a new virtual machine” button in the toolbar. The creation wizard presents several installation methods. Select “Local install media (ISO image or CDROM)” for installing from an ISO file. Click Forward to continue.

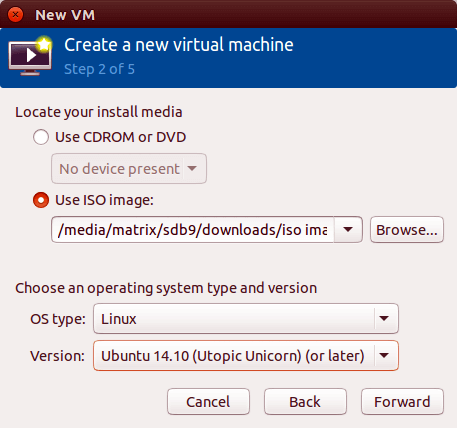
Browse to the ISO file location and select the installation media. Virt-manager attempts to automatically detect the operating system. If detection fails, manually search for the OS type. Proper OS detection optimizes VM settings. Click Forward.

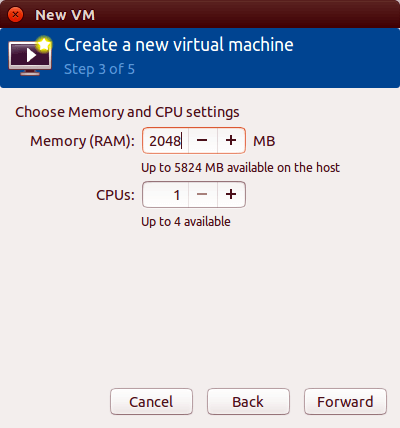
Configure memory and CPU allocation. Assign at least 2048 MB (2 GB) of RAM for modern operating systems. Allocate 2 or more CPU cores for better performance. These values can be adjusted later if needed. Click Forward.

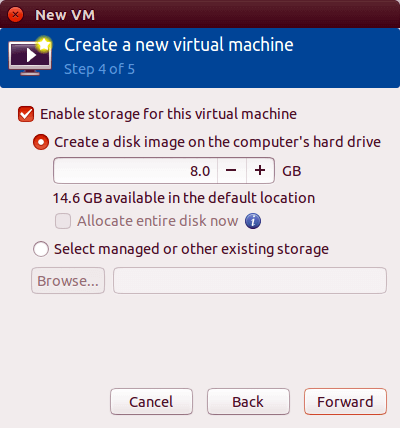
Specify virtual disk size and location. The default location is /var/lib/libvirt/images/. Allocate sufficient space for the operating system and applications—20 GB works for minimal installations, while 40-60 GB accommodates desktop environments. Click Forward.

Name the virtual machine and review configuration settings. Select the network interface—choose “Virtual network ‘default’: NAT” for basic connectivity or the bridge interface for direct network access. Check “Customize configuration before install” to adjust additional settings. Click Finish.
The VM console window opens, displaying the installation process. Follow the operating system’s installation prompts to complete guest OS setup.
Method 2: Using virt-install (Command-Line)
The virt-install utility creates virtual machines from the command line, ideal for automation or headless servers. Here’s an example creating a Debian VM:
sudo virt-install \
  --name debian-vm \
  --ram 2048 \
  --vcpus 2 \
  --disk path=/var/lib/libvirt/images/debian-vm.qcow2,size=30 \
  --os-variant debian11 \
  --cdrom /path/to/debian-13-amd64-netinst.iso \
  --network network=default \
  --graphics vnc \
  --console pty,target_type=serial
Key parameters explained: –name sets the virtual machine name. –ram specifies memory in megabytes. –vcpus determines CPU count. –disk defines the virtual disk path and size in gigabytes. The –os-variant parameter optimizes settings for the specified OS type—list available variants with osinfo-query os.
The –cdrom parameter points to the installation ISO file. –network specifies the network connection type. –graphics vnc enables VNC access to the console. After executing the command, connect to the VM console with virt-viewer:
virt-viewer debian-vmComplete the operating system installation through the console interface.
Step 9: Managing Virtual Machines
Basic Virsh Commands
The virsh command-line tool provides complete VM control. List all virtual machines:
virsh list --allThis displays both running and stopped VMs. Start a virtual machine:
virsh start debian-vmThe VM boots and becomes accessible. Shut down gracefully:
virsh shutdown debian-vmThis sends an ACPI shutdown signal to the guest OS. For immediate shutdown, use:
virsh destroy debian-vmDespite the name, destroy simply forces immediate power-off without damaging the VM. Reboot a running VM:
virsh reboot debian-vmVM Information and Monitoring
Retrieve detailed VM information:
virsh dominfo debian-vmThis displays configuration details including CPU count, memory allocation, and current state. Check only the power state:
virsh domstate debian-vmView performance statistics:
virsh domstats debian-vmThis provides real-time metrics on CPU usage, memory consumption, and disk I/O.
Managing VM Autostart
Configure a VM to start automatically with the host system:
virsh autostart debian-vmDisable autostart:
virsh autostart --disable debian-vmThis flexibility allows critical VMs to start automatically while keeping test VMs manually controlled.
Accessing VM Console
Connect to the text console of a running VM:
virsh console debian-vmThis provides direct terminal access to the guest system. Use Ctrl+] to disconnect. For graphical console access, use virt-viewer:
virt-viewer debian-vmThis opens a window displaying the VM’s graphical output.
Best Practices and Security Hardening
Host System Security
Maintaining host system security is fundamental to virtualization environment protection. Keep Debian 13 updated with the latest security patches:
sudo apt update && sudo apt upgrade -ySchedule regular updates or enable automatic security updates. Configure the firewall to control network access. Install ufw (Uncomplicated Firewall) for straightforward management:
sudo apt install ufw
sudo ufw enable
Define rules allowing only necessary services. If running SSH, permit it before enabling the firewall:
sudo ufw allow sshVM Security Measures
Isolate virtual machines on separate networks based on security requirements. Production VMs should not share networks with test or development machines. Apply security updates to guest operating systems regularly, just like the host system.
Implement strong authentication for VM access. Use SSH keys instead of passwords for remote access. Disable root SSH login in guest systems. Run security scanning tools on virtual machines to identify vulnerabilities.
SSH Security for Remote KVM Management
When managing KVM remotely via SSH, harden the SSH configuration. Edit /etc/ssh/sshd_config on the host:
sudo nano /etc/ssh/sshd_configDisable root login:
PermitRootLogin noConfigure key-based authentication and disable password authentication:
PubkeyAuthentication yes
PasswordAuthentication no
Change the default SSH port to reduce automated attacks. Restart SSH after changes:
sudo systemctl restart sshInstall fail2ban to automatically block repeated failed login attempts:
sudo apt install fail2ban
sudo systemctl enable fail2ban
Resource Management
Set appropriate resource limits for virtual machines to prevent any single VM from exhausting host resources. Monitor resource usage regularly with tools like htop or virsh domstats. When multiple VMs run simultaneously, allocate resources conservatively—overcommitting CPU is generally safe, but memory overcommitment can cause stability issues.
Troubleshooting Common Issues
Virtualization Not Enabled Error
If virt-manager displays “KVM acceleration cannot be used,” the processor’s virtualization extensions are disabled. Restart the system, enter BIOS/UEFI settings, and enable Intel VT-x or AMD-V. The setting might be under advanced CPU configuration, security settings, or virtualization options depending on the motherboard manufacturer.
KVM Module Not Loading
If KVM modules fail to load, check whether they’re blacklisted:
cat /etc/modprobe.d/blacklist.confIf kvm, kvm_intel, or kvm_amd appear in this file, remove the entries. Check kernel messages for errors:
dmesg | grep kvmThis reveals hardware or configuration issues preventing module loading. Force module loading during boot by adding module names to /etc/modules.
Libvirtd Service Fails to Start
When libvirtd won’t start, examine service logs:
journalctl -xe -u libvirtdThis displays detailed error messages. Common causes include corrupted configuration files in /etc/libvirt/ or permission issues. Verify libvirt packages installed completely:
sudo apt install --reinstall libvirt-daemon-systemPermission Denied Errors
“Permission denied” errors when creating VMs indicate group membership problems. Verify the user belongs to libvirt and kvm groups:
groupsIf the groups don’t appear, add the user:
sudo usermod -aG libvirt,kvm $USERCompletely log out—closing the terminal isn’t sufficient—and log back in. Test with:
virsh list --allIf errors persist, check permissions on /var/run/libvirt/libvirt-sock.
Network Connectivity Issues
When VMs can’t access the network, first verify the default network is active:
virsh net-list --allStart it if necessary:
virsh net-start defaultFor bridged networking problems, confirm the bridge exists and includes the physical interface:
brctl showCheck firewall rules aren’t blocking VM traffic. Test basic connectivity from the VM using ping. If the host can ping external addresses but VMs cannot, verify IP forwarding is enabled:
sudo sysctl net.ipv4.ip_forwardEnable if disabled:
echo "net.ipv4.ip_forward=1" | sudo tee -a /etc/sysctl.conf
sudo sysctl -p
Performance Optimization Tips
CPU Configuration
Pin virtual machine CPUs to specific physical cores for consistent performance. Edit the VM definition with:
virsh edit debian-vmAdd CPU pinning in the <vcpu> section. Use host-passthrough CPU mode to expose all host CPU features to the guest, improving performance for CPU-intensive workloads. Configure CPU topology to match the guest’s expectations—some applications perform better with multiple cores per socket while others prefer multiple sockets.
Memory Optimization
Enable huge pages for virtual machines with large memory allocations. Huge pages reduce memory management overhead, improving performance. Configure ballooning to allow dynamic memory adjustment. This lets the host reclaim unused memory from VMs when needed. Set reasonable memory limits to prevent overcommitment issues.
Storage Performance
Use virtio drivers for disk I/O—these paravirtualized drivers deliver significantly better performance than emulated IDE or SATA controllers. Choose the raw disk format instead of qcow2 when maximum I/O performance is critical, though qcow2 offers better features like snapshots and compression. Store virtual machine disks on SSD storage rather than traditional hard drives whenever possible.
Configure appropriate cache modes for virtual disks. The writethrough cache mode provides safety at the cost of performance, while writeback offers better performance but slightly higher risk during host crashes. Select based on workload requirements.
Network Performance
Use virtio network drivers in guest systems for optimal throughput. Ensure vhost_net is loaded on the host for improved network performance. Configure multi-queue virtio-net for VMs requiring high network throughput. This allows network processing to utilize multiple CPU cores.
System Tuning
Install the tuned daemon for automated system tuning:
sudo apt install tuned
sudo systemctl enable --now tuned
Apply the virtual-host profile on KVM hosts for optimal virtualization performance. This profile adjusts various kernel parameters for hosting virtual machines.
Congratulations! You have successfully installed KVM. Thanks for using this tutorial for installing the latest version of KVM (Kernel-based Virtual Machine) on Debian 13 “Trixie” system. For additional help or useful information, we recommend you check the official KVM website.