How To Install LEMP on Linux Mint 22

In this tutorial, we will show you how to install LEMP on Linux Mint 22.
This article assumes you have at least basic knowledge of Linux, know how to use the shell, and most importantly, you host your site on your own VPS. The installation is quite simple and assumes you are running in the root account, if not you may need to add ‘sudo‘ to the commands to get root privileges. I will show you the step-by-step installation of the LEMP stack on Linux Mint 22.
Prerequisites
- A server running one of the following operating systems: Linux Mint 22.
- It’s recommended that you use a fresh OS install to prevent any potential issues.
- Basic familiarity with the Linux terminal and command-line interface.
- An active internet connection.
- 1 GHz or faster processor
- 1 GB of RAM (2 GB recommended)
- 20 GB of available disk space
- Administrative privileges are essential for installing and configuring software on your system. Ensure that you have superuser or sudo access.
Install LEMP on Linux Mint 22
Step 1. Update Your Linux Mint System.
Before installing any packages, it’s always a good practice to update the package repository to ensure you have access to the latest versions. Run the following command in the terminal:
sudo apt update
sudo apt upgrade
This command updates the package lists and upgrades any existing packages to their latest versions.
Step 2. Installing Nginx Web Server.
Nginx is a high-performance web server that will handle HTTP requests and serve web pages. To install Nginx on Linux Mint 22, follow these steps:
Open the terminal and run the following command:
sudo apt install nginx
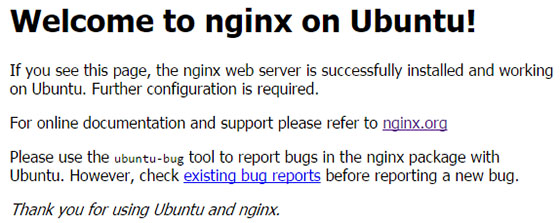
Once the installation is complete, Nginx will automatically start running. You can verify that Nginx is running by opening a web browser and accessing your server’s IP address or domain name. You should see the default Nginx welcome page.

Step 3. Installing MariaDB.
MariaDB is a popular open-source database server that will store and manage your website’s data. To install MariaDB on Linux Mint 22, follow these steps:
Open the terminal and run the following command:
sudo apt install mariadb-server
After the installation is complete, it’s recommended to run the MariaDB security script to improve the security of your database server. Run the following command:
sudo mysql_secure_installation
This script will prompt you to set a root password, remove anonymous users, disable remote root login, and remove the test database. Follow the prompts and answer the questions according to your preferences.
To verify that MariaDB is installed and running correctly, you can log into the MariaDB shell using the following command:
sudo mysql
If the installation was successful, you should see the MariaDB prompt. You can exit the shell by typing exit and pressing Enter.
Step 4. Installing PHP 8.3.
PHP is a server-side scripting language that powers dynamic web applications. To install PHP 8.3 on Linux Mint 22, follow these steps:
Open the terminal and run the following command:
sudo apt install php8.3-fpm php8.3-mysql
This command installs PHP 8.3 along with the PHP FastCGI Process Manager (FPM) and the PHP MySQL extension, which is required for PHP to communicate with MariaDB.
To configure Nginx to use PHP-FPM, you need to edit the Nginx configuration file. Open the default Nginx configuration file using a text editor with sudo privileges:
sudo nano /etc/nginx/sites-available/default
Find the location block that begins with location ~ \.php$ and modify it to look like this:
location ~ \.php$ {
    include snippets/fastcgi-php.conf;
    fastcgi_pass unix:/var/run/php/php8.3-fpm.sock;
}
Save the changes and exit the text editor.
To test the PHP setup, create a new file named phpinfo.php in the /var/www/html directory with the following content:
<?php
phpinfo();
?>
Save the file and access it through your web browser by visiting http://your-server-ip/phpinfo.php. If PHP is configured correctly, you should see a page displaying detailed information about your PHP installation.
Step 5. Test LEMP Stack.
With all the components installed and configured, it’s time to test the complete LEMP stack. Follow these steps:
Create a new PHP file named info.php in the /var/www/html directory with the following content:
<?php
phpinfo();
?>
Save the file and access it through your web browser by visiting http://your-server-ip/info.php. If the LEMP stack is set up correctly, you should see a page displaying detailed PHP configuration information.
If you encounter any issues or errors during the testing process, double-check the installation steps and configuration files for any mistakes. Common issues include incorrect file permissions, misconfigured server blocks, or missing dependencies.
Step 6. Firewall Configuration.
It’s crucial to configure your firewall to allow incoming HTTP and HTTPS traffic. Linux Mint 22 comes with the UFW (Uncomplicated Firewall) firewall by default. To allow HTTP and HTTPS traffic, run the following commands:
sudo ufw allow 'Nginx HTTP'
sudo ufw allow 'Nginx HTTPS'
These commands will open ports 80 (HTTP) and 443 (HTTPS) in your firewall, allowing web traffic to reach your server.
Step 7. Setting Up Virtual Hosts.
If you plan to host multiple websites on your LEMP server, you’ll need to set up virtual hosts. Virtual hosts allow you to define separate configurations for each website, enabling you to host multiple domains on a single server. To set up virtual hosts, follow these steps:
Create a new directory for your website in the /var/www directory. For example, if your website is named example.com, create a directory named example.com:
sudo mkdir /var/www/example.com
Create an index.html file in the website directory with some sample content:
sudo nano /var/www/example.com/index.html
Add the following HTML content to the file:
<html>
<head>
<title>Welcome to idroot.us!</title>
</head>
<body>
<h1>Success! Your virtual host is working.</h1>
</body>
</html>
Save the file and exit the text editor.
Create a new Nginx server block configuration file for your website:
sudo nano /etc/nginx/sites-available/example.com
Add the following configuration to the file, replacing example.com with your domain name:
server {
listen 80;
server_name example.com www.example.com;
root /var/www/example.com;
index index.html;

location / {
try_files $uri $uri/ =404;
}
}
Save the file and exit the text editor.
Enable the new server block by creating a symbolic link from the sites-available directory to the sites-enabled directory:
sudo ln -s /etc/nginx/sites-available/example.com /etc/nginx/sites-enabled/
Test the Nginx configuration for syntax errors:
sudo nginx -t
If the configuration is valid, restart the Nginx service to apply the changes:
sudo systemctl restart nginx
Your virtual host is now set up and ready to serve your website.
Congratulations! You have successfully installed LEMP. Thanks for using this tutorial to install the latest version of the LEMP stack on the Linux Mint system. For additional help or useful information, we recommend you check the official LAMP website.