How To Install Linkwarden on Rocky Linux 9

In today’s digital landscape, managing bookmarks securely and privately is more important than ever. Linkwarden, a self-hosted bookmark manager, provides users with a powerful tool to organize and access their favorite links without relying on third-party services. This article offers a comprehensive guide on how to install Linkwarden on Rocky Linux 9, ensuring you have all the necessary steps to get started smoothly.
Prerequisites
System Requirements
- CPU: Minimum dual-core processor.
- RAM: At least 2 GB; 4 GB recommended for optimal performance.
- Storage: Minimum of 10 GB free disk space.
Software Requirements
- Operating System: Rocky Linux 9 installed and updated.
- Packages: Git, Docker, Docker Compose, PostgreSQL.
User Permissions
Ensure that your user account has sudoprivileges. This is crucial for installing software and managing services effectively.
Step-by-Step Installation Guide
Step 1: Install Docker and Docker Compose
Docker is essential for running Linkwarden in a containerized environment. Follow these steps to install Docker and Docker Compose on your Rocky Linux system:
sudo dnf install -y docker
sudo systemctl start docker
sudo systemctl enable docker
This command installs Docker and ensures it starts automatically upon booting the system. Next, install Docker Compose with the following commands:
sudo curl -L "https://github.com/docker/compose/releases/latest/download/docker-compose-linux-$(uname -m)" -o /usr/local/bin/docker-compose
sudo chmod +x /usr/local/bin/docker-compose
After installation, verify that Docker and Docker Compose are installed correctly by running:
docker --version
docker-compose --version
Step 2: Clone the Linkwarden Repository
The next step involves cloning the Linkwarden repository from GitHub. Open your terminal and execute the following commands:
git clone https://github.com/linkwarden/linkwarden.git
cd linkwarden
This will create a local copy of the Linkwarden source code in a directory named linkwarden.
Step 3: Configure Environment Variables
Linkwarden requires specific environment variables for configuration. Create a copy of the sample environment file and edit it:
cp .env.sample .env
nano .env
You will need to set the following variables in the .env file:
- NEXTAUTH_URL: Set this to your server’s URL (e.g.,
http://localhost:3000) or your domain name if accessible externally. - NEXTAUTH_SECRET: Generate a random secret key for session management. You can use a tool like
/dev/urandom. - DATABASE_URL: Configure this to connect to your PostgreSQL database. The format is:
postgres://user:password@localhost:5432/linkwarden.
Your edited .env file should look something like this:
NEXTAUTH_URL=http://localhost:3000
NEXTAUTH_SECRET=your_generated_secret_key
DATABASE_URL=postgres://user:password@localhost:5432/linkwarden
Step 4: Create a Docker Compose File
The next step is to set up Docker Compose to manage your containers easily. Create a file named docker-compose.yml:
nano docker-compose.yml
Add the following configuration to define your services:
version: '3.3'
services:
  postgres:
    image: postgres:16-alpine
    restart: always
    environment:
      POSTGRES_PASSWORD: YOUR_POSTGRES_PASSWORD
    volumes:
      - pgdata:/var/lib/postgresql/data

  linkwarden:
    image: linkwarden/linkwarden:latest
    ports:
      - "3000:3000"
    environment:
      DATABASE_URL: postgresql://user:password@db:5432/linkwarden

volumes:
  pgdata:
This configuration sets up two services: PostgreSQL as the database backend and Linkwarden itself. Make sure to replace YOUR_POSTGRES_PASSWORD, user, and password with secure values of your choice.
Step 5: Start Linkwarden Using Docker Compose
You are now ready to start Linkwarden using Docker Compose. Run the following command in your terminal:
docker-compose up -d
This command will download the necessary images and start the containers in detached mode. You can check if everything is running smoothly by executing:
docker-compose ps
If all services are up, you should see them listed as running.
Step 6: Accessing Linkwarden
Your Linkwarden instance should now be accessible via a web browser. Open your preferred browser and navigate to:
http://localhost:3000
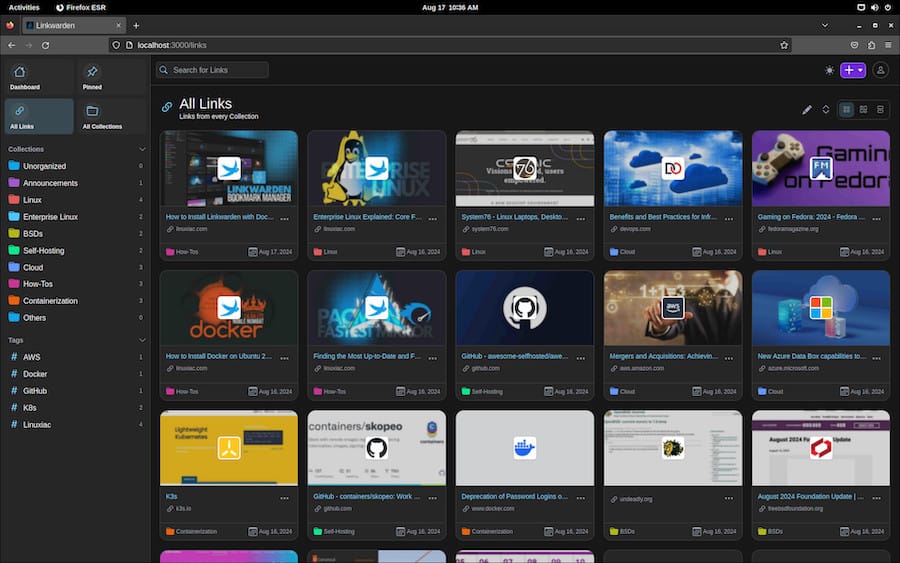
You should see the Linkwarden interface where you can start adding bookmarks and organizing them according to your preferences.

Troubleshooting Common Issues
If you encounter issues during installation or while running Linkwarden, here are some common problems and their solutions:
- Error connecting to the database:
Ensure that PostgreSQL is running correctly. You can check logs with:docker-compose logs postgresVerify that the connection string in your
.envfile is correct. - Docker service not starting:
If you receive errors related to Docker, ensure that it is installed properly and that your user belongs to the Docker group:sudogroupadd docker $USER newgrp dockerRestart your terminal session after making this change.
- No response from Linkwarden in browser:
Check if the container is running with:docker psIf it’s not listed, review logs for errors using:
docker-compose logs linkwarden - Persistent data issues:
Ensure that volumes are correctly set up in your Docker Compose file. Data should persist across container restarts. - CORS issues when accessing from another device:
If accessing from another device, ensure that you set the correct URL in theNEXTAUTH_URL. - Email notifications not working:
Verify SMTP settings if configured in your application settings.
Congratulations! You have successfully installed Linkwarden. Thanks for using this tutorial for installing the Linkwarden on the Rocky Linux 9 system. For additional help or useful information, we recommend you check the official Linkwarden website.