How To Install Munin on Ubuntu 22.04 LTS

In this tutorial, we will show you how to install Munin on Ubuntu 22.04 LTS. For those of you who didn’t know, Munin is a powerful open-source monitoring tool that helps system administrators keep track of their servers’ performance and resource usage. It provides a comprehensive overview of various system metrics, such as CPU usage, memory consumption, disk I/O, and network traffic, through a user-friendly web interface. Munin uses a client-server architecture, where the Munin master collects data from multiple Munin nodes and generates graphs and reports.
This article assumes you have at least basic knowledge of Linux, know how to use the shell, and most importantly, you host your site on your own VPS. The installation is quite simple and assumes you are running in the root account, if not you may need to add ‘sudo‘ to the commands to get root privileges. I will show you the step-by-step installation of the Munin monitoring tool on Ubuntu 22.04 (Jammy Jellyfish). You can follow the same instructions for Ubuntu 22.04 and any other Debian-based distribution like Linux Mint, Elementary OS, Pop!_OS, and more as well.
Prerequisites
- A server running one of the following operating systems: Ubuntu 22.04, 20.04, and any other Debian-based distribution like Linux Mint.
- It’s recommended that you use a fresh OS install to prevent any potential issues.
- SSH access to the server (or just open Terminal if you’re on a desktop).
- An active internet connection. You’ll need an internet connection to download the necessary packages and dependencies.
- A
non-root sudo useror access to theroot user. We recommend acting as anon-root sudo user, however, as you can harm your system if you’re not careful when acting as the root.
Install Munin on Ubuntu 22.04 LTS Jammy Jellyfish
Step 1. To ensure a smooth installation process, it’s crucial to update your system packages to their latest versions. This step helps prevent potential compatibility issues and security vulnerabilities. Open your terminal and run the following commands:
sudo apt update
sudo apt upgrade
Step 2. Installing Munin Master.
The Munin master is the central component that collects data from the Munin nodes and generates graphs and reports.
To install the Munin master on Ubuntu 22.04 LTS, follow these steps:
sudo apt install munin
Configure the Munin master by editing the /etc/munin/munin.conf file:
sudo nano /etc/munin/munin.conf
Uncomment the following lines and modify them according to your setup:
dbdir /var/lib/munin
htmldir /var/cache/munin/www
logdir /var/log/munin
rundir /var/run/munin
If you are using a web server other than Apache, you may need to configure it to serve the Munin web interface. For example, if you are using a Nginx web server, create a new configuration file:
sudo nano /etc/nginx/sites-available/munin
Add the following content to the file:
server {
listen 80;
server_name munin.example.com;

location / {
alias /var/cache/munin/www/;
index index.html;
}
}
Replace munin.example.com with your desired domain name. Then, create a symbolic link to enable the configuration:
sudo ln -s /etc/nginx/sites-available/munin /etc/nginx/sites-enabled/
Restart the web server for the changes to take effect:
sudo systemctl restart nginx
Step 3. Installing Munin Node.
Munin nodes are installed on each server you want to monitor. They collect system metrics and send them to the Munin master. To install the Munin node on Ubuntu 22.04 LTS, follow these steps:
sudo apt install munin-node
Configure the Munin node by editing the /etc/munin/munin-node.conf file:
sudo nano /etc/munin/munin-node.conf
Uncomment the following line and add the IP address of your Munin master:
allow ^123\.456\.789\.012$
Replace 123.456.789.012 with the actual IP address of your Munin master.
Start the munin-node service and enable it to start on boot:
sudo systemctl start munin-node
sudo systemctl enable munin-node
Step 4. Configuring Munin Plugins.
Munin uses plugins to collect various system metrics. Many plugins are installed by default and automatically enabled. However, you can enable additional plugins or configure existing ones to suit your monitoring needs.
List the available Munin plugins:
sudo munin-node-configure --suggest
Enable a plugin by creating a symbolic link in the /etc/munin/plugins directory. For example, to enable the CPU plugin:
sudo ln -s /usr/share/munin/plugins/cpu /etc/munin/plugins/
If a plugin requires additional configuration, you can modify its settings in the corresponding configuration file located in the /etc/munin/plugin-conf.d directory. For example, to configure the df plugin to monitor specific filesystems:
sudo nano /etc/munin/plugin-conf.d/df
Add the following content to the file:
[df]
env.exclude none unknown iso9660 squashfs udf romfs ramfs debugfs
Restart the munin-node service for the changes to take effect:
sudo systemctl restart munin-node
Step 5. Accessing the Munin Web Interface.
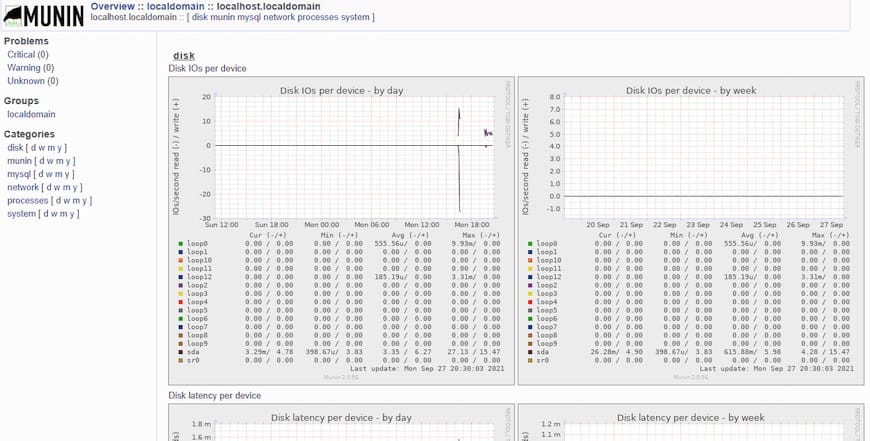
Once you have installed and configured Munin, you can access the web interface to view graphs and reports of your system’s performance. Open a web browser and navigate to the Munin web interface URL. By default, it should be:
http://your-server-ip/munin
You should see the Munin overview page, displaying graphs for various system metrics. Click on a specific graph to view more detailed information.

Congratulations! You have successfully installed Munin. Thanks for using this tutorial for installing the Munin networked resource monitoring tool on Ubuntu 22.04 LTS Jammy Jellyfish system. For additional help or useful information, we recommend you check the Munin website.