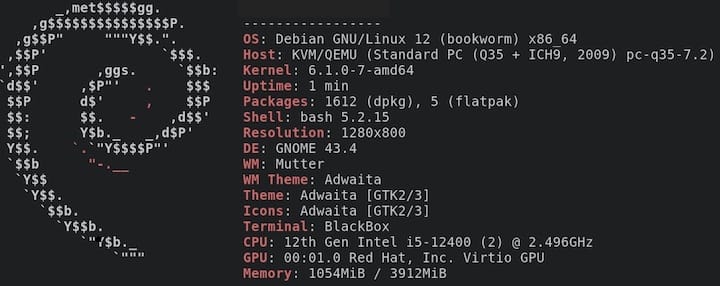
How To Install Neofetch on Debian 12

In this tutorial, we will show you how to install Neofetch on Debian 12. For those of you who didn’t know, Neofetch is a powerful command line utility that displays system information in a visually appealing manner.
This article assumes you have at least basic knowledge of Linux, know how to use the shell, and most importantly, you host your site on your own VPS. The installation is quite simple and assumes you are running in the root account, if not you may need to add ‘sudo‘ to the commands to get root privileges. I will show you the step-by-step installation of the Neofetch on a Debian 12 (Bookworm).
Prerequisites
- A server running one of the following operating systems: Debian 12 (Bookworm).
- It’s recommended that you use a fresh OS install to prevent any potential issues.
- SSH access to the server (or just open Terminal if you’re on a desktop).
- An active internet connection. You’ll need an internet connection to download the necessary packages and dependencies for Neofetch.
- A
non-root sudo useror access to theroot user. We recommend acting as anon-root sudo user, however, as you can harm your system if you’re not careful when acting as the root.
Install Neofetch on Debian 12 Bookworm
Step 1. Before we install any software, it’s important to make sure your system is up to date by running the following apt commands in the terminal:
sudo apt update
sudo apt install apt-transport-https lsb-release ca-certificates
This command will refresh the repository, allowing you to install the latest versions of software packages.
Step 2. Installing Neofetch on Debian 12.
- Installing Neofetch via the Package Manager
The simplest and recommended method to install Neofetch on Debian 12 is by using the package manager. Now open the terminal and execute the following command to install Neofetch:
sudo apt install neofetch
Enter your password if prompted and confirm the installation by typing “Y” when prompted.
- Building Neofetch from Source
If you prefer to build Neofetch from the source, follow these steps for a more hands-on installation. First, install the necessary build tools by executing the following command:
sudo apt install build-essential
Obtain the Neofetch source code from the official GitHub repository using the following command:
git clone https://github.com/dylanaraps/neofetch.git
Navigate to the cloned directory:
cd neofetch
Build Neofetch using the make command:
make
sudo make install
To ensure that Neofetch built from source is working correctly, follow these steps in the terminal, and enter the command:
neofetch
Step 3. Customizing Neofetch.
Neofetch offers extensive customization options. Let’s explore how you can personalize your Neofetch configuration. Now locate the Neofetch configuration file by executing the command:
nano ~/.config/neofetch/config.conf
Within the configuration file, you can modify various settings, such as the ASCII art or logo, information display options, and enabled or disabled modules.
Step 4. Modifying Neofetch Settings.
Customize your Neofetch display by making changes to the configuration file:
- To change the ASCII art or logo, locate the “image_backend” line and modify it with the desired path or ASCII art.
- Adjust the information display options by navigating to the “info” section. Enable or disable specific elements to tailor the output to your preferences.
- You can also control which modules are displayed. Locate the “modules” section and modify it according to your requirements.
- Once you’ve made your changes, save the file by pressing Ctrl + X, followed by Y, and then hit Enter.
For a detailed list of available options, refer to the Neofetch documentation or use the --help flag:
neofetch --help
Step 4. Neofetch Example Command Line Usage.
Let’s explore some practical examples of using Neofetch on the command line:
- Displaying system information:
neofetch

- Including additional details:
neofetch --gtk2
- Using command-line options to customize output:
neofetch --colors 1 4 3 5
Step 5. Troubleshooting Neofetch Installation Issues.
Encountering issues during the installation process is not uncommon. Here are some common problems and their solutions:
- Common Installation Errors and Solutions
- Error: “Package ‘neofetch’ has no installation candidate.” Solution: Ensure that your package repositories are correctly configured. Update them using the
sudo apt updatecommand and retry the installation. - Error: “Permission denied” or “Unable to locate package.” Solution: Ensure that you have administrative privileges and that your package repository is up to date. Also, verify that the package name is correct.
- Checking System Compatibility
Before installing Neofetch, make sure your Debian 12 system meets the following requirements:
- Debian 12 (or a compatible derivative)
- Terminal emulator (e.g., GNOME Terminal, Xfce Terminal)
- Adequate system resources (disk space, memory, and CPU)
Congratulations! You have successfully installed Neofetch. Thanks for using this tutorial for installing the latest version of the Neofetch on Debian 11 Bookworm. For additional help or useful information, we recommend you check the official Neofetch website.