How To Install Nessus Scanner on AlmaLinux 10

In today’s rapidly evolving cybersecurity landscape, vulnerability scanning has become an essential practice for maintaining robust IT infrastructure security. Organizations face an increasing number of cyber threats, making proactive security assessment crucial for protecting sensitive data and maintaining business continuity. This comprehensive guide will walk you through the complete process of installing and configuring Nessus Scanner on AlmaLinux 10, providing you with the knowledge and tools necessary to implement effective vulnerability management.
AlmaLinux 10 represents an excellent choice for security professionals seeking a stable, enterprise-grade platform for vulnerability scanning operations. The combination of Nessus Scanner’s industry-leading capabilities with AlmaLinux’s reliability creates a powerful security assessment solution. Throughout this tutorial, you’ll learn not only how to install Nessus Scanner but also how to optimize its performance, configure advanced settings, and troubleshoot common issues that may arise during deployment.
This detailed walkthrough covers everything from initial system preparation to running your first vulnerability scan, ensuring you have a complete understanding of the installation process and best practices for ongoing maintenance.
What is Nessus Scanner?
Nessus Scanner, developed by Tenable, stands as one of the most widely recognized and trusted vulnerability assessment tools in the cybersecurity industry. This comprehensive security scanner operates on a client-server architecture, providing organizations with the capability to identify, assess, and prioritize security vulnerabilities across their network infrastructure.
At its core, Nessus utilizes a sophisticated plugin-based system that enables it to detect thousands of different vulnerability types, including missing patches, configuration errors, malware infections, and compliance violations. The scanner’s extensive plugin library is continuously updated to address emerging threats and newly discovered vulnerabilities, ensuring that security assessments remain current and effective.
Nessus offers several deployment options to meet different organizational needs. Nessus Essentials provides a free version suitable for educational purposes and small-scale environments, limited to scanning up to 16 IP addresses. Nessus Professional delivers comprehensive scanning capabilities for commercial environments without IP limitations. Nessus Manager offers centralized management for multiple scanners across large enterprises.
The scanner’s architecture allows for both authenticated and unauthenticated scanning methodologies. Authenticated scans provide deeper vulnerability assessment by utilizing system credentials to examine internal configurations and installed software. Unauthenticated scans perform external assessments similar to those conducted by potential attackers, identifying vulnerabilities accessible without system access.
Nessus generates detailed reports that include vulnerability descriptions, risk ratings, remediation recommendations, and compliance status information. These reports enable security teams to prioritize remediation efforts based on risk severity and potential impact on business operations.
Why Choose AlmaLinux 10 for Nessus Scanner?
AlmaLinux 10 emerges as an outstanding platform for hosting Nessus Scanner due to its enterprise-grade stability, security features, and Red Hat Enterprise Linux (RHEL) compatibility. This community-driven distribution provides the reliability and performance characteristics essential for critical security infrastructure while maintaining cost-effectiveness for organizations of all sizes.
The distribution’s binary compatibility with RHEL ensures that Nessus Scanner operates seamlessly within the AlmaLinux environment. Tenable officially supports AlmaLinux for Nessus deployments, providing confidence in compatibility and ongoing support. This official support translates to reliable updates, comprehensive documentation, and community assistance when needed.
AlmaLinux 10’s security-focused architecture includes advanced features such as SELinux integration, comprehensive firewall management, and robust access control mechanisms. These security enhancements complement Nessus Scanner’s capabilities, creating a hardened environment for vulnerability assessment operations.
The distribution’s long-term support lifecycle ensures stability and security updates for extended periods, reducing the operational overhead associated with frequent system migrations. This stability is particularly important for vulnerability scanning infrastructure, where consistency and reliability are paramount.
Performance optimization features built into AlmaLinux 10 enhance Nessus Scanner’s scanning efficiency. The distribution’s efficient resource management, optimized networking stack, and streamlined package management contribute to faster scan execution and reduced system overhead.
Community support for AlmaLinux continues to grow, with active development communities providing regular updates, security patches, and technical assistance. This community-driven approach ensures that the platform remains current with emerging security requirements and technological advances.
System Requirements and Prerequisites
Before beginning the Nessus Scanner installation process, ensuring your AlmaLinux 10 system meets the necessary hardware and software requirements is crucial for optimal performance and functionality.
Hardware Requirements:
- CPU: Minimum 2 cores (4 cores recommended for optimal performance)
- RAM: 4GB minimum (8GB recommended for concurrent scanning operations)
- Storage: 10GB free disk space minimum (additional space recommended for scan data and logs)
- Network: Stable internet connection for plugin updates and licensing validation
Software Prerequisites:
Your AlmaLinux 10 system should have a fresh installation with all available updates applied. Root privileges or sudo access are required for the installation process. The system should have basic networking tools and utilities installed, including wget, curl, and text editors for configuration management.
Network Requirements:
Nessus Scanner requires access to TCP port 8834 for its web interface. Ensure this port is available and not in use by other services. The system needs outbound internet connectivity for downloading plugin updates and communicating with Tenable’s licensing servers. For scanning operations, the system requires network access to target hosts and systems within your scanning scope.
Pre-installation Checklist:
Verify system updates are current using sudo dnf update -y. Confirm user privileges allow software installation and service management. Test network connectivity to ensure successful package downloads and licensing operations. Check available disk space to accommodate the installation and future scan data storage.
Hostname Configuration:
Modern Nessus installations require proper hostname configuration as a package dependency. Verify your system’s hostname is correctly set and resolvable. If needed, configure the hostname using hostnamectl set-hostname your-hostname before proceeding with the installation.
Downloading Nessus Scanner
The Nessus Scanner download process requires careful attention to package selection and version compatibility to ensure successful installation on AlmaLinux 10.
Accessing the Download Portal:
Navigate to Tenable’s official download page at tenable.com/downloads/nessus. The portal provides access to all available Nessus versions and platform-specific installers. Registration is required to access download links and obtain activation codes for your chosen Nessus version.
Package Selection:
For AlmaLinux 10 installations, select the Red Hat Enterprise Linux 8 x86_64 RPM package, as AlmaLinux maintains binary compatibility with RHEL. The package filename follows the format Nessus-<version>-es8.x86_64.rpm or similar, depending on the specific release version.
Download Methods:
You can download the package directly through your web browser or use command-line tools for server installations. For command-line downloads, use wget or curl:
curl --request GET \
  --url 'https://www.tenable.com/downloads/api/v2/pages/nessus/files/Nessus-10.9.1-el9.x86_64.rpm' \
  --output 'Nessus-10.9.1-el9.x86_64.rpm'
Version Considerations:
Always download the latest stable version to ensure access to the most recent security updates and vulnerability checks. Verify the package checksum if provided to ensure download integrity and prevent corrupted installation files.
License Agreement:
Review and accept Tenable’s software license agreement during the download process. This agreement outlines usage terms, limitations, and support provisions for your Nessus installation. Keep a copy of the license agreement for your records and compliance purposes.
Storage Recommendations:
Save the downloaded package to a dedicated directory such as /tmp or /home/user/downloads for easy access during installation. Ensure the download location has sufficient space and appropriate permissions for the installation process.
Installing Nessus Scanner on AlmaLinux 10
The installation process for Nessus Scanner on AlmaLinux 10 involves several critical steps that must be executed with precision to ensure successful deployment and optimal performance.
Pre-installation System Preparation:
Begin by updating your AlmaLinux 10 system to ensure all packages are current and compatible with the Nessus installation. Execute the following commands to prepare your system:
sudo dnf update -y
sudo dnf install wget nano net-tools htop -y
These commands update the system packages and install essential utilities required for the installation process and ongoing system management.
Hostname Package Installation:
Modern Nessus installations require the hostname package as a dependency. Install it using:
sudo dnf install hostname -yThis dependency ensures proper system identification and networking functionality for the Nessus service.
RPM Package Installation:
Navigate to the directory containing your downloaded Nessus package and install it using the dnf package manager:
sudo dnf install ./Nessus-10.9.1-el9.x86_64.rpmThe dnf package manager automatically resolves dependencies and handles the installation process. Alternative installation methods include using rpm directly:
sudo rpm -ivh Nessus-10.9.1-el9.x86_64.rpmInstallation Verification:
After successful installation, verify that Nessus files are properly installed by checking the installation directory:
ls -la /opt/nessus/The installation creates the following key directories and files:
/opt/nessus/sbin/nessusd– Main Nessus daemon executable/opt/nessus/etc/nessus/– Configuration files directory/opt/nessus/var/nessus/– Runtime data and plugin storage/usr/lib/systemd/system/nessusd.service– Systemd service file
File Permissions and Ownership:
Verify that installed files have correct permissions and ownership. The installation process should automatically set appropriate permissions, but manual verification ensures security and functionality:
sudo chown -R root:root /opt/nessus/
sudo chmod 755 /opt/nessus/sbin/nessusd
Installation Troubleshooting:
Common installation issues include package dependency conflicts, insufficient disk space, or permission errors. If dependency issues arise, resolve them by installing missing packages individually or using the --skip-broken option with dnf. For permission errors, ensure you’re running installation commands with sudo privileges.
Post-installation Configuration:
After successful installation, the Nessus daemon is ready for configuration and startup. The installation process creates necessary user accounts and system configurations automatically, preparing the system for service activation.
Managing Nessus Service
Proper service management is essential for maintaining reliable Nessus Scanner operations and ensuring the system starts automatically after reboots or system maintenance.
Service Activation:
Start the Nessus daemon service using systemctl commands:
sudo systemctl start nessusd
sudo systemctl enable nessusd
The first command immediately starts the service, while the second enables automatic startup during system boot.
Service Status Verification:
Monitor the service status to ensure proper operation:
sudo systemctl status nessusdA properly running service displays “active (running)” status with process information and recent log entries. The output should show the main process ID and confirm that the service is loaded and enabled.
Service Control Commands:
Additional service management commands include:
sudo systemctl stop nessusd      # Stop the service
sudo systemctl restart nessusd   # Restart the service
sudo systemctl reload nessusd    # Reload configuration without restart
Log File Monitoring:
Nessus maintains detailed logs for troubleshooting and monitoring purposes. Access logs using:
sudo journalctl -u nessusd -fThis command displays real-time log entries for the Nessus service, helping identify configuration issues or operational problems.
Resource Monitoring:
Monitor system resource usage to ensure optimal performance:
sudo systemctl show nessusd --property=MainPID
ps aux | grep nessusd
htop
These commands help track CPU usage, memory consumption, and overall system impact of the Nessus service.
Service Configuration:
The Nessus service configuration file located at /usr/lib/systemd/system/nessusd.service contains startup parameters and service dependencies. Modifications should be made carefully and tested thoroughly before production deployment.
Startup Verification:
Verify that the service starts automatically by rebooting the system and checking service status:
sudo reboot
# After reboot:
sudo systemctl status nessusd
Configuring Firewall for Nessus
Firewall configuration is crucial for securing Nessus Scanner while allowing necessary network communications for web interface access and scanning operations.
Firewall Rule Creation:
AlmaLinux 10 uses firewalld as the default firewall management system. Configure firewall rules to allow Nessus web interface access:
sudo firewall-cmd --zone=public --add-port=8834/tcp --permanent
sudo firewall-cmd --reload
These commands permanently add TCP port 8834 to the public zone and reload the firewall configuration.
Rule Verification:
Verify that the firewall rules are correctly applied:
sudo firewall-cmd --list-ports
netstat -tulpn | grep 8834
The first command displays all open ports, while the second confirms that Nessus is listening on port 8834.
Advanced Firewall Configuration:
For enhanced security, consider restricting access to specific IP addresses or networks:
sudo firewall-cmd --zone=public --add-rich-rule='rule family="ipv4" source address="192.168.1.0/24" port protocol="tcp" port="8834" accept' --permanent
sudo firewall-cmd --reload
This configuration limits access to the 192.168.1.0/24 network range, improving security by preventing unauthorized access from external networks.
Zone-based Management:
Firewalld supports zone-based firewall management for different network interfaces and trust levels. Consider creating a dedicated zone for Nessus operations:
sudo firewall-cmd --new-zone=nessus --permanent
sudo firewall-cmd --zone=nessus --add-port=8834/tcp --permanent
sudo firewall-cmd --reload
Firewall Troubleshooting:
If connectivity issues arise, temporarily disable the firewall for testing:
sudo systemctl stop firewalld
# Test connectivity, then re-enable:
sudo systemctl start firewalld
Security Considerations:
Implement additional security measures such as fail2ban for intrusion prevention and regular firewall rule auditing. Monitor firewall logs for suspicious activity and adjust rules as needed for your specific environment.
Accessing Nessus Web Interface
The Nessus web interface provides comprehensive vulnerability scanning capabilities through an intuitive browser-based management console.
Initial Web Access:
Access the Nessus web interface using your preferred web browser by navigating to:
https://your-server-ip:8834For local installations, use https://localhost:8834 to access the interface directly from the server.
SSL Certificate Handling:
Nessus uses a self-signed SSL certificate by default, which triggers browser security warnings. These warnings are normal and expected for initial access. Click “Advanced” or “Continue to site” to proceed with the connection.
Browser Compatibility:
Nessus supports modern web browsers including Chrome, Firefox, Safari, and Edge. Ensure your browser has JavaScript enabled and supports modern web standards for optimal interface functionality.
Connection Troubleshooting:
If the interface is inaccessible, verify that:
- The Nessus service is running (
sudo systemctl status nessusd) - Port 8834 is open in the firewall
- Network connectivity exists between your browser and the server
- No proxy settings interfere with the connection
Security Considerations:
The web interface uses HTTPS encryption to protect authentication credentials and scan data. Avoid accessing the interface over unsecured networks or public Wi-Fi connections. Consider implementing additional authentication layers for enhanced security.
Mobile Access:
While Nessus provides a responsive web interface, full functionality is optimized for desktop browsers. Mobile access is possible for monitoring and basic operations, but comprehensive scanning configuration requires desktop access.
Session Management:
Nessus implements session timeouts for security purposes. Extended periods of inactivity result in automatic logout, requiring re-authentication to continue operations.
Initial Setup and Activation
The initial setup process configures Nessus Scanner for your specific environment and activates your chosen license type.
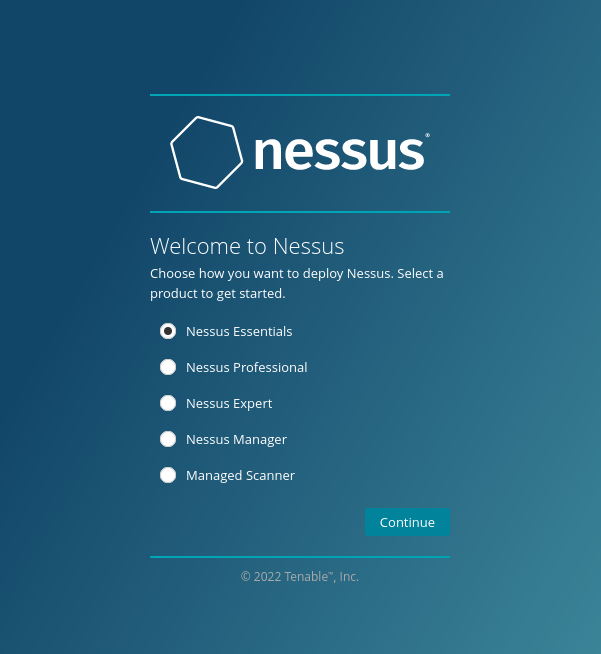
Product Selection:
Upon first access, Nessus presents several product options:
- Nessus Essentials: Free version for educational and personal use (limited to 16 IP addresses)
- Nessus Professional: Full-featured commercial version with unlimited IP scanning
- Nessus Manager: Enterprise management solution for multiple scanners

Registration Process:
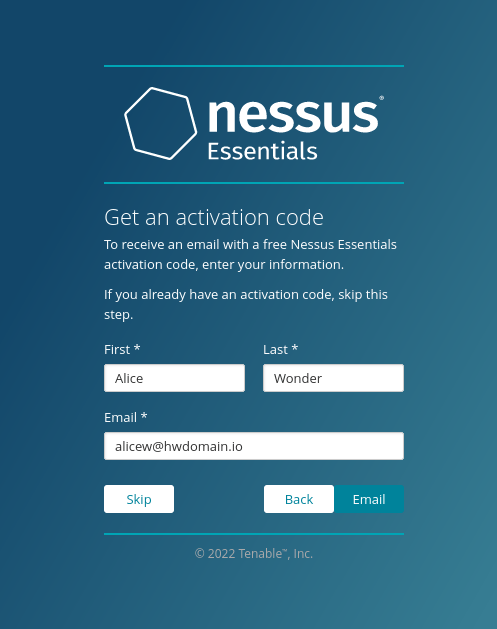
Select your desired product and complete the registration process. For Nessus Essentials, provide your name and email address to receive an activation code. Professional licenses require purchase and activation through Tenable’s licensing system.
Activation Code Entry:
Enter the activation code received via email or provided with your license purchase. The system validates the code and configures appropriate feature access based on your license type.

Administrator Account Creation:
Create an administrator account for Nessus management:
Username: admin (or your preferred username)
Password: [Strong password meeting complexity requirements]
Use a strong password containing uppercase and lowercase letters, numbers, and special characters to ensure account security.
Plugin Installation:
After activation, Nessus automatically downloads and installs vulnerability detection plugins. This process typically takes 10-30 minutes depending on your internet connection speed and server performance. The system displays progress information during plugin compilation.
System Optimization:
During initial setup, configure system settings for optimal performance:
- Update Settings: Enable automatic plugin updates to ensure current vulnerability detection
- Scan Performance: Adjust concurrent scan limits based on system resources
- Network Settings: Configure network interfaces and routing for scan operations
Initial Configuration Verification:
Verify successful setup by checking:
- Plugin compilation completion
- License activation status
- Administrator account functionality
- System resource allocation
Creating and Running Your First Scan
Executing your first vulnerability scan demonstrates Nessus Scanner’s capabilities and validates your installation configuration.
Scan Template Selection:
Navigate to “My Scans” and select “Create a new scan.” Choose from available scan templates:
- Basic Network Scan: General vulnerability assessment for network devices
- Advanced Scan: Comprehensive security evaluation with detailed configuration options
- Web Application Scan: Specialized assessment for web applications and services
- Discovery Scan: Network discovery and asset identification
Scan Configuration:
Configure scan parameters for your target environment:
Basic Settings:
- Name: Descriptive scan name for easy identification
- Description: Detailed description of scan purpose and scope
- Folder: Organizational folder for scan storage
- Targets: IP addresses, hostnames, or network ranges to scan
Advanced Settings:
- Timing: Scan scheduling and frequency options
- Performance: Concurrent host and check limits
- Credentials: Authentication information for comprehensive scanning
- Plugins: Specific vulnerability checks to include or exclude
Target Specification:
Define scan targets using various formats:
- Individual IP addresses:
192.168.1.10 - IP ranges:
192.168.1.1-192.168.1.100 - CIDR notation:
192.168.1.0/24 - Hostnames:
server1.example.com
Scan Execution:
Launch the scan by clicking the “Save” button, then select the start icon from the “My Scans” page. Monitor scan progress through the real-time status display showing completion percentage and current activity.
Results Analysis:
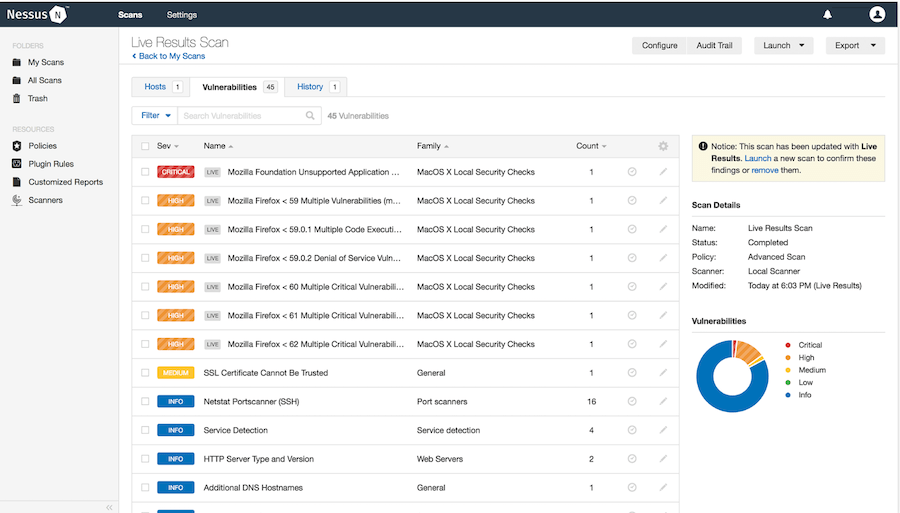
Upon completion, review scan results organized by severity levels:
- Critical: Immediate attention required
- High: Significant security risks
- Medium: Moderate vulnerabilities
- Low: Minor security issues
- Informational: System information and configuration details

Report Generation:
Generate comprehensive reports for stakeholders and remediation teams. Export options include PDF, HTML, CSV, and XML formats for integration with other security tools and workflows.
Troubleshooting Common Issues
Understanding common Nessus Scanner issues and their solutions ensures smooth operation and minimal downtime.
Installation Problems:
Package dependency conflicts can occur during installation. Resolve by installing missing dependencies manually:
sudo dnf install missing-package-name
sudo dnf install --skip-broken ./Nessus-<version>-es8.x86_64.rpm
Service Startup Failures:
If the Nessus service fails to start, check system logs for error messages:
sudo journalctl -u nessusd --no-pagerCommon causes include port conflicts, permission issues, or insufficient system resources. Resolve port conflicts by identifying competing services and adjusting configurations accordingly.
Web Interface Access Problems:
Connection issues to the web interface often result from firewall restrictions or service problems. Verify firewall rules and service status:
sudo firewall-cmd --list-ports
sudo systemctl status nessusd
curl -k https://localhost:8834
Plugin Update Failures:
Plugin update problems can disrupt vulnerability scanning capabilities. Manually trigger plugin updates:
sudo /opt/nessus/sbin/nessuscli update --allCheck internet connectivity and proxy settings if updates continue failing.
Performance Issues:
Scan performance problems may indicate resource constraints or configuration issues. Monitor system resources during scanning:
top
iostat -x 1
Adjust scan performance settings and consider hardware upgrades for persistent performance issues.
License Activation Problems:
License activation failures require verification of activation codes and network connectivity to Tenable’s servers. Retry activation with correct codes and ensure outbound internet access is available.
Security Best Practices and Optimization
Implementing security best practices and optimization techniques ensures reliable, secure, and efficient Nessus Scanner operations.
System Hardening:
Secure your AlmaLinux 10 system hosting Nessus Scanner:
sudo dnf update -y
sudo systemctl enable --now firewalld
sudo setsebool -P httpd_can_network_connect 1
Configure SELinux policies appropriately and disable unnecessary services to reduce attack surface.
Access Control:
Implement strong access controls for Nessus management:
- Use complex passwords for all user accounts
- Enable two-factor authentication when available
- Regularly rotate administrative passwords
- Limit administrative access to authorized personnel only
Network Security:
Segment Nessus scanning networks to prevent lateral movement during compromise. Implement network monitoring to detect suspicious scanning activities and unauthorized access attempts.
Regular Updates:
Maintain current software versions:
sudo dnf update nessus
sudo /opt/nessus/sbin/nessuscli update --all
Subscribe to Tenable security advisories and apply patches promptly to address security vulnerabilities.
Backup and Recovery:
Implement regular backup procedures for Nessus configurations and scan data:
sudo cp -r /opt/nessus/etc/nessus/ /backup/location/
sudo cp -r /opt/nessus/var/nessus/ /backup/location/
Test backup restoration procedures regularly to ensure data recoverability.
Performance Optimization:
Optimize scanning performance through proper resource allocation and configuration tuning. Monitor system performance metrics and adjust scan parameters based on network capacity and target system capabilities.
Compliance Considerations:
Ensure Nessus operations comply with organizational security policies and regulatory requirements. Document scanning procedures and maintain audit trails for compliance reporting.
Congratulations! You have successfully installed Nessus. Thanks for using this tutorial for installing the Nessus vulnerability scanner on your AlmaLinux OS 10 system. For additional help or useful information, we recommend you check the official Nessus website.