How To Install Nethogs on Debian 12

In this tutorial, we will show you how to install Nethogs on Debian 12. Nethogs is not your average network monitoring tool. Instead of breaking down traffic per protocol or per subnet, as most tools do, Nethogs groups bandwidth usage by process. This unique approach allows you to pinpoint exactly which process is consuming your network resources. If your network is slower than expected, Nethogs can help diagnose the culprit.
But the utility of Nethogs extends beyond troubleshooting. It’s also a powerful tool for understanding your applications‘ network behavior, helping you optimize their performance and manage your resources more effectively. Whether you‘re a system administrator managing a server or a developer optimizing an application, Nethogs can provide valuable insights into your network usage.
This article assumes you have at least basic knowledge of Linux, know how to use the shell, and most importantly, you host your site on your own VPS. The installation is quite simple and assumes you are running in the root account, if not you may need to add ‘sudo‘ to the commands to get root privileges. I will show you the step-by-step installation of the Nethogs monitoring network traffic on a Debian 12 (Bookworm).
Prerequisites
- A server running one of the following operating systems: Debian 12 (Bookworm).
- It’s recommended that you use a fresh OS install to prevent any potential issues.
- SSH access to the server (or just open Terminal if you’re on a desktop).
- You will need an active internet connection to download the Nethogs package.
- A domain name pointed to your server IP (optional but recommended for a production environment).
- A
non-root sudo useror access to theroot user. We recommend acting as anon-root sudo user, however, as you can harm your system if you’re not careful when acting as the root.
Install Nethogs on Debian 12 Bookworm
Step 1. Before diving into the installation process, there are a few pre-installation steps to ensure a smooth and successful setup. First, your Debian 12 system should be up-to-date. You can update your system by running the following commands in the terminal:
sudo apt update
sudo apt upgrade
These commands will update your package list and upgrade all your installed packages to their latest versions.
Step 2. Installing Nethogs on Debian 12.
With the pre-installation steps out of the way, we can now proceed to install Nethogs on Debian 12. The installation process involves a series of commands executed in the terminal.
sudo apt install nethogs
This command will download and install Nethogs and any necessary dependencies from the Debian repositories.
Step 3. Using Nethogs.
Once Nethogs is installed, you can start monitoring your network traffic. To launch Nethogs, simply type nethogs in the terminal:
sudo nethogs
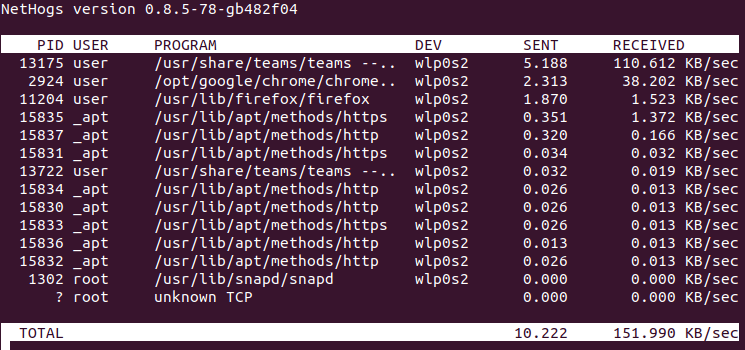
This command will display a live table of your current network traffic, grouped by process. The table shows the total sent and received traffic for each running process, allowing you to see at a glance which processes are consuming your network resources.
Understanding the output of Nethogs is crucial for effective network monitoring. The table includes several columns, including the process ID, the user running the process, the network device being used, the amount of data sent and received, and the total amount of data used.

Nethogs offers several advanced features for more detailed network monitoring. For example, you can filter traffic by the process by appending the process ID to the nethogs command:
sudo nethogs -p <process_id>
You can also set the refresh interval (in seconds) with the -d option:
sudo nethogs -d 5
Nethogs also allows you to display traffic in different units (KB, MB, GB) with the -u option:
sudo nethogs -u KB
Congratulations! You have successfully installed Nethogs. Thanks for using this tutorial to install the latest version of Nethogs network monitoring tool on Debian 12 Bookworm. For additional help or useful information, we recommend you check the official Nethogs website.