How To Install NextCloud on AlmaLinux 9

Nextcloud is a powerful open-source platform that offers secure file storage, collaboration tools, and seamless integration with various applications. With Nextcloud, you can create your own private cloud storage solution, ensuring complete control over your data. AlmaLinux 9, a stable and secure Linux distribution, provides an ideal foundation for hosting Nextcloud. In this comprehensive guide, we will walk you through the process of installing Nextcloud on AlmaLinux 9, enabling you to set up your own self-hosted cloud storage solution.
Prerequisites and Requirements
Before we dive into the installation process, let’s ensure that your system meets the necessary requirements:
System Requirements
- A server or virtual machine running AlmaLinux 9
- Minimum 2 GB of RAM (4 GB recommended)
- Dual-core CPU or better
- At least 20 GB of disk space
Software Requirements
- AlmaLinux 9 installed and updated
- LAMP stack components: Apache web server, MariaDB/MySQL database server, PHP
Access Requirements
- SSH access to your AlmaLinux 9 server
- Non-root user with sudo privileges
Make sure your system fulfills these requirements before proceeding with the installation.
Step 1: Preparing the System
To begin, log in to your AlmaLinux 9 server using SSH and update the system packages to ensure you have the latest versions:
sudo dnf update -yNext, install the necessary utilities that we’ll use throughout the installation process:
sudo dnf install wget nano unzip -yFor the Nextcloud installation to work smoothly, we need to temporarily set SELinux to permissive mode:
sudo setenforce 0Remember to re-enable SELinux after the installation by running sudo setenforce 1.
Step 2: Installing Apache Web Server
Nextcloud requires a web server to host its files and handle client requests. We’ll use Apache, the most widely used web server. Install Apache using the following command:
sudo dnf install httpd -yOnce the installation is complete, start the Apache service and enable it to start automatically on system boot:
sudo systemctl start httpd
sudo systemctl enable httpd
To allow incoming HTTP and HTTPS traffic, configure the firewall:
sudo firewall-cmd --permanent --add-service=http
sudo firewall-cmd --permanent --add-service=https
sudo firewall-cmd --reload
Apache is now installed and ready to serve Nextcloud.
Step 3: Installing PHP and Required Modules
Nextcloud is written in PHP, so we need to install PHP and its essential modules for Nextcloud to function properly. Run the following command to install PHP and the required modules:
sudo dnf install php php-gd php-mbstring php-intl php-pecl-apcu php-mysqlnd php-opcache php-json php-zip php-curl -yAfter the installation, you can verify the PHP version by running:
php -vMake sure the PHP version is compatible with the Nextcloud release you plan to install.
Step 4: Installing MariaDB Database Server
Nextcloud uses a database to store user information, file metadata, and other essential data. We’ll use MariaDB, a popular open-source database server. Install MariaDB with the following command:
sudo dnf install mariadb-server -yOnce installed, start the MariaDB service and enable it to start automatically on system boot:
sudo systemctl start mariadb
sudo systemctl enable mariadb
To secure your MariaDB installation, run the mysql_secure_installation script:
sudo mysql_secure_installationFollow the prompts to set a strong root password, remove anonymous users, disable remote root login, and remove test databases.
Step 5: Creating a Database for Nextcloud
Nextcloud requires a dedicated database to store its data. Log in to the MariaDB shell using the root password you set earlier:
sudo mysql -u root -pCreate a new database for Nextcloud:
CREATE DATABASE nextcloud;Create a dedicated database user with appropriate permissions:
CREATE USER 'nextclouduser'@'localhost' IDENTIFIED BY 'your_strong_password';
GRANT ALL PRIVILEGES ON nextcloud.* TO 'nextclouduser'@'localhost';
FLUSH PRIVILEGES;
Replace your_strong_password with a secure password of your choice. Exit the MariaDB shell:
exit;Step 6: Downloading and Configuring Nextcloud
Download the latest Nextcloud release from the official website using wget:
wget https://download.nextcloud.com/server/releases/latest.zipExtract the downloaded ZIP file to the Apache web server directory:
sudo unzip latest.zip -d /var/www/html/Set the appropriate ownership and permissions for the Nextcloud directory:
sudo chown -R apache:apache /var/www/html/nextcloud/
sudo chmod -R 755 /var/www/html/nextcloud/
Nextcloud files are now in place and ready for configuration.
Step 7: Configuring Apache for Nextcloud
To configure Apache to serve Nextcloud, create a new virtual host configuration file:
sudo nano /etc/httpd/conf.d/nextcloud.confAdd the following configuration:
<VirtualHost *:80>
    DocumentRoot /var/www/html/nextcloud
    ServerName your_domain.com

    <Directory /var/www/html/nextcloud/>
        Require all granted
        AllowOverride All
        Options FollowSymLinks MultiViews
        <IfModule mod_dav.c>
            Dav off
        </IfModule>
    </Directory>
</VirtualHost>
Replace your_domain.com with your actual domain name. Save the file and exit the editor.
Enable the new configuration by restarting Apache:
sudo systemctl restart httpdStep 8: Securing Nextcloud with SSL/TLS
To ensure secure communication between clients and your Nextcloud server, it’s essential to configure SSL/TLS. We’ll use Certbot, a tool that simplifies the process of obtaining and installing SSL certificates from Let’s Encrypt.
Install Certbot and the Apache plugin:
sudo dnf install certbot python3-certbot-apache -yObtain and install SSL certificates for your domain:
sudo certbot --apache -d your_domain.comFollow the prompts to provide your email address and agree to the Let’s Encrypt terms of service. Certbot will automatically configure Apache to use the obtained SSL certificates.
Step 9: Finalizing Installation via Web Interface
With all the necessary components in place, you can now finalize the Nextcloud installation through the web interface:
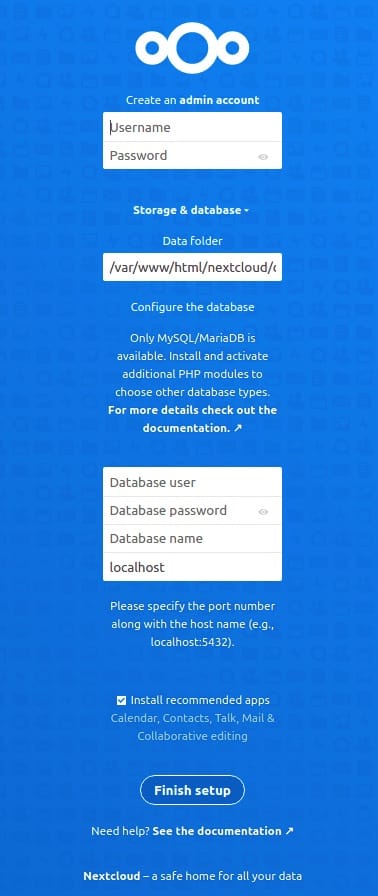
- Open a web browser and navigate to your Nextcloud server’s domain (e.g.,
https://your_domain.com). - You will be greeted with the Nextcloud setup page. Choose a username and password for your admin account.
- Provide the database details you configured earlier (database user, password, and database name).
- Click the “Finish setup” button to complete the installation process.

Congratulations! You have successfully installed NextCloud. Thanks for using this tutorial for installing NextCloud open-source self-hosted on your AlmaLinux 9 system. For additional help or useful information, we recommend you check the official NextCloud website.