How To Install Nextcloud on Fedora 41

Nextcloud is a powerful open-source platform that allows you to create your own private cloud storage solution. With it, you can store, share, and sync data across multiple devices securely. In this guide, we will walk you through the process of installing Nextcloud on Fedora 41. Whether you’re using Fedora for personal or business purposes, this detailed tutorial will help you set up Nextcloud efficiently.
Prerequisites
Before diving into the installation process, ensure you have the following prerequisites in place:
- A fresh installation of Fedora 41 (either server or desktop edition).
- Root or sudo privileges on your system.
- A stable internet connection and a static IP address configured.
- A minimum of 2 GB RAM and 10 GB disk space for a basic setup (more resources may be required for larger installations).
Step 1: Update Your Fedora System
Before installing any software, it’s essential to make sure your system is up-to-date with the latest packages and security patches. This ensures a smooth installation process and minimizes compatibility issues.
sudo dnf update -yThis command will update all installed packages to their latest versions. Once the update is complete, reboot your system if necessary:
sudo rebootStep 2: Install Apache Web Server
Nextcloud requires a web server to operate. In this guide, we will be using Apache, one of the most popular and reliable web servers available on Linux systems.
To install Apache on Fedora 41, run the following command:
sudo dnf install httpd -yOnce installed, start the Apache service and enable it to start automatically at boot:
sudo systemctl start httpd
sudo systemctl enable httpd
You also need to configure the firewall to allow HTTP traffic:
sudo firewall-cmd --permanent --add-service=http
sudo firewall-cmd --reload
Your Apache web server is now installed and running.
Step 3: Install PHP and Required Modules
Nextcloud is built using PHP, so we need to install PHP along with several required extensions for optimal performance.
Run the following command to install PHP and its necessary modules:
sudo dnf install php php-gd php-curl php-dom php-xml php-mbstring php-json php-zip php-intl -yAfter installation, verify that PHP is installed correctly by checking its version:
php --versionIf needed, you can adjust specific PHP settings like memory limits or file upload sizes by editing the /etc/php.ini file. For example:
sudo nano /etc/php.iniYou might want to increase the memory limit for larger installations:
memory_limit = 512MStep 4: Install and Configure MariaDB Database
Nextcloud requires a database to store its data. MariaDB is an excellent choice due to its performance and compatibility with MySQL-based applications like Nextcloud.
To install MariaDB on Fedora 41, run the following command:
sudo dnf install mariadb mariadb-server -yStart and enable MariaDB service:
sudo systemctl start mariadb
sudo systemctl enable mariadb
Secure MariaDB Installation
It’s important to secure your MariaDB installation by setting a root password and removing unnecessary access permissions. Run the following command:
sudo mysql_secure_installationYou will be prompted with several questions; follow these recommendations:
- Set root password: Yes (choose a strong password).
- Remove anonymous users: Yes.
- Disallow root login remotely: Yes.
- Remove test database: Yes.
- Reload privilege tables now: Yes.
Create Database and User for Nextcloud
Create a new database and user for Nextcloud by logging into MariaDB as root:
mysql -u root -pCreate the database and user with appropriate privileges:
CREATE DATABASE nextcloud;
CREATE USER 'nextcloud_user'@'localhost' IDENTIFIED BY 'password';
GRANT ALL PRIVILEGES ON nextcloud.* TO 'nextcloud_user'@'localhost';
FLUSH PRIVILEGES;
EXIT;
Step 5: Download and Install Nextcloud
The next step is to download the latest version of Nextcloud from their official website. Use the following commands to download and extract it into your web directory:
wget https://download.nextcloud.com/server/releases/latest.tar.bz2
tar xjf latest.tar.bz2
sudo mv nextcloud /var/www/html/
Set Permissions for Nextcloud Directory
You must set proper permissions on the Nextcloud directory so that Apache can access it. Run these commands:
sudo chown -R apache:apache /var/www/html/nextcloud/
sudo chmod -R 755 /var/www/html/nextcloud/
Step 6: Configure Apache for Nextcloud
You now need to configure Apache to serve your Nextcloud instance. Create a new virtual host configuration file for Nextcloud:
sudo nano /etc/httpd/conf.d/nextcloud.confAdd the following configuration inside the file (replace “your_domain_or_IP_address” with your actual domain or IP):
<VirtualHost *:80>
    ServerName your_domain_or_IP_address
    DocumentRoot /var/www/html/nextcloud/
    ErrorLog /var/log/httpd/nextcloud_error.log
    CustomLog /var/log/httpd/nextcloud_access.log combined

    <Directory /var/www/html/nextcloud/>
        AllowOverride All
        Require all granted
    </Directory>
</VirtualHost>
Save and close the file. Then restart Apache for changes to take effect:
sudo systemctl restart httpdStep 7: Configure SELinux and Firewall Settings (Optional)
If SELinux is enabled on your system, you’ll need to make some adjustments so that it doesn’t interfere with Nextcloud’s operation.
Allow HTTPD Scripts Through SELinux
sudo setsebool httpd_can_network_connect on -P
sudo chcon -R --type httpd_sys_rw_content_t /var/www/html/nextcloud/
Add Firewall Rules for HTTPS (Optional)
If you’re planning on using SSL/TLS encryption (which is highly recommended), you’ll need to allow HTTPS traffic through your firewall as well:
sudo firewall-cmd --permanent --add-service=https
sudo firewall-cmd --reload
Step 8: Accessing Nextcloud Web Interface for Initial Setup
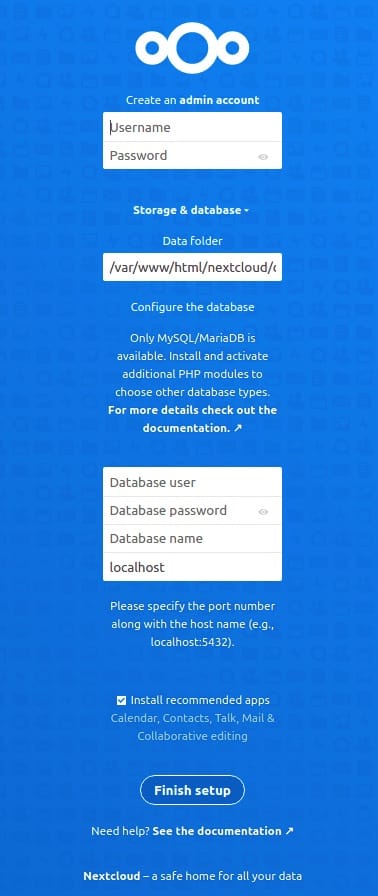
Your server is now ready! Open a web browser and navigate to http://your_domain_or_IP_address/nextcloud. You will be greeted by the initial setup wizard.
- Create an admin account by entering a username and password.
- Select “Storage & Database” options — enter the database credentials created earlier (‘nextcloud_user’, password, and database name).
- Select any additional options based on your preferences (e.g., enabling default apps).

Troubleshooting Common Issues During Installation
- If you encounter permission errors during installation, double-check that you’ve set correct ownership of the Nextcloud directory using `
chown` commands. - If you face database connection issues during setup, ensure that MariaDB is running properly and that you’ve entered correct credentials in the setup wizard.
- If SSL certificates are not working correctly after configuring HTTPS, ensure that you’ve properly configured Let’s Encrypt or other SSL providers.
Congratulations! You have successfully installed Nextcloud. Thanks for using this tutorial for installing the Nextcloud open-source file hosting on your Fedora 41 system. For additional or useful information, we recommend you check the official Nextcloud website.