How To Install Nextcloud on Manjaro

Nextcloud is an open-source cloud storage solution that allows users to host their own file sharing and collaboration platform. It serves as an excellent alternative to proprietary services like Dropbox and Google Drive, providing users with complete control over their data. This article will guide you through the process of installing Nextcloud on Manjaro, ensuring you have a self-hosted cloud solution that meets your needs.
Introduction
With the growing concerns around data privacy and security, self-hosting your own cloud service has become increasingly popular. Nextcloud not only offers file storage but also provides additional features such as document collaboration, calendar synchronization, and more. This comprehensive guide will walk you through the installation process on a Manjaro system, covering all necessary prerequisites and configurations.
Prerequisites
System Requirements
- Minimum Hardware: 1 CPU core, 512 MB RAM, 1 GB disk space.
- Recommended Hardware: 2 CPU cores, 2 GB RAM, SSD for performance.
Necessary Software Packages
- Web Server: Apache or Nginx.
- Database: MariaDB (or MySQL).
- PHP: Version 7.4 or higher with necessary extensions.
Before starting the installation, ensure that your system is updated. Use the following command:
sudo pacman -SyuPreparing the System
Updating the System
Keeping your system updated ensures that you have the latest security patches and software improvements. Run the following command to update your Manjaro system:
sudo pacman -SyuInstalling Required Dependencies
You will need to install Apache (or Nginx), PHP, and MariaDB. Here’s how to do it:
# Install Apache
sudo pacman -S apache

# Install PHP and necessary modules
sudo pacman -S php php-apache php-gd php-intl php-mysql php-curl php-xml

# Install MariaDB
sudo pacman -S mariadb
After installation, start and enable the services:
# Start Apache
sudo systemctl start httpd
sudo systemctl enable httpd

# Start MariaDB
sudo systemctl start mariadb
sudo systemctl enable mariadb
Setting Up the Database
Installing MariaDB
If you haven’t already installed MariaDB, you can do so using the package manager as shown above. After installation, secure your MariaDB installation:
sudo mysql_secure_installationThis command will prompt you to set a root password and configure security settings.
Configuring MariaDB for Nextcloud
Create a database and user for Nextcloud by accessing the MariaDB shell:
sudo mysql -u root -p
CREATE DATABASE nextcloud;
CREATE USER 'nextclouduser'@'localhost' IDENTIFIED BY 'your_password';
GRANT ALL PRIVILEGES ON nextcloud.* TO 'nextclouduser'@'localhost';
FLUSH PRIVILEGES;
EXIT;
Downloading and Installing Nextcloud
Downloading Nextcloud
You can download the latest version of Nextcloud from its official website. Use the following commands to download and extract it:
cd /tmp
wget https://download.nextcloud.com/server/releases/latest.zip
unzip latest.zip -d /srv/http/
Setting Permissions
After extracting Nextcloud files, set the correct permissions for the web server to access them:
sudo chown -R http:http /srv/http/nextcloud
sudo chmod -R 755 /srv/http/nextcloud
Configuring the Web Server
Apache Configuration
Create a new configuration file for Nextcloud in Apache’s configuration directory:
sudo nano /etc/httpd/conf/extra/nextcloud.conf
Add the following configuration settings:
Alias /nextcloud "/srv/http/nextcloud/"

<Directory /srv/http/nextcloud/>
   Options +FollowSymlinks
   AllowOverride All
   Require all granted
<IfModule mod_dav.c>
Dav off
</IfModule>
</Directory>
Enable necessary Apache modules:
sudo a2enmod rewrite headers env dir mime
sudo systemctl restart httpd
Nginx Configuration (if applicable)
If you’re using Nginx instead of Apache, create a new server block configuration file:
server {
    listen 80;
    server_name your_domain_or_IP;

    root /srv/http/nextcloud;

    location / {
        index index.php index.html index.htm;
        try_files $uri $uri/ /index.php$request_uri;
    }

    location ~ \.php$ {
        include fastcgi_params;
        fastcgi_pass unix:/run/php-fpm/php-fpm.sock;
        fastcgi_index index.php;
        fastcgi_param SCRIPT_FILENAME $document_root$fastcgi_script_name;
    }

    location ~ /\.ht {
        deny all;
    }
}
Restart Nginx after saving your configuration changes:
sudo systemctl restart nginx
Finalizing Installation via Web Interface
Accessing Nextcloud Setup Wizard
You can now access the Nextcloud setup wizard by navigating to your server’s IP address or domain name followed by ‘/nextcloud‘. For example:
http://your_domain_or_IP/nextcloud
Completing the Setup
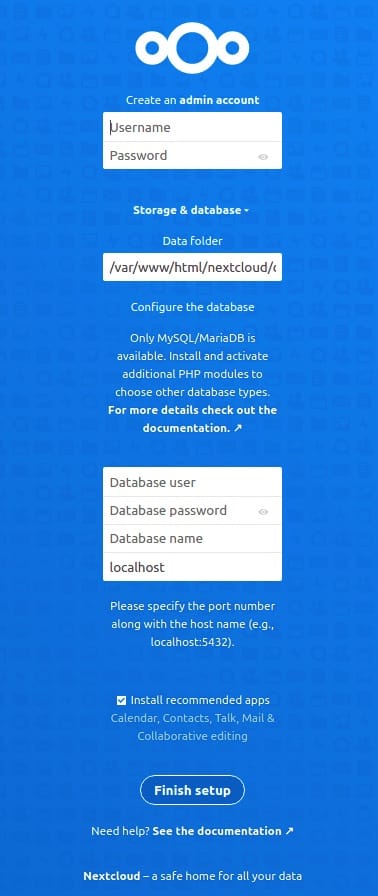
The setup wizard will prompt you for database details and admin account information. Fill in these fields as follows:
- User name: Admin username.
- Password: Admin password.
- Select database type: MySQL/MariaDB.
- User: nextclouduser.
- Password: your_password.
- Name of database: nextcloud.
- Add data folder location (optional):
If everything is configured correctly, click on “Finish Setup” to complete the installation process. You should now see your Nextcloud dashboard!
Post-Installation Configuration
Configuring Additional Settings
Your Nextcloud installation is now up and running! However, there are several additional configurations you might want to consider for optimal performance and security. Here are some recommendations:
- Email Configuration:Set up an SMTP server in Nextcloud settings to enable email notifications for user activities.
- Cron Jobs:Configure cron jobs for background tasks like file scanning and notifications. Use the following command:
* * * * * php -f /srv/http/nextcloud/cron.php - Ssl Configuration (Optional): For enhanced security, consider setting up HTTPS using Let’s Encrypt or another certificate authority.You can use Certbot for this purpose:
sudo pacman -S certbot
certbot --apache
certbot --nginx
Troubleshooting Common Issues
Error: Cannot write into “apps” directory.
This error usually indicates that your web server does not have write permissions to the apps directory. You can resolve this by adjusting permissions as follows:
sudochown -R http:http /srv/http/nextcloud/apps
chmod -R 775 /srv/http/nextcloud/apps
Error: Your data directory is invalid.
If you encounter this error during setup, ensure that your data directory exists and has proper permissions set for the web server user. Check if there is a file called “.ocdata” in your data directory.
Error: Internal Server Error (500).
This error may arise from misconfigurations in either Apache or Nginx settings. Check your configuration files for any syntax errors using:
sudo nano /etc/httpd/conf/httpd.conf
sudo nano /etc/nginx/nginx.conf
You can also check logs for more details:
sudo tail -f /var/log/httpd/error_log
sudo tail -f /var/log/nginx/error.log
Congratulations! You have successfully installed Nextcloud. Thanks for using this tutorial for installing the Nextcloud open-source file hosting on Manjaro system. For additional or useful information, we recommend you check the official Nextcloud website.