How To Install Nextcloud on Ubuntu 24.04 LTS

Nextcloud is a powerful, open-source collaboration platform that enables you to host your own file sharing, calendar, contacts, and more. By installing Nextcloud on your Ubuntu 24.04 LTS server, you gain complete control over your data and ensure privacy. In this comprehensive guide, we’ll walk you through the step-by-step process of setting up Nextcloud on Ubuntu 24.04 LTS, optimizing its performance, and enhancing security.
Prerequisites
Before you begin, ensure that you have the following:
- An Ubuntu 24.04 LTS server with a non-root user having sudo privileges.
- Minimum hardware requirements: 1GB RAM, 1 CPU core, and 10GB disk space.
- A domain name pointed to the server’s IP address for web access.
Step 1: System Preparation
Start by updating and upgrading the system packages to ensure all software is current. Open a terminal and run the following commands:
sudo apt update
sudo apt upgrade
Next, install essential tools like wget and unzip:
sudo apt install wget unzip
Step 2: Install LAMP Stack
Nextcloud requires a web server, PHP, and a database to function. We’ll install the LAMP (Linux, Apache, MySQL/MariaDB, PHP) stack to fulfill these requirements.
Apache Installation
Install Apache2 as the web server:
sudo apt install apache2
Once installed, the Apache service will start automatically. You can verify it by accessing your server’s IP address in a web browser.
PHP Installation
Install PHP 8.3 and the necessary modules for Nextcloud:
sudo apt install php8.3 libapache2-mod-php8.3 php8.3-mysql php8.3-xml php8.3-mbstring php8.3-gd php8.3-curl php8.3-zip php8.3-intl php8.3-bcmath php8.3-gmp
MariaDB Installation
Install MariaDB as the database server:
sudo apt install mariadb-server
Secure the MariaDB installation by running the security script:
sudo mysql_secure_installation
Follow the prompts to set a strong root password and configure other security options.
Create a database and user for Nextcloud:
sudo mysql -u root -p
Enter the MariaDB root password when prompted. Then, run the following SQL commands:
CREATE DATABASE nextcloud;
GRANT ALL ON nextcloud.* TO 'nextcloud'@'localhost' IDENTIFIED BY 'your_strong_password';
FLUSH PRIVILEGES;
EXIT;
Replace your_strong_password with a secure password for the Nextcloud database user.
Step 3: Download and Configure Nextcloud
Download the latest Nextcloud release using wget:
wget https://download.nextcloud.com/server/releases/latest.zip
Extract the Nextcloud archive to the Apache web root directory:
sudo unzip latest.zip -d /var/www/
Set proper permissions for Nextcloud files and directories:
sudo chown -R www-data:www-data /var/www/nextcloud/
sudo chmod -R 755 /var/www/nextcloud/
Step 4: Configure Apache for Nextcloud
Create an Apache virtual host configuration file for Nextcloud:
sudo nano /etc/apache2/sites-available/nextcloud.conf
Add the following configuration:
<VirtualHost *:80>
    DocumentRoot /var/www/nextcloud/
    ServerName your_domain.com

    <Directory /var/www/nextcloud/>
        Options +FollowSymlinks
        AllowOverride All
        Require all granted
        <IfModule mod_dav.c>
            Dav off
        </IfModule>
    </Directory>

    ErrorLog ${APACHE_LOG_DIR}/error.log
    CustomLog ${APACHE_LOG_DIR}/access.log combined
</VirtualHost>
Replace your_domain.com with your actual domain name.
Enable the Nextcloud site and necessary Apache modules:
sudo a2ensite nextcloud.conf
sudo a2enmod rewrite headers env dir mime
sudo systemctl restart apache2
Step 5: Finalize Nextcloud Installation
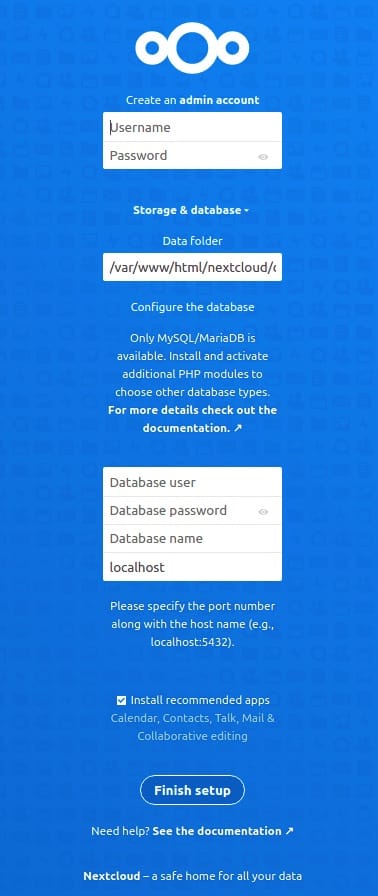
Access the Nextcloud web installer through a browser by visiting http://your_domain.com. You will see the Nextcloud setup page.

Enter the database credentials you created earlier and create an admin account. Click “Finish Setup” to complete the installation.
After the installation, you will be redirected to the Nextcloud dashboard. Install any recommended apps and resolve any security warnings that may appear.
Step 6: Enhance Performance and Security
Performance Tuning
To improve Nextcloud’s performance, install and configure PHP-FPM, enable OPCache, APCu, and Redis for caching:
sudo apt install php8.3-fpm php8.3-opcache php-apcu redis-server
Configure PHP-FPM by editing the www.conf file:
sudo nano /etc/php/8.3/fpm/pool.d/www.conf
Uncomment and modify the following lines:
pm = dynamic
pm.max_children = 120
pm.start_servers = 12
pm.min_spare_servers = 6
pm.max_spare_servers = 18
Restart PHP-FPM:
sudo systemctl restart php8.3-fpm
Enable OPCache by editing the 10-opcache.ini file:
sudo nano /etc/php/8.3/mods-available/opcache.ini
Uncomment and modify the following lines:
opcache.enable=1
opcache.memory_consumption=128
opcache.interned_strings_buffer=8
opcache.max_accelerated_files=10000
opcache.revalidate_freq=1
Install and configure APCu and Redis for Nextcloud:
sudo apt install php-apcu php-redis
Edit the Nextcloud config file:
sudo nano /var/www/nextcloud/config/config.php
Add the following lines to enable caching:
'memcache.local' => '\OC\Memcache\APCu',
'memcache.distributed' => '\OC\Memcache\Redis',
'redis' => [
    'host' => 'localhost',
    'port' => 6379,
],
Restart Apache:
sudo systemctl restart apache2
Security Enhancements
Set up a firewall using ufw to restrict access to necessary ports:
sudo ufw allow 80/tcp
sudo ufw allow 443/tcp
sudo ufw enable
Configure SSL with Let’s Encrypt to enable HTTPS:
sudo apt install certbot python3-certbot-apache
sudo certbot --apache -d your_domain.com
Follow the prompts to obtain and configure the SSL certificate.
Enable HTTP/2 in the Apache configuration:
sudo nano /etc/apache2/apache2.conf
Add the following line:
Protocols h2 http/1.1
Restart Apache:
sudo systemctl restart apache2
Strict Transport Security
Configure Apache to use HSTS for enhanced security. Edit the Nextcloud virtual host file:
sudo nano /etc/apache2/sites-available/nextcloud.conf
Add the following line inside the <VirtualHost> block:
Header always set Strict-Transport-Security "max-age=15552000; includeSubDomains"
Restart Apache:
sudo systemctl restart apache2
Congratulations! You have successfully installed Nextcloud. Thanks for using this tutorial for installing the Nextcloud with LAMP on Ubuntu 24.04 LTS system. For additional help or useful information, we recommend you check the Nextcloud website.