How To Install OBS Studio on Debian 13

OBS Studio stands as the premier open-source broadcasting software for content creators, streamers, and video professionals worldwide. This comprehensive guide details multiple installation methods for OBS Studio on Debian 13 (Trixie), ensuring seamless streaming and recording capabilities for users of all experience levels.
System Requirements and Prerequisites
Hardware Requirements
Before installing OBS Studio on Debian 13, verify that the system meets the minimum hardware specifications. RAM requirements include at least 4GB of system memory, though 8GB or more delivers optimal performance for high-resolution streaming and recording operations.
The CPU specifications demand a modern dual-core processor, with quad-core Intel or AMD processors recommended for 1080p streaming. GPU requirements include OpenGL 3.2 compatible graphics cards, with dedicated NVIDIA or AMD graphics providing hardware acceleration benefits.
Storage considerations include 500MB for the base installation, with additional space required for recordings and temporary files. Network bandwidth of 5-10 Mbps upload speed ensures stable streaming quality.
Software Prerequisites
Debian 13 Trixie installation must be current with updated package repositories. Essential system libraries include FFmpeg for video encoding, V4l2loopback-dkms for virtual camera functionality, and development tools if building from source.
Verify the Debian version using the lsb_release -a command to confirm Trixie compatibility. Ensure sudo privileges are configured for the user account performing the installation.
Pre-Installation System Preparation
System Updates and Repository Configuration
Update the Debian package database to ensure access to the latest software versions. Execute comprehensive system updates to maintain compatibility and security:
sudo apt update
sudo apt upgrade -y
sudo apt autoremove
Verify the system architecture using uname -m to confirm amd64 or arm64 compatibility. Check available disk space with df -h to ensure sufficient storage capacity.
Terminal Access and Permissions
Confirm sudo access by running sudo whoami, which should return “root” if permissions are correctly configured. Install essential build tools that may be required for certain installation methods:
sudo apt install curl wget gnupg2 software-properties-common apt-transport-httpsCreate a backup of the current system configuration before proceeding with installation. This precautionary step enables system restoration if complications arise.
Method 1: Installing from Official Debian Repository
Standard APT Installation
The official Debian repository provides the most stable OBS Studio installation method. This approach ensures automatic security updates and seamless integration with the Debian package management system.
Execute the standard installation command:
sudo apt update
sudo apt install obs-studio
The package manager automatically resolves dependencies, including required multimedia libraries and system components. OBS Studio version 30.2.3+dfsg-3 is currently available in the Debian 13 repositories.
Installation Verification
Verify the installation success by checking the installed version:
obs-studio --versionLaunch OBS Studio from the terminal to confirm proper functionality:
obs-studioThe application should start without errors, displaying the main interface with default scenes and sources panels.
Advantages and Limitations
Repository installation benefits include stability, automatic updates, and official Debian support. The packages undergo rigorous testing before inclusion in stable repositories, ensuring reliability for production environments.
Limitations include potentially older software versions compared to upstream releases. Advanced features or recent bug fixes may not be immediately available through this method.
Method 2: Installing via Deb-Multimedia Repository
Repository Setup and GPG Key Import
The Deb-Multimedia repository provides newer OBS Studio versions with enhanced multimedia codec support. Import the repository GPG key to ensure package authenticity:
sudo gpg --no-default-keyring --keyring /usr/share/keyrings/deb-multimedia.gpg --keyserver keyserver.ubuntu.com --recv-keys 5C808C2B65558117Add the Deb-Multimedia repository to the system sources:
echo "deb [signed-by=/usr/share/keyrings/deb-multimedia.gpg] https://www.deb-multimedia.org trixie main non-free" | sudo tee /etc/apt/sources.list.d/deb-multimedia.listEnhanced Installation Process
Update the package database to include Deb-Multimedia packages:
sudo apt updateInstall the deb-multimedia-keyring package:
sudo apt install deb-multimedia-keyringProceed with OBS Studio installation from the enhanced repository:
sudo apt install obs-studio ffmpegThis method provides access to newer FFmpeg libraries and additional multimedia codecs not available in standard repositories.
Benefits of Enhanced Repository
The Deb-Multimedia approach delivers superior codec support for various streaming platforms and recording formats. Enhanced performance optimization and newer feature sets become available through this installation method.
Hardware acceleration capabilities receive improvements through updated libraries and drivers. Plugin compatibility extends beyond standard repository limitations.
Method 3: Installing OBS Studio via Flatpak
Flatpak Installation and Configuration
Flatpak technology provides sandboxed application environments with enhanced security and isolation. Install Flatpak on Debian 13:
sudo apt install flatpakAdd the Flathub repository for accessing Flatpak applications:
sudo flatpak remote-add --if-not-exists flathub https://flathub.org/repo/flathub.flatpakrepoOBS Studio Flatpak Installation
Install OBS Studio through Flatpak with automatic dependency resolution:
flatpak install flathub com.obsproject.Studio -yGrant necessary permissions for camera and media access:
flatpak permission-set com.obsproject.Studio camera yes
flatpak permission-set com.obsproject.Studio microphone yes
Launch the Flatpak version using:
flatpak run com.obsproject.StudioFlatpak Advantages and Considerations
Sandboxed environments provide enhanced security through application isolation. Automatic updates ensure access to the latest upstream releases without system-wide dependency conflicts.
Performance considerations include slightly increased memory usage and longer startup times. Storage requirements expand due to bundled dependencies within the Flatpak package.
Method 4: Installing via Snap Package
Snap Installation Process
Snap packages offer universal Linux compatibility with automatic update mechanisms. Enable snap support on Debian 13:
sudo apt install snapd
sudo systemctl enable --now snapd.socket
Install OBS Studio via Snap:
sudo snap install obs-studioInterface Connections and Permissions
Connect essential interfaces for full functionality:
sudo snap connect obs-studio:camera
sudo snap connect obs-studio:audio-record
sudo snap connect obs-studio:removable-media
sudo snap connect obs-studio:home
These connections enable camera access, audio recording capabilities, and file system permissions required for OBS Studio operations.
Snap-Specific Benefits
Automatic rollback capabilities allow reverting to previous versions if issues arise. Confined application execution enhances system security through strict permission controls.
Update management occurs transparently through the snap daemon, ensuring consistent software versions across different systems.
Method 5: Building OBS Studio from Source
Development Environment Setup
Source compilation provides access to cutting-edge features and custom optimization options. Install comprehensive build dependencies:
sudo apt install build-essential cmake git ninja-build pkg-config qtbase5-dev libqt5svg5-dev qtbase5-private-dev libavcodec-dev libavfilter-dev libavformat-dev libavutil-dev libswresample-dev libswscale-dev libx11-dev libgl1-mesa-dev libpulse-dev libxcomposite-dev libxinerama-dev libv4l-dev libudev-dev libfreetype6-dev libfontconfig-dev qtwayland5 libwayland-dev libdrm-devInstall additional libraries for enhanced functionality:
sudo apt install libssl-dev libcurl4-openssl-dev libjson-c-dev libwebsocketpp-dev libasio-devSource Code Acquisition and Compilation
Clone the official OBS Studio repository:
git clone --recursive https://github.com/obsproject/obs-studio.git
cd obs-studio
Create and configure the build directory:
mkdir build && cd build
cmake -DUNIX_STRUCTURE=1 -DCMAKE_INSTALL_PREFIX=/usr -DCMAKE_BUILD_TYPE=Release ..
Compile using all available CPU cores:
make -j$(nproc)Package Creation and Installation
Generate Debian packages from the compiled source:
cpack -G DEBInstall the generated package:
sudo dpkg -i obs-studio-*.debMark the package to prevent automatic upgrades:
sudo apt-mark hold obs-studioAdvanced Configuration Options
Custom build flags enable specific feature sets and optimizations. Browser source functionality requires CEF (Chromium Embedded Framework) integration during compilation.
Plugin development capabilities expand through source installation, allowing custom functionality and third-party integrations.
Launching and Initial Configuration
Application Startup Methods
Launch OBS Studio through multiple methods depending on installation type. Command-line execution provides immediate access:
obs-studioGUI application menu access through Activities > Show Applications > OBS Studio provides graphical launching options.

Desktop integration creates shortcuts and file associations for streamlined workflow management.
First-Time Setup Wizard
The Auto-Configuration Wizard optimizes settings based on hardware capabilities and intended usage. Select between streaming and recording optimization profiles during initial setup.
Hardware detection automatically configures video and audio devices. Resolution and frame rate settings adjust based on system capabilities and performance requirements.
Quality presets balance performance with output fidelity, providing starting points for fine-tuning based on specific needs.
Interface Overview and Navigation
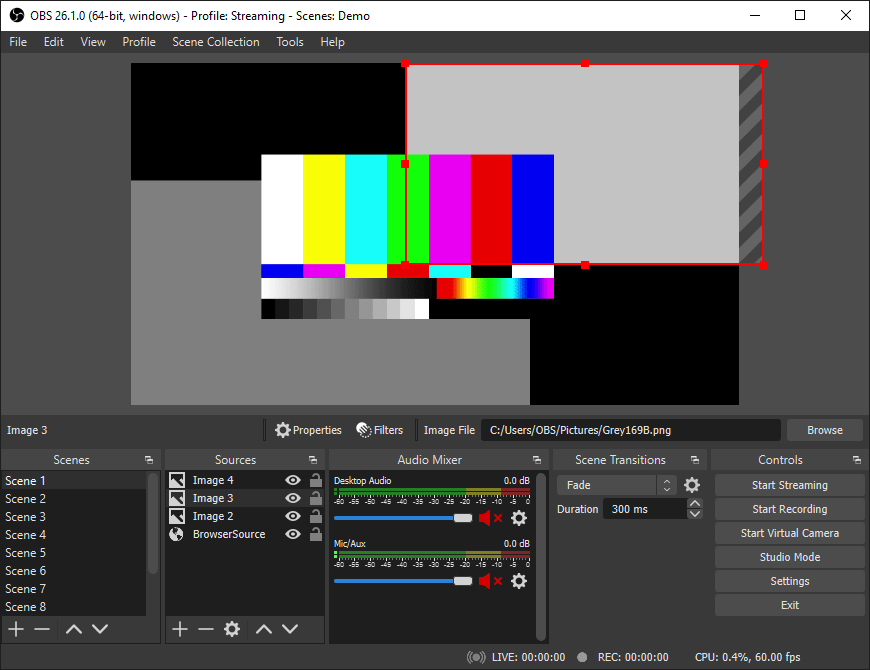
Main window components include Scenes for organizing different broadcast layouts, Sources for adding content elements, and Mixer for audio level management.
Settings panels provide comprehensive configuration options for video, audio, output, and advanced parameters. Plugin management interfaces enable extending functionality through additional modules.
Dock arrangement customization adapts the workspace to individual preferences and workflow requirements.
Essential Configuration and Optimization
Video Settings Optimization
Resolution configuration should match streaming platform requirements and system capabilities. Common settings include 1920×1080 for full HD or 1280×720 for performance optimization.
Frame rate selection depends on content type and bandwidth limitations. 30 FPS suits most content, while 60 FPS benefits gaming streams with rapid motion.
Hardware acceleration through VAAPI (AMD/Intel) or NVENC (NVIDIA) reduces CPU usage and improves encoding performance. Enable these options in Settings > Output > Streaming.
Audio Configuration and Management
Input device selection configures microphones and audio interfaces. Output monitoring enables real-time audio feedback through headphones or speakers.
Noise suppression filters improve audio quality by reducing background noise. Gain adjustment normalizes audio levels across different sources.
Audio mixing capabilities allow balancing multiple audio sources, including game audio, microphone input, and music playback.
Performance Tuning and Resource Management
CPU usage optimization involves selecting appropriate encoder presets. x264 provides software encoding, while hardware encoders reduce CPU load.
Quality versus performance balancing requires testing different bitrate and encoder settings. Monitor system resources during streaming to identify optimal configurations.
Memory management includes configuring replay buffer sizes and temporary file locations to prevent storage overflow.
Virtual Camera Setup
V4l2loopback module installation enables virtual camera functionality for video conferencing applications:
sudo apt install v4l2loopback-dkmsLoad the kernel module:
sudo modprobe v4l2loopbackConfigure OBS Studio virtual camera output through Tools > Virtual Camera for integration with applications like Zoom, Teams, or Skype.
Common Troubleshooting and Problem Resolution
Installation Issues and Solutions
Repository key expiration problems require updating GPG keys. Remove expired keys and reimport current versions:
sudo apt-key del 5C808C2B65558117
sudo gpg --no-default-keyring --keyring /usr/share/keyrings/deb-multimedia.gpg --keyserver keyserver.ubuntu.com --recv-keys 5C808C2B65558117
Dependency conflicts may arise when mixing installation methods. Remove conflicting packages before attempting alternative installation approaches.
Runtime Problems and Debugging
Audio capture failures often result from incorrect device permissions. Add the user to the audio group:
sudo usermod -a -G audio $USERVideo capture issues may require adjusting camera permissions or installing additional drivers. Check device availability using:
lsusb
v4l2-ctl --list-devices
Performance and Compatibility Issues
Wayland display server compatibility may require additional configuration. Set the XDG_SESSION_TYPE environment variable if running under X11:
export XDG_SESSION_TYPE=x11Multiple monitor setups occasionally cause display capture problems. Verify screen configuration and adjust capture sources accordingly.
Debugging and Log Analysis
Enable debug logging through Settings > General > Logging Level. Log files location: ~/.config/obs-studio/logs/ for detailed error analysis.
Common error messages include missing codecs, permission denials, and hardware acceleration failures. Community forums provide solutions for specific error conditions.
Plugin Installation and Management
Official Plugin Integration
OBS plugins package extends functionality through additional filters, sources, and outputs:
sudo apt install obs-pluginsPlugin dependencies may require specific libraries or development packages. Check plugin documentation for requirements before installation.
Third-Party Plugin Installation
Manual plugin installation involves copying plugin files to the appropriate directories. User-specific plugins location: ~/.config/obs-studio/plugins/.
Plugin compatibility verification ensures proper OBS Studio version matching. Incompatible plugins may cause crashes or functionality issues.
Security considerations for third-party plugins include verifying source authenticity and reviewing code if possible. Only install plugins from trusted developers.
Performance Monitoring and Maintenance
System Resource Monitoring
CPU and GPU utilization monitoring prevents system overload during streaming or recording. Use system monitors or OBS Studio’s built-in performance statistics.
Memory consumption tracking helps identify memory leaks or excessive usage patterns. Monitor RAM usage during extended streaming sessions.
Storage management includes regular cleanup of temporary files, recordings, and log files to prevent disk space exhaustion.
Regular Maintenance Tasks
OBS Studio updates depend on installation method. Repository installations receive automatic updates, while compiled versions require manual updating.
Plugin compatibility checks ensure continued functionality after OBS Studio updates. Test critical plugins after major version upgrades.
Configuration backups protect custom settings and scene configurations. Export settings through File > Settings > General > Export for safekeeping.
Congratulations! You have successfully installed OBS Studio. Thanks for using this tutorial for installing the latest version of OBS Studio on Debian 13 “Trixie” system. For additional help or useful information, we recommend you check the official OBS Studio website.