How To Install Odoo on Rocky Linux 9

In this tutorial, we will show you how to install Odoo on Rocky Linux 9. For those of you who didn’t know, Odoo is a business management tool that comes as a suite with numerous applications to help organizations in management and ease the day-to-day company operations. Odoo works as a central application that allows you to manage business-related tasks from one single web application dashboard. It is user-friendly, scalable, customizable, flexible, and helps you manage businesses and organizations with a CMS.
This article assumes you have at least basic knowledge of Linux, know how to use the shell, and most importantly, you host your site on your own VPS. The installation is quite simple and assumes you are running in the root account, if not you may need to add ‘sudo‘ to the commands to get root privileges. I will show you the step-by-step installation of the Odoo ERP Software on Rocky Linux. 9.
Prerequisites
- A server running one of the following operating systems: Rocky Linux 9.
- It’s recommended that you use a fresh OS install to prevent any potential issues.
- SSH access to the server (or just open Terminal if you’re on a desktop).
- A
non-root sudo useror access to theroot user. We recommend acting as anon-root sudo user, however, as you can harm your system if you’re not careful when acting as the root.
Install Odoo on Rocky Linux 9
Step 1. The first step is to update your system to the latest version of the package list. To do so, run the following commands:
sudo dnf check-update
sudo dnf install dnf-utils
sudo dnf install epel-release
sudo dnf install python3 python3-devel git gcc git redhat-rpm-config libxslt-devel bzip2-devel openldap-devel libjpeg-devel freetype-devel
Step 2. Installing PostgreSQL on Rocky Linux 9.
By default, PostgreSQL is not available on Rocky Linux 9 base repository. Now run the following command below to add the PostgreSQL stable repository to your system:
sudo dnf install http://apt.postgresql.org/pub/repos/yum/reporpms/EL-9-x86_64/pgdg-redhat-repo-latest.noarch.rpm
Next, run the following command to install the latest stable version of PostgreSQL to your server:
sudo dnf check-update
sudo dnf install postgresql14-server postgresql14-docs
In addition, you can install additional modules, binaries, and libraries in PostgreSQL:
sudo dnf install postgresql14-libs postgresql14-plperl postgresql14-plpython3 postgresql14-pltcl postgresql14-tcl postgresql14-contrib postgresql14-llvmjit
Once the installation is done, start the PostgreSQL service and enable it to automatically start on reboot all in one go with:
sudo systemctl enable postgresql-14 --now
sudo systemctl status postgresql-14
For additional resources on installing PostgreSQL, read the post below:
Step 3. Installing Wkhtmltopdf Tool.
In order for Odoo to print receipts, it needs an application that renders HTML to PDF which is readily available on GitHub. You can install using the following commands:
wget https://github.com/wkhtmltopdf/packaging/releases/download/0.12.6.1-2/wkhtmltox-0.12.6.1-2.almalinux9.x86_64.rpm
sudo dnf install ./wkhtmltox-0.12.6.1-2.almalinux9.x86_64.rpm
Step 4. Installing Odoo on Rocky Linux 9.
First, add an Odoo user to run the Odoo service:
sudo useradd -m -U -r -d /opt/odoo -s /bin/bash odoo
Next, log in with the odoo user and download the latest version of Odoo using the following command:
sudo su - odoo
git clone https://www.github.com/odoo/odoo --depth 1 --branch 15.0 /opt/odoo/odoo15
After that, change the directory to /opt/odoo/odoo15 and create a Python virtual environment:
cd /opt/odoo/odoo15
python3 -m venv venv
In order to use the python virtual environment you just created, you have to activate it by using the following command below:
source venv/bin/activate
Inside the virtual environment, install the required Python modules for the installation of Odoo to go smoothly:
/opt/odoo/odoo15/venv/bin/python3 -m pip install --upgrade pip
pip3 install -r requirements.txt
pip3 install setuptools wheel PyPDF2 Pillow reportlab babel markupsafe passlib werkzeug lxml decorator polib jinja2
After the successful installation of Odoo requirements, deactivate Python virtual environment.
deactivate
Also, ensure to create a directory for add-ons then exit the Odoo user:
mkdir /opt/odoo/odoo15/odoo-custom-addons
exit
Step 5. Configure Odoo.
Now we create a custom configuration file for Odoo as shown:
sudo nano /etc/odoo.conf
Add the following file:
[options]
admin_passwd = Your-Strong-Password
db_host = False
db_port = False
db_user = odoo
db_password = False
addons_path = /opt/odoo/odoo15/odoo/addons, /opt/odoo/odoo15/odoo-custom-addons
Step 6. Create a Systemd Service File for Odoo.
Now create a systemd unit file for Odoo:
sudo tee /etc/systemd/system/odoo.service<<EOF
[Unit]
Description=Odoo
Requires=postgresql.service
After=network.target postgresql.service

[Service]
Type=simple
SyslogIdentifier=odoo
PermissionsStartOnly=true
User=odoo
Group=odoo
ExecStart=/opt/odoo/odoo15/venv/bin/python3 /opt/odoo/odoo15/odoo-bin -c /etc/odoo.conf
StandardOutput=journal+console

[Install]
WantedBy=multi-user.target
EOF
Save the file, then reload the systemd daemon with the following command:
sudo systemctl daemon-reload
sudo systemctl enable --now odoo
sudo systemctl status odoo
Step 7. Configure Firewall.
Rocky Linux 9 comes with firewalld enabled by default, and it will block other connections from other computers that are trying to access our Odoo service. We must open the appropriate ports so that the Odoo resources can be accessed from other machines:
sudo firewall-cmd --zone=public --add-port=8069/tcp --permanent
sudo firewall-cmd --reload
Step 8. Accessing Odoo Web Interface.
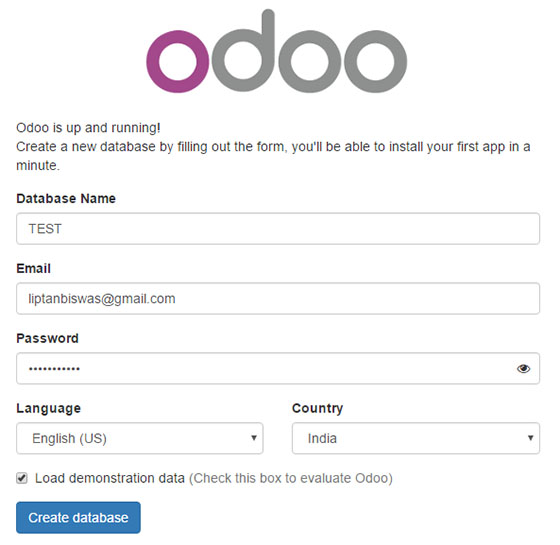
Once successfully installed, open your web browser and access the Odoo Web UI using the URL http://your-IP-address:8069 If your installation is correct, you will see the page for setting up Odoo for the first time:

Congratulations! You have successfully installed Odoo. Thanks for using this tutorial for installing the Odoo ERP Software on your Rocky Linux 9 system. For additional help or useful information, we recommend you check the official Odoo website.