![]()
In this tutorial, we will show you how to install OpenLDAP on Ubuntu 20.04 LTS. For those of you who didn’t know, OpenLDAP (lightweight directory access protocol) provides user authentication and enables you to set up user accounts that provide the user access to each computer in your network without having to set up a local user account on each computer. OpenLDAP is the free and open-source implementation of LDAP.
This article assumes you have at least basic knowledge of Linux, know how to use the shell, and most importantly, you host your site on your own VPS. The installation is quite simple and assumes you are running in the root account, if not you may need to add ‘sudo‘ to the commands to get root privileges. I will show you the step-by-step installation of the OpenLDAP on Ubuntu 20.04 (Focal Fossa). You can follow the same instructions for Ubuntu 18.04, 16.04, and any other Debian-based distribution like Linux Mint.
Prerequisites
- A server running one of the following operating systems: Ubuntu 20.04, 18.04, and any other Debian-based distribution like Linux Mint or elementary OS.
- It’s recommended that you use a fresh OS install to prevent any potential issues.
- A
non-root sudo useror access to theroot user. We recommend acting as anon-root sudo user, however, as you can harm your system if you’re not careful when acting as the root.
Install OpenLDAP on Ubuntu 20.04 LTS Focal Fossa
Step 1. First, make sure that all your system packages are up-to-date by running the following apt commands in the terminal.
sudo apt update
sudo apt upgrade
Step 2. Installing OpenLDAP on Ubuntu 20.04.
OpenLDAP is available via the default repositories included within Ubuntu 20.04, Now run the following command to install it:
sudo apt install slapd ldap-utils
During the installation, you will be prompted to set the OpenLDAP administrative password.

You can confirm the installation was successful by using the commands lapcat to output SLAPD database contents:
sudo slapcat
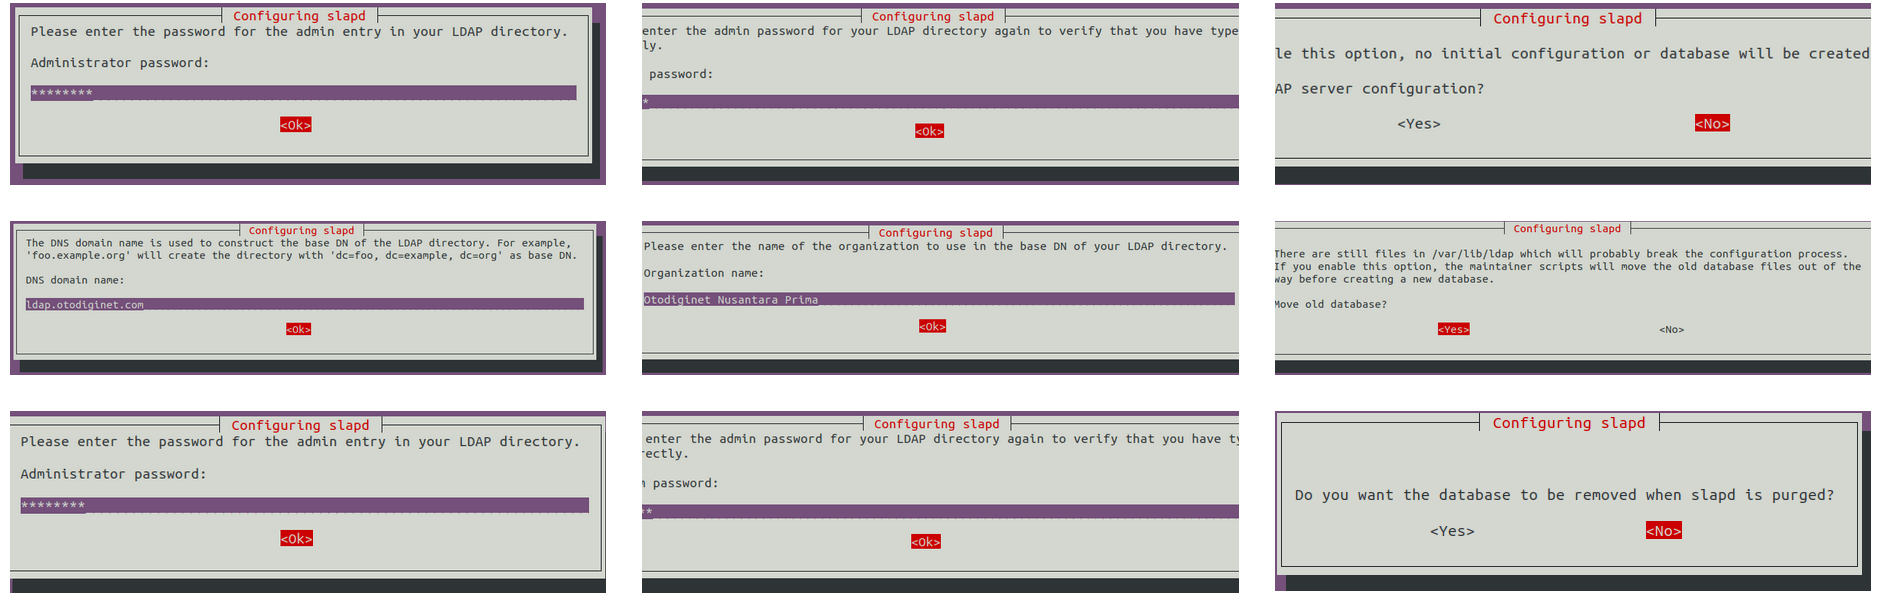
Step 3. Configure OpenLDAP.
After installation, now configure OpenLDAP with the following command:
sudo dpkg-reconfigure slapd
You will then need to answer the following questions:
Then, we will be dropped back into our command-line environment. Our OpenLDAP server should be up and running. We can verify this by running:
sudo systemctl status slapd
Next, we will test the OpenLDAP instance by running the following command:
ldapwhoami -H ldap:// -x
Step 4. Installing phpLDAPadmin.
Now that the OpenLDAP server is set up we will install and configure phpLDAPadmin. This utility provides you with a front-end web-based application to administer your active directory accounts:
sudo apt install phpldapadmin
Next, open the phpLDAPadmin configuration file with the command:
sudo nano /etc/phpldapadmin/config.php
We edited the parameters as suitable to our system:
$servers = new Datastore();
 /* $servers->NewServer('ldap_pla') must be called before each new LDAP server
    declaration. */
 $servers->newServer('ldap_pla');
 /* A convenient name that will appear in the tree viewer and throughout
    phpLDAPadmin to identify this LDAP server to users. */
 $servers->setValue('server','name','LDAP idroot server');
 /* Examples:
    'ldap.example.com',
    'ldaps://ldap.example.com/',
    'ldapi://%2fusr%local%2fvar%2frun%2fldapi'
            (Unix socket at /usr/local/var/run/ldap) */
 $servers->setValue('server','host','127.0.0.1');
 /* The port your LDAP server listens on (no quotes). 389 is standard. */
 // $servers->setValue('server','port',389);
 /* Array of base DNs of your LDAP server. Leave this blank to have phpLDAPadmin
    auto-detect it for you. */
 $servers->setValue('server','base',array('dc=ldap,dc=idroot,dc=us'));
Step 5. Accessing phpLDAPadmin Web Interface.
Once successfully installed, now open a web browser and type the URL: http://ldap.idroot.us/phpldapdmin. You should see the following page:

We can proceed by pressing the “login” button on the left side of the window. We will then see a login page that looks like this:

For our Login DN, we will use cn=admin, This was followed by our base DN used previously. In our example, our full Login DN will be cn=admin,dc=ldap,dc=idroot,dc=us
Congratulations! You have successfully installed OpenLDAP. Thanks for using this tutorial for installing the OpenLDAP on Ubuntu 20.04 LTS Focal Fossa system. For additional help or useful information, we recommend you check the official OpenLDAP website.
[su_box title=”VPS Manage Service Offer” style=”bubbles” box_color=”#000000″ radius=”10″]If you don’t have time to do all of this stuff, or if this is not your area of expertise, we offer a service to do “VPS Manage Service Offer”, starting from $10 (Paypal payment). Please contact us to get the best deal![/su_box]