How To Install OwnCloud on CentOS Stream 10

In this tutorial, we will show you how to install OwnCloud on CentOS Stream 10. OwnCloud is an open-source file hosting software that allows you to create your own private cloud storage system. It offers features similar to popular cloud services like Dropbox or Google Drive but with the added benefit of complete control over your data. By installing OwnCloud on CentOS Stream 10, you can ensure your files are stored securely on your own server, giving you full autonomy over your data.
CentOS Stream 10, the latest version of the popular Linux distribution, provides a stable and robust foundation for hosting OwnCloud. Its continuous release model ensures you have access to the latest features and security updates, making it an excellent choice for your cloud storage needs.
By following this guide, you’ll be able to set up your own OwnCloud instance, allowing you to store, sync, and share files across devices while maintaining privacy and security.
Prerequisites
Before we dive into the installation process, let’s ensure you have everything needed to successfully set up OwnCloud on CentOS Stream 10:
- A server running CentOS Stream 10 with root access
- Minimum 2GB RAM (4GB or more recommended for optimal performance)
- At least 10GB of free disk space
- A domain name pointed to your server’s IP address (optional but recommended)
- Basic knowledge of Linux command line operations
It’s crucial to start with a clean, updated system. Run the following commands to ensure your CentOS Stream 10 is up-to-date:
sudo dnf update -y
sudo dnf upgrade -y
After updating, it’s a good practice to reboot your system to ensure all changes take effect:
sudo reboot
Setting Up LAMP Stack
OwnCloud requires a web server, database, and PHP to function. We’ll set up the LAMP (Linux, Apache, MySQL, PHP) stack, which is a popular combination for web hosting.
Installing Apache Web Server
Apache is one of the most widely used web servers. Install it using the following command:
sudo dnf install httpd -y
After installation, start and enable Apache to run on system boot:
sudo systemctl start httpd
sudo systemctl enable httpd
Installing MariaDB Database
MariaDB is a fork of MySQL and provides excellent performance for OwnCloud. Install it with:
sudo dnf install mariadb-server mariadb -y
Start and enable MariaDB:
sudo systemctl start mariadb
sudo systemctl enable mariadb
Secure your MariaDB installation:
sudo mysql_secure_installation
Follow the prompts to set a root password and remove insecure default settings.
Installing PHP and Required Modules
OwnCloud requires PHP 7.4 or higher. Install PHP and necessary modules:
sudo dnf install php php-cli php-mysqlnd php-zip php-devel php-gd php-mcrypt php-mbstring php-curl php-xml php-pear php-bcmath php-json php-pdo php-pecl-apcu php-pecl-apcu-devel -y
Restart Apache to load the PHP module:
sudo systemctl restart httpd
Database Configuration
Now that we have our LAMP stack set up, let’s create a database and user for OwnCloud.
Creating OwnCloud Database
Log into MariaDB as root:
sudo mysql -u root -p
Create the OwnCloud database and user:
CREATE DATABASE owncloud;
CREATE USER 'ownclouduser'@'localhost' IDENTIFIED BY 'your_strong_password';
GRANT ALL PRIVILEGES ON owncloud.* TO 'ownclouduser'@'localhost';
FLUSH PRIVILEGES;
EXIT;
Replace ‘your_strong_password’ with a secure password of your choice.
Installing OwnCloud
With our environment prepared, we can now install OwnCloud.
Downloading OwnCloud
First, navigate to the Apache web root directory:
cd /var/www/html
Download the latest version of OwnCloud:
sudo wget https://download.owncloud.com/server/stable/owncloud-complete-latest.tar.bz2
Extract the archive:
sudo tar -xjf owncloud-complete-latest.tar.bz2
Setting Proper Permissions
Ensure Apache has the correct permissions to access OwnCloud files:
sudo chown -R apache:apache /var/www/html/owncloud
sudo chmod -R 755 /var/www/html/owncloud
SELinux Configuration
If SELinux is enabled on your system, you need to configure it to allow Apache to write to the OwnCloud directory:
sudo semanage fcontext -a -t httpd_sys_rw_content_t '/var/www/html/owncloud/data(/.*)?'
sudo semanage fcontext -a -t httpd_sys_rw_content_t '/var/www/html/owncloud/config(/.*)?'
sudo semanage fcontext -a -t httpd_sys_rw_content_t '/var/www/html/owncloud/apps(/.*)?'
sudo restorecon -R '/var/www/html/owncloud/'
Apache Configuration
To make OwnCloud accessible via web browser, we need to configure Apache.
Creating Virtual Host Configuration
Create a new configuration file for OwnCloud:
sudo nano /etc/httpd/conf.d/owncloud.conf
Add the following content:
<VirtualHost *:80> ServerAdmin
    ServerAdmin webmaster@your_domain.com
    DocumentRoot /var/www/html/owncloud
    ServerName your_domain.com

    <Directory /var/www/html/owncloud/>
        Options +FollowSymlinks
        AllowOverride All
        Require all granted
        SetEnv HOME /var/www/html/owncloud
        SetEnv HTTP_HOME /var/www/html/owncloud
    </Directory>

    ErrorLog /var/log/httpd/owncloud_error.log
    CustomLog /var/log/httpd/owncloud_access.log combined
 </VirtualHost>
Replace ‘your_domain.com’ with your actual domain name or server IP address.
SSL/TLS Setup
For enhanced security, it’s highly recommended to use HTTPS. You can obtain a free SSL certificate from Let’s Encrypt. Install Certbot:
sudo dnf install certbot python3-certbot-apache -y
Obtain and install a certificate:
sudo certbot --apache -d your_domain.com
Follow the prompts to complete the SSL setup.
Enabling Required Modules
Ensure the necessary Apache modules are enabled:
sudo a2enmod rewrite
sudo a2enmod headers
sudo a2enmod env
sudo a2enmod dir
sudo a2enmod mime
Restart Apache to apply all changes:
sudo systemctl restart httpd
OwnCloud Initial Setup
With all components in place, we can now complete the OwnCloud installation through the web interface.
Accessing Web Installer
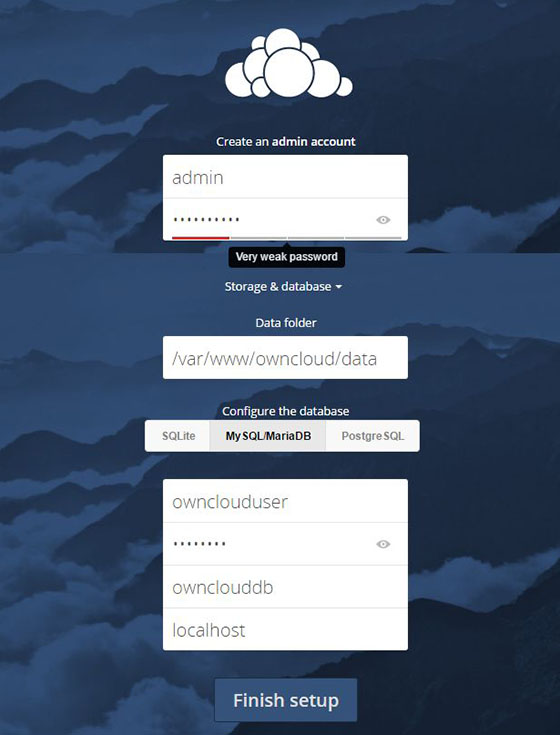
Open your web browser and navigate to your domain or server IP address. You should see the OwnCloud setup page.

Creating Admin Account
Enter your desired username and password for the admin account.
Database Connection Configuration
Select “MySQL/MariaDB” as the database, and enter the following details:
- Database user: ownclouduser
- Database password: your_strong_password (the one you set earlier)
- Database name: owncloud
- Host: localhost
Storage Configuration
Choose the data folder location. The default is usually fine for most installations.
Click “Finish Setup” to complete the installation.
Post-Installation Tasks
After successfully installing OwnCloud, there are a few additional steps to enhance security and performance.
Security Hardening
Update the PHP memory limit in the php.ini file:
sudo nano /etc/php.ini
Find the line with memory_limit and change it to:
memory_limit = 512M
Performance Optimization
Enable OPcache for PHP:
sudo nano /etc/php.d/10-opcache.ini
Add or modify the following lines:
opcache.enable=1
opcache.enable_cli=1
opcache.interned_strings_buffer=8
opcache.max_accelerated_files=10000
opcache.memory_consumption=128
opcache.save_comments=1
opcache.revalidate_freq=1
Cron Job Setup
Set up a cron job for OwnCloud background tasks:
sudo crontab -u apache -e
Add the following line:
*/5 * * * * /usr/bin/php -f /var/www/html/owncloud/cron.php
Memory Cache Configuration
Install and configure Redis for improved caching:
sudo dnf install redis -y
sudo systemctl start redis
sudo systemctl enable redis
Edit the OwnCloud config file:
sudo nano /var/www/html/owncloud/config/config.php
Add the following lines:
'memcache.local' => '\OC\Memcache\Redis',
'redis' => [
     'host' => 'localhost',
     'port' => 6379,
],
Troubleshooting Common Issues
Even with careful installation, you might encounter some issues. Here are solutions to common problems:
Permission Problems
If you encounter permission errors, double-check the ownership and permissions of the OwnCloud directory:
sudo chown -R apache:apache /var/www/html/owncloud
sudo chmod -R 755 /var/www/html/owncloud
Database Connection Issues
Ensure your database credentials are correct in the config.php file:
sudo nano /var/www/html/owncloud/config/config.php
PHP Configuration Errors
Check PHP error logs for any configuration issues:
sudo tail -f /var/log/php-fpm/error.log
SELinux-related Problems
If SELinux is causing issues, you can temporarily set it to permissive mode for testing:
sudo setenforce 0
Remember to set it back to enforcing mode after troubleshooting:
sudo setenforce 1
Maintenance and Upgrades
Regular maintenance and timely upgrades are crucial for keeping your OwnCloud installation secure and up-to-date.
Backup Procedures
Regularly backup your OwnCloud data and database:
sudo rsync -avz /var/www/html/owncloud/ /path/to/backup/
mysqldump -u root -p owncloud > owncloud_db_backup.sql
Update Process
To update OwnCloud, download the latest version and replace the existing files:
cd /var/www/html
sudo wget https://download.owncloud.org/community/owncloud-complete-latest.tar.bz2
sudo tar -xjf owncloud-complete-latest.tar.bz2
sudo rsync -avz owncloud/ /var/www/html/owncloud/
sudo chown -R apache:apache /var/www/html/owncloud
Then, navigate to your OwnCloud URL, and you’ll be prompted to complete the update process.
Health Monitoring
Regularly check the OwnCloud log files for any issues:
sudo tail -f /var/www/html/owncloud/data/owncloud.log
Performance Tuning
Monitor your server’s performance and adjust PHP and database settings as needed. Use tools like top, htop, or mysqltuner to identify bottlenecks.
Congratulations! You have successfully installed OwnCloud. Thanks for using this tutorial for installing OwnCloud on your CentOS Stream 10 system. For additional help or useful information, we recommend you check the official OwnCloud website.